
This is a Veteran Owned site

Auto-ScribesShop-made center finding
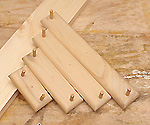
By Tom Hintz Locating the center of a piece of wood is a common task in woodworking. While finding the center of a wide piece of wood is easily done with a tape measure, centering tape or ruler, the same task on a narrow piece is much more difficult to do accurately. The Auto-Scribes came from my frustration with finding an easy, fast way of handling this task. The Auto-Scribes Custom Plan Set provides full-size templates for laying out Auto-Scribes with 6 1/2", 4 1/2", 2 1/2" and 1 1/2" maximum capacities. Material wider than this can be handled with a centering tape measure.
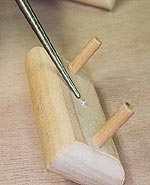
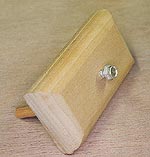
The crux of this tools design is accurately positioning three equidistant points, in a straight line. The outer two points are drilled for ¼-inch hardwood dowels, and the center point to accept a small screw through the scribe's body. The full-sized templates included in the Auto-Scribes Plan Set makes this critical step easy and very accurate. I built the set of Auto-Scribes pictured here from 1 ½"-wide by ¾"-thick poplar. Virtually any kind of wood can be used but I strongly suggest poplar or a hardwood. Before final assembly, I shaped edges on the router table with a 3/8-inch roundover bit. This step is primarily for looks and comfort. To use the scribes, choose one that fits easily over your board. Place a dowel on each side of the board, rotate so they are in firm contact with the boards edges and slide it along, letting the screw tip make a fine scratch down the center of the board. That's it. Fast, accurate and essentially mistake-proof. I keep the screw tips in my Auto-Scribes adjusted so they make a very light scratch that is easy to see, and just as easy to sand out during preparation for finishing.
|
|||||
All written, photographic and drawn materials are property of and copyright by NewWoodworker.com LLC 2000-2019. Materials may not be used in any way without the written permission of the owner.