
This is a Veteran Owned site
![]()
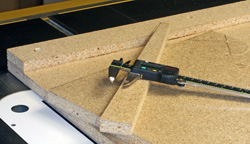 |
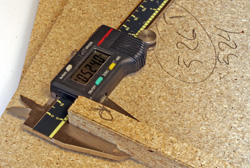
The 5-Cut method is extremely accurate if you use accurate tools. This is a very good place to start using a digital caliper in your woodworking. Click Image to enlarge |
5-Cut Sled Fence Test
Easy but micrometer-accurate
Text, photos and video by Tom Hintz
Posted - 5-15-2010
The 5-Cut test procedure is a simple way to see how square the fence on your table saw sled is to the miter slot. I know some think this test shows how square the fence is to the blade itself but it doesn't. The miter slot is the only consistent controlling factor. If the blade is not perfectly square to the miter slot it will cut a slightly wider kerf in the work piece being held against the sled fence. However, that cut will be exactly parallel to the miter slot. If the fence is not exactly 90-degrees to the miter slot the angle between the edge that was against the fence and one cut on that sled will be something other than 90-degrees. If every cut you make on the sled is a little off, the overall impact on a project can be very noticeable.
There is a 4-cut version of this test but it can be less accurate than the 5-cut method. The 4-cut version depends on you starting with one perfectly straight edge against the fence. The 5-cut procedure eliminates this potential error with one additional cut. I think that is a very small price to pay in time and one extra little strip of wood for the assurance of accuracy the first time.
Testing Equipment
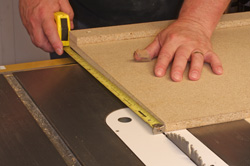 |
We want the test piece to be as big as we can use safely so measure how much room you have between where the sled will remain stable and the blade. Click image to enlarge |
To do this test accurately you need a digital caliper. A micrometer would work also but woodworkers have far more use for a good digital caliper. If your sled fence produces an error in this test large enough to measure "accurately" with a tape or solid scale, your sled is in big trouble. Remember that the amount of error we see in the final piece has been accumulated through all five cuts. We hopefully are looking for very small numbers here and digital measuring instruments are the only way to read such small deficiencies and the necessary corrections accurately.
We also need a flat, relatively square piece of wood to use in the test. It is a good idea to prepare two or three test blanks just in case corrections need to be made. The test piece should have at least one edge as straight as we can get it to use against the fence. Usually you can find one side that if not perfectly straight is concave rather than having a high spot in the middle which would allot it to can rock. We need the test piece to be stable through the first cut. If we accomplish that, all subsequent edges will be cut flat prior to being placed against the fence for the remaining cuts. The test piece should be roughly square and sized so that the sled stays on the table saw surface when starting the cuts. I like MDF or plywood roughly 12 to 14"square to do this test on my PM2000 table saw. The maximum size piece you can use depends on the area in front of your blade. Put your sled on the saw and measure from the fence to the blade (where it breaks through the thickness of wood being used) to get the size you can use.
Of course we need a sled. I have heard of people using this technique to check and adjust a miter gauge but I consider that dangerous. It is much harder to keep a miter gauge far enough on the table to produce stable cuts, which make this technique accurate. Consequently, I do not recommend using 5-Cut method on anything but a table saw sled.
Layout
 |
 |
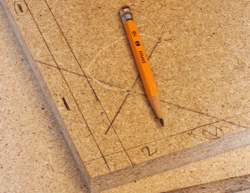
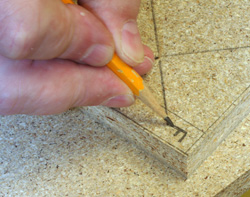
A combination square(left) makes drawing layout cuts fast and consistent. Note that there are two cutlines at the first cut as that will also be the fifth cut. Make the first four cuts, (right) stopping the saw and waiting for the blade to stop before removing and discarding the cutoff piece from next to the blade. Click images to enlarge |
|
Find the straightest edge of your workpiece and put that against the sled fence. Mark the side at the blade #1. Because we will be turning the piece clockwise for each subsequent cut we number the remaining edges in a counterclockwise direction. With the piece still against the fence the farthest edge from you is #2, the edge to the left #3 and, the edge against the fence is #4. The edge marked #1 will also be #5 but place that mark a bit further from the edge so that it remains after the first cut.
I also find it helpful to draw cutlines on all four edges. I use a small combination square set to 1/2". Draw cut lines on all four edges. Then on edge # 1 & 5, add a second cut line 1" (or double whatever your layout line spacing is from the edge) in from the edge for the final cut.
It is important to keep the cutlines far enough into the material so that the blade is fully engaged. The 1/2" layout line keeps the blade making a full cut and running as straight as it can. We can be dealing with very small numbers with this test so it is important to eliminate any error we can.
Make the Cuts
 |
 |
Then mark the final edge (right) so you can identify the front and back. The back is closest to the operator. Measure the ends of the 5th cutoff piece to determine the amount of error. This one turned out to be 0.002" and that is the total accumulated over the five cuts! Click images to enlarge |
|
There is nothing fancy about making the cuts for the 5-Cut test. Start with the #1 side at the blade, make that cut and shut the saw off to retrieve the cutoff piece. Turn the workpiece (clockwise) to edge #2, align the cutline with the edge of the sled and make that cut. Shut the saw off between each cut so you can safely remove the scrap. Getting more than one cutoff piled up next to the blade can get a bit dangerous. The cutoffs from cuts #1 through #4 should be discarded so they do not get mixed up with the cutoff from cut #5 that we want to measure.
When we get to edge #5 mark the front and rear (the end nearest the operator) so they can be identified after the cut. Then go ahead and make the final cut on edge #5 and then shut the saw off.
Find the Error
Using the digital calipers, measure the width off the front end of the #5 cutoff and record that number. Turn the piece around and measure the width of the rear end and record that. If the numbers are different subtract the small one from the big one and you get the total error. To find out exactly how out of alignment the fence is, divide that total error by 5. On the sled used for this article the fence showed a total error of 0.002"! To correct that error I would have to move the fence about 0.0004"! I am calling this fence perfect.
Video Tutor |
If you need to make an adjustment remember that if the #5 cutoff is wider at the front than the rear, the fence is angled towards the blade. If the rear of the test piece is wider the fence is angled away from the blade. Make an adjustment equal to 1/5th of the total error found and repeat the test. If you are careful in making this adjustment, the fence will be right on the money, or as close as you can measure after one or two tests.
Making jigs can be fun and improve your productivity in the shop. However, if your jigs are not perfectly aligned your projects along with your self-image can suffer. Take the time to get them right and life will be way more fun in the shop!
Have a comment on this story? - Email Me!
Back to the Tips & Tricks Directory
All written, photographic and drawn materials are property of and copyright by NewWoodworker.com LLC 2000-2019. Materials may not be used in any way without the written permission of the owner.