
This is a Veteran Owned site
![]()
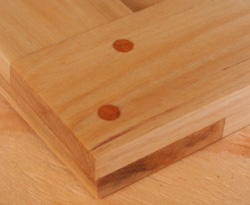 |
The Half-Lap Joint is fairly easy to make and VERY strong when done right. That's a good combination for all woodworkers. Click image to enlarge |
Half-Lap Joints
Simple to make but very tough
Text, photos & video by Tom Hintz
Posted - 2-10-2010
The half-lap joint has been around about as long as woodworking because it is relatively easy to make yet very tough. Because the half-lap joint contact area is nearly all long-grain to long-grain, (the shoulders are the only exception) properly applied adhesives get an extremely firm grip on the wood. The physical size of the half-lap contact area is huge in relation to the pieces being joined so once the adhesive is cured this joint is often far stronger than the wood around it.
Uses
The half-lap joint can be used to make frames for pictures, perimeter door frames for panel or glass doors, dust dividers in cabinets and in many other situations. Because the half-lap does not add any thickness to the pieces of wood being joined, there are virtually no limitations for using it.
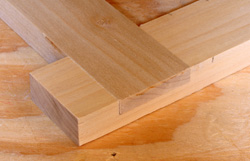 |
Though frequently used at the ends of the pieces, half-laps can be placed virtually anywhere a joint is needed. Cutting what is essentially a dado like this takes some accuracy but can be done with a little practice. Click image to enlarge |
The half-lap can be used anywhere along the length of a piece of wood and not just at the ends. Cutting a clean half-lap joint in the middle of a work piece requires your full attention but it can be done. With a little practice a mid-board half-lap could represent an attractive alternative to more complicated joints such as the mortise and tenon.
The Wood
For any joinery to come out well, the wood being used has to be right. We are going to assume that you have processed the project wood so that it is straight, square, consistent in thickness and cut to the proper lengths. If not, go back and read my story "Perfect Joints Are Not an Accident", process your wood and then come back. We'll wait on you.
Setup
Half-lap joints can be cut on a table saw, most often with a stacked dado cutter. However, you can also cut the half-lap on a router table using a miter gauge and a flat-bottomed bit. The router table presents an extra challenge because of the tendency of a router bit to blow out the wood as it exits the cut. You can moderate this damage by using a sacrificial piece of wood as a backer.
In some situations half-lap joints can be cut with a hand-held router, often used with a jig. Our Auto-Width Dado Jig is frequently used with a hand-held router to make angled half-laps and even crossing half-laps commonly used at the center of X-braces.
For our purposes here we will focus on the table saw. However, the setup procedures remain the same on the router table as well.
 |
 |
Taking your time and "sneaking up" on the correct depth actually saves lots of time and frustration. this first cut (left) was intentionally a little shallow. Now I can raise the dado cutter slightly and re cut both pieces (right) until they fit together perfectly flush. Click image to enlarge |
|
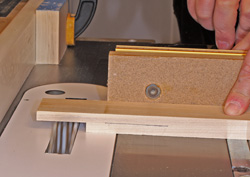
I use a gauge block on the fence so that it can used to size the cut while the wood is held in the miter gauge. The gauge block prevents the wood from being in contact with the saws rip fence and the miter gauge at the same time during the cut. That would be a big no-no because it is a major kickback instigator.
Put the gauge block against the fence (temporarily) near the dado set for now and then add a piece of the wood that the half-laps is being cut to fit against the gauge block. Now place any straight piece of wood against the sample piece with its end projecting out along the dado stack. This last piece of wood simply extends the outer edge of the sample piece so we can use it for setting the fence position.
If we adjust the fence position so that the outer piece of wood just runs into the outer tooth on the dado stack, that setup will cut the half-lap slightly oversized. We want that bit of extra width because when assembled, it is far easier to sand the end of the half-lap down so that it is flush with the rest of the assembly. Conversely, sanding the entire side of the assembly down so that it is flush with a slightly undersized half-lap is a long and difficult chore. You learn things like this after spending an entire afternoon sanding down the side of a project to match one of those too-short half-laps.....
Sneaking Up
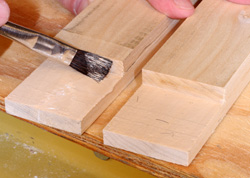 |
 |
Apply a thin but even coat of glue(left) to the entire surface, including the shoulder. You don't need much clamping pressure. I use simple spring clamps (right) and have never had a problem. Click images to enlarge |
|
Set the cutting depth of the dado stack so that it is less than half the thickness of the wood being worked with. We want to remove exactly half of the woods thickness eventually but hitting this setting correctly the first time around is very tough. It is much easier to start out low and then sneak up on the right setting.
Using scraps of wood that match the thickness of your project pieces cut a half-lap in each piece with the blade in this low position. Then lay those workpieces on the saw surface and try to slide them together.
Note the amount of interference between the pieces and raise the dado stack about half of that amount. If you are smart you will make these adjustments in small steps and will probably save wood and frustration in the process. The half correction is because we are cutting both pieces. Re-cut the sample pieces at the new dado set height setting and repeat the fitting/correction process until they slide together and the outer faces are flush to each other.
|
I added dowels just to show the appearance. A well-made half-lap joint does not need any holding help. You can treat the edges with roundovers or whatever you like. Click image to enlarge |
When satisfied with the fit on the sample pieces you should be able to go ahead and cut the half-laps in all of your project pieces. After cutting, dry fit the assembly to be sure there are no problems before moving on.
If you are going to put a panel in this frame, cut the groove now. You have to use a router table because the groove must stop before reaching the ends. If we milled a full-length groove for the panel in our frame pieces, it will show at the ends. Take your time and use a router table and a good bit to make the groove.
Assembly
Note: If you are putting a panel inside this assembly you have to assemble the frame on the panel as you go because of the stopped grooves. Otherwise, the assembly procedures remain the same.
Apply a thin but even coat of glue to all mating surfaces including the shoulder on each of the half-laps. Assemble the pieces and make certain that the shoulder on both sides of each joint is fully in contact with the mating piece. I use spring clamps to apply pressure but C-lamps or similar can be used. When first assembling the pieces use very light clamping pressure so that you can move the pieces to perfect their alignment. Then when satisfied with the alignment gently tighten the clamps to apply a bit more pressure. If the pieces are prepared correctly very little clamping pressure is needed. Too much pressure just wants to distort the assembly.
Make sure that the corners are square, the shoulders are all in full contact and then leave it alone! This is a very tough joint when the glue has dried but until then you can rack the assembly fairly easily so get it right and then wait!
Video Tutor |
When the glue has dried you can carefully sand the ends of the half-laps flush with the rest of the side. If you have a bit more protrusion than planned on you can use a rasp to speed the process a little. In these case I use a rasp to take down most of the material but when change to the sander when it gets close to the rest of the surface.
Half-lap joints can be machined with roundover bits and even cabinet lip bits if you want. I have used just about any bit design that made sense on this type of joint without issue. And when finish/stain is applied, the end grain portions of the joint darken to add some visual interest.
Though they seldom need any strength-related help, you can add mechanical fasteners to a half-lap if you want, most often as decoration. I sometimes will add a couple of dowels, set at a 45-degree angle in a half-lap joint but just for the looks. The half-lap joint is plenty strong on its own.
The half-lap joint can be used in many situations to add strength and visual appeal. Once you have made a few half-lap joints they are much easier to make and you never have to worry about strength.
Related Material
Perfect Joints Are Not an Accident
Have a comment on this article? - Email Me!
All written, photographic and drawn materials are property of and copyright by NewWoodworker.com LLC 2000-2019. Materials may not be used in any way without the written permission of the owner.