
This is a Veteran Owned site

 |
Using a table saw is safe and easy if you understand the basic procedures and pay attention at all times! Click image to enlarge |
Table Saw Basics
Using It Right – and Safely
Text & photos by Tom Hintz
Posted – 9-14-2006
NEW! Check out our full-length Table Saw Basics DVD! Click Here!
Note: In this story, we assume that your table saw has been properly assembled and set up as described in its instruction manual and Part 1 of this series, Table Saw Basics – Setup & Alignment. If the alignment of your saw has not been checked recently, do that before continuing with this story!
If you learn nothing else about the table saw, get it firmly in your head that in a fight between a spinning blade and your fingers, you lose - every time. The only reasons for your fingers to be near the blade are poor technique and even worse judgment.
The good news is that a table saw is very safe when used correctly. Learning the basic table saw techniques and then being consistent in their application will help keep you safe while helping you get the most from your machine.
Complacency
In a Safety Survey conducted on NewWoodworker.com LLC a few years ago we discovered that respondents with around 18 years of woodworking experience were sustaining injuries at a much higher rate than were novices. In each of the injury producing accidents, the veteran woodworker reporting the injury indicated knowing what they were doing was wrong and admitted having done it before. Having gotten away with it, they continued until the injury-producing accident occurred. The only reasonable conclusion is that complacency was a major factor.
What is unfortunate is that virtually all of these injuries could have been avoided by using simple techniques, well designed push devices and the safety equipment that came on the saw originally. You can learn to operate your machines safely from the start or take chances until something bad happens. The decision is yours.
Danger Zone
 |
There is no reason to put your hands close to the blade (the Danger Zone) while it is turning. If reaching in this close doesn't bother you, you don't understand the problem! Click image to enlarge |
Because there are virtually no “minor” hand-to-blade accidents on a table saw keeping your fingers a safe distance from the Danger Zone surrounding the blade should be a primary (and consistent) goal in your woodworking life.
While there are no universally accepted dimensions that define the Danger Zone, it is easy to avoid through the use of good push devices. The biggest problem with even the best push device designs is and always has been convincing the woodworker to use them all the time.
Guard & Splitter Assembly
Removing the factory-supplied blade guard and splitter assembly is far too common in woodworking. The rational behind removing these important safety devices ranges from uninformed to bizarre. Nobody argues that some procedures such as cutting dados require their removal. In addition, some commercial and shop-built table saw jigs also require the assembly to be removed. However, the vast majority of table saw procedures are easily accomplished with far greater safety if the blade guard and splitter installed as per the manufacturer’s instructions.
One of the more paranoid theories regarding the blade guard and splitter is that the only reason they are supplied is to protect the manufacturer from lawsuits. Oddly enough, there is a bit of truth in this bit of twisted logic from the aluminum foil in the hat brigade. If a manufacturer were to sell a table saw without these proven safety systems, they probably would be sued.
I hear from hundreds of new woodworkers every month and have noted that this newer breed of hobbyists does not seem to suffer the same level of frustrations so many veterans blame on using the blade guard and splitter assembly. It appears that when you learn with the blade guard and splitter installed, it is less of an issue later when you attain the coveted grizzled veteran status.
When photographing stories for NewWoodworker.com LLC I often remove the blade guard and splitter because seeing the interaction between the blade and wood is important to the story. I have to admit that I also have been guilty of leaving the guard assembly off more than necessary. That is changing though as I grow older and realize that my powers of healing and recovery are slowly waning.
Push Devices
 |
 |
 |
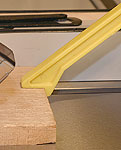
Simple push sticks (top) are not used at my table saw as they afford virtually no directional control. A good push handle (middle) is far better and is what I use for most cuts at the table saw. Push blocks (bottom) are great for wide or sheet stock as they provide a very good grip and keep you fingers out of harms way. Click images to enlarge |
There are two primary purposes for using push devices: spacing your hand farther from the blade and putting sacrificial material between your hand and the blade. The intent of push devices is that when things go wrong, the push device contacts the blade rather than your fingers or hand. The space they create between your hand and the blade give you a much better opportunity to withdraw a still uninjured hand should things go dangerously wrong.
It is important to note that despite hearing from literally thousands of woodworkers on this subject over the years, hundreds of whom have had dangerous accidents on the table saw, none of those using a good push device suffered a blade contact injury. Some had bruised, sore or even a few broken fingers caused by the push device being kicked by the blade. Remarkably, few aside from the rare broken fingers required medical intervention.
At the bottom of the push device hierarchy (and rightly so) is the simple push stick. These dreadful excuses for a safety device usually have a handle area and a simple notched end, seldom more than ¾”-wide that actually contacts the wood. The problem with this design is that it affords virtually no directional control over the wood. You hook the notch over the wood and push it through, hoping it doesn’t turn into the blade before enough of it reaches the splitter. In my shop, these notched sticks have no use on the table saw.
Oddly, there is little middle ground in the world of push devices. We go from the worst, push sticks directly to the best, push handles. While push handles still have the notch, it is actually a step near the rear of an extended “foot” that gives the operator very good directional control while pushing the piece across the blade. Even with the splitter in place, this additional control allows keeping the wood firmly against the fence throughout the cut. That is safer and produces a much smoother cut edge at the same time.
Push handles are available commercially, like the Saw-Aid from Stots or they can be made in the shop. I use Saw-Aid most frequently but have several shop-made versions that are used primarily when side-to-side clearance is an issue.
The other “best” design in push devices is the rubber-soled push block, usually associated with jointers. At the table saw, push blocks are great when working with sheet stock or wide boards. The rubber sole often gives a better grip on the wood than your hand, plus the elevated handle moves your fingers farther from the blade. Both are good things.
Blade Height
 |
While we do not want excess blade exposed above the wood, we need enough for it to operate efficiently. Click image to enlarge |
There are many theories about setting blade height but the one I hear most, particularly from blade manufacturers makes the most sense. Set the blade just high enough so that the bottom of the gullets are at or just below the top surface of the wood at their highest point. That helps the blade clear sawdust and introduce cooling air into the cut.
The only real exception is when making a stopped cut. In those situations, many woodworkers raise the blade fully to reduce the angle (radius) where the cut stops. Some also raise the blade when cutting laminates or veneer plywood, thinking that the teeth impacting the wood closer to straight down will reduce chipping. I have not found this to be nearly as effective as using a quality blade designed for cutting laminates and veneers, its height set to the gullets as mentioned earlier.
Feed Rate
When making any cut on the table saw, the speed at which the wood is pushed into the blade is important to the quality of cut and safety. Like many things in woodworking, developing a feel for the proper feed rate is largely a function of experience. It is important to know that a miss-aligned saw can mimic many of the signs of excessively fast or slow feed rates, a factor you can prevent by checking the alignments frequently.
Moving the wood across the blade too quickly can result in excessive chipping or splintering (blow out) along the cut edge, especially when the blade exits the wood. Also, the wood may feel like it wants to ride up on the blade during an excessively fast feed rate. Another sign is the saw bogging down. Those conditions, along with the feeling that you have to apply more pressure than normal can be a signal to slow down a little.
Moving the wood too slowly is usually evidenced by burning of the wood along the cut edge and a reduced “feel” of the blade cutting. Here again, the species of wood can make a difference as some, like maple burn more quickly than others.
 |
Featherboards can be helpful in many table saw operations. They help keep the stock flat on the table or snug against the fence. Click image to enlarge |
When you are moving the wood across a sharp, quality blade at the proper rate, the cut edge will show minimal chipping, splintering or burning. Applying just enough pressure to feel the blade working without the sensation of it resisting seems to be right for whatever species of wood is being worked with. Unfortunately, there is no way to develop that feel other than cutting wood and paying attention to the results.
Featherboards
Using featherboards can be very helpful for stabilizing the wood as it enters the area of the blade. Placing a featherboard vertically can help cut consistent depth dados and grooves. While they can help prevent kickbacks, featherboards not replacements for the anti-kickback features of a splitter assembly.
When making through cuts, featherboards must be located before the blade, not at or after it. The pressure of a featherboard will try to close the kerf onto the blade, setting the stage for a kickback or at least a poor-quality cut.
Rip Cuts
 |
Rip cuts are easy, if we have a straight edge against the fence. If the board can rock on the fence the cut will not be safe nor straight. Click image to enlarge |
Using the rip fence to guide wood across the blade is an exceptionally accurate way to size the piece. At the same time, the table saw cuts a straight edge, exactly parallel to the one against the fence.
While rip cuts are safe and easy, there are things that can increase the chances for an accident, the most obvious being not using the blade guard and splitter that came with the machine. Next is not using a good push handle or push block to control the wood while keeping your hands removed from the vicinity of the blade.
The size of the piece being cut is also important. The instruction manual for the saw may provide recommendations on the minimum stock length that is safe to cut. Small pieces of wood are exceptionally difficult to control while being pushed across the table saw blade. When confronted with a piece of wood less than 12” long, I consider using another machine, like a bandsaw to make the cut.
For rip cuts, the side of the wood against the fence must straight or the wood can rock while engaged with the blade. A very small deviation, measured in the thousandths of an inch, can be enough for the blade to grab the wood and try to throw it back at the operator. If the splitter assembly and anti-kickback pawls are not in place the operator could be in trouble.
If the wood to be cut does not have at least one straight edge, it should be jointed to create one. If a jointer is not available, a simple jig can be made to straighten an edge. See the Table Saw Jointer Jig link in the Resource list at the end of this story.
Another common problem area is trying to control a long piece of wood, especially as it moves off the rear edge of the table and its weight, multiplied by leverage work against you. Without an adequate, properly adjusted (height) work support or outfeed table to catch the wood, the operator is forced to apply increasing downward force to maintain control. Even more dangerous is the temptation to reach over the blade area to control or retrieve the wood.
The keys to safe, accurate rip cuts is to have a sufficiently long straight edge against the fence, use a good push handle or push block to guide the wood through the blade. When the size of the wood dictates, adding a work support or outfeed table lets you concentrate on making the cut, not catching the wood on the other side of the blade.
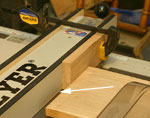
Crosscuts
 |
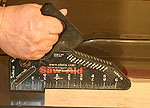
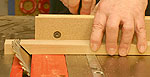
Adding a sandpaper-covered auxiliary face to the miter gauge makes cross cuts safer and easier. Click image to enlarge |
This seemingly simple cut can easily be compromised by a miss-adjusted miter gauge or not cutting on the layout marks. Another key is maintaining control of the wood; in particular making sure it does not rock against the miter gauge face nor slip side-to-side during the cut. These problems increase with the size of the piece being cut.
Most woodworkers find that adding an extended wooden auxiliary face to their miter gauge fence provides much more support that makes accurate crosscuts much easier. Many also cover that wooden face with sandpaper (150-grit works well) that makes holding the wood steady much easier in both 90-degree and miter cuts.
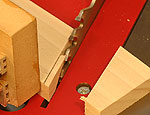
A commonly used technique for making repetitive crosscuts is to clamp a gauge block to the rip fence and use that as a stop when repositioning the wood for the next cut. In addition to acting as a stop, the gauge block also spaces the wood away from the rip fence so the cut off piece does not become trapped between the blade and the rip fence face.
 |
Clamping a simple gauge block to the fence makes repetitive cross cuts fast and accurate. Plus, the space created by the gauge block provides room for the cutoff to drop without becoming wedged between the fence and blade. Click image to enlarge |
To avoid simultaneous contact of the wood with the rip fence and miter gauge, the gauge block should be set close to the operator’s edge of the fence. That way the wood can be slid over until it butts against the gauge block to size the cut but when moved forward towards the blade, it moves off the gauge block before contacting the blade. When the cut is complete, the waste can safely drop to the table without becoming trapped between the blade and fence.
Some believe it is OK to use the miter gauge and rip fence at the same time when cutting dados. The rational is that because the dado blade does not cut completely through the wood, a kickback is not possible. There are many woodworkers who can testify how dangerously wrong this is. If the teeth of a blade (or stacked dado) are engaged with the wood, that wood can kick out if it cocks at all during the cut. It is never a good idea for the wood to be in contact with the miter gauge fence and the rip fence at the same time during a cut.
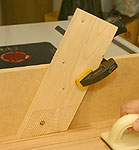
Miter Cuts
 |
Making the first miter cut 1/16" or so long and then taking a second, final cut on the layout line eliminates much of the "pull" of the blade that tries to slide the wood along the fence. Click image to enlarge |
Making accurate miter cuts is largely a matter of adjusting the miter gauge precisely and then holding the wood motionless as it passes across the blade. The sandpaper-faced auxiliary fence described earlier is a big help in maintaining control of the wood during these cuts.
Another tip for making accurate miter cuts, particularly steep ones, is to make an initial cut about 1/16” over the length needed. Then carefully make a final cut on the layout line. The initial cut removes most of the waste, leaving less than the blades width to trim away. This greatly reduces the force of the blade on the wood and makes holding the wood absolutely still during the cut easier.
Bevel Cuts
 |
 |
Bevel cuts using the rip fence or miter gauge are safe and accurate if control of the wood is maintained and we have straight edges against the fence. Click images to enlarge |
|
Because the blade tilts one way - most often towards the fence – a little extra caution is in order when making bevel cuts. Whether guiding the stock with the rip fence or miter gauge, either the work piece or the cut off waste will be above the angled blade.
When we make a bevel cut using the rip fence for guidance, we are controlling the piece that is passing beneath the tilted blade. It is important to remember that until it clears the blade completely, this piece is also trapped between the fence and blade. If the fence and blade are properly aligned, this does not present a problem. We complete the cut, push the stock beyond the blade and shut the saw off before retrieving it.
Because the waste (cutoff) drops free on the upper side of the blade, it can be thrown off the saw though generally not violently because it is not trapped. I always stand on the fence side of the blade when making bevel cuts using the rip fence so I am out of the way should the waste come off of the table.
When using the miter guide to make bevel cuts, we are controlling the piece passing over the tilted blade and the waste drops beneath it. Here again, the waste can be thrown off the saw. The natural operators position when making miter gauge cuts puts you out of that path.
However you make bevel cuts, paying attention to how the cut is being made and where you are standing will keep you safe.
It is also important to remember that because of the angle of the blade, it is cutting considerably more wood than when it is straight up. That increases the resistance of the blade cutting the wood proportionately. Maintaining a firm grip on the wood and slowing the feed rate slightly will help make a true, straight cut while decreasing the chances of the wood cocking and starting a kickback.
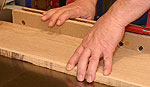
Dados & Rabbets
 |
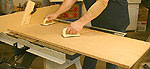 |
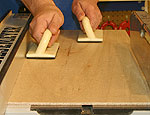
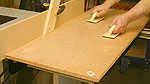
Cutting dados or rabbet along the long edge of a rectangular board (left) is safe and easy. Trying to cut either across the width of the same board (right) provides very little material against the fence making this cut a prime candidate for trouble. Click images to enlarge |
|
Though tempting because of their price, I strongly recommend not using wobble-type dado blades. The stacked dado sets are far more efficient and the better quality ones cut extremely clean, flat-bottomed grooves that make your projects turn out much better.
Not all saws are capable of using stacked dado sets at their full width because of variances in the length of the arbor. It is important that the nut can be installed far enough onto the arbor shaft that at least one full thread on the arbor shaft protrudes out of the nut. Better contractor and cabinet saws have sufficiently long arbors to use the full stacked dado set. Portable and benchtop table saws are generally the ones lacking sufficient arbor length.
The manufacturer of the dado set will specify the maximum width it is capable of cutting. Very often that width does not use all of the included chipper plates at one time but rather various combinations of them to produce specific dado widths.
When cutting a dado or rabbet at or near the edge of the wood, a sacrificial face must be added to the fence to prevent the cutter from accidentally contacting the fence. The sacrificial fence also allows “burying” part of the dado stack to cut narrow rabbets.
The sacrificial fence is usually just a length of ¾”-thick wood with a semicircular cutout for blade clearance. The sacrificial fence can be clamped or screwed to the fence, whatever is best for your fence design.
Another benefit of the sacrificial fence is that if made tall enough, a feather board can be clamped to it to help keep the wood being cut flat on the table to insure a consistent depth dado.
I have found that using rubber soled push blocks makes controlling the wood while making dado and rabbet cuts very easy. In addition to the increased “grip” on the wood, the push blocks add distance and material between your hands, the wood and cutter. Too many believe that because the dado cutter is buried in the wood (usually ½” or less from the surface) that it is safe to push the wood across it with bare hands. The inconsistency of wood compounded by the close proximity of your hands to the cutter makes this a very dangerous practice.
Video Tutor |
The table saw is great for cutting dados and rabbets in material with a sufficiently wide edge that can be held against the fence to keep it stable as you move it across the cutter. Longer, relatively narrow pieces like bookcase sides are nearly impossible to control during these cuts. The result can be a kickout or badly cut dado. When the piece being cut is narrow enough to make it unstable at the table saw, using a router and jig is often a safer and more effective choice. See our Auto-Width Dado Jig Plan for one option.
The only real tricks to making rabbet and dado cuts on the table saw is to keep the wood flat on the table and maintain a feed rate that allows the cutter to work rather than force feeding the wood into it. Even at cutting depths of ¼”, the width of the dado cutter means that a considerable amount of wood is being removed. Overly fast feed rates can easily translate into chipping at the edges and inconsistent depth of the cut.
Tip: The inconsistent thickness today’s wood requires test cuts to be sure the dado width actually fits properly. Stacked dado manufacturers usually include a chart specifying combinations of blades and chippers to produce common width grooves. You will often have to shim that stack slightly to get a clean fit. See the Resources section at the end of this story for more on cutting dados.
The most reliable safety device is your own sense of danger. If you encounter a situation that seems risky, there is a good chance it is if for no other reason than you are concerned about it. Stop and think the task through. The versatility of the table saw usually provides an alternative way of doing nearly any cut that is safer and often more effective.
Take your time and concentrate on what you are doing. No cut or project is worth risking an injury.
Resources
Auto-Width Dado Jig
An alternative to cutting them on the table saw
Caring For Your Cast Iron Table
NewWoodworker.com LLC Safety Survey
Setting Up & Using Stacked Dado Sets
Table Saw section of our Tips & Tricks pages - Click Here
Have a comment on this story? - Email Me!
All written, photographic and drawn materials are property of and copyright by NewWoodworker.com LLC 2000-2019. Materials may not be used in any way without the written permission of the owner.