
This is a Veteran Owned site
![]()
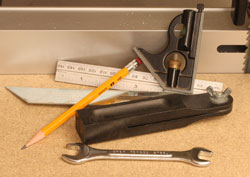 |
All you really need for this adjustment are these tools, a piece of wood with a straight edge and a band saw! Click image to enlarge |
Correcting Band Saw Blade Drift
Two wrongs can make a right - or straight
Text, photos and video by Tom Hintz
Posted - 9-3-2008
Band saw blade drift is a tendency of the blade to veer to the left or right while making a cut using the rip fence. It can manifest itself in the blade wanting to stray off the cut line or the wood seemingly being pulled away from the fence during the cut. The amount of drift varies from real bad to very minor but most band saw exhibit this condition to some extent. Blade drift occurs only when using a rip fence.
It is important to note that there are many contributing factors to blade drift on a band saw. If the blade is not tracking on the center of the tires (they do have a subtle crown to their shape) or if the guides are not properly adjusted, blade drift can result or be made worse. Complicating this is that a cheap or slightly damaged blade can drift far worse. In the case of a damaged blade, it can even reverse the problem and make the blade wander in the opposite direction. I once had a brand new band saw blade just brush a piece of broken nail in a piece of wood. That contact knocked the edge off of the teeth on the left side (from my view) of the blade. The blade immediately began turning hard to the right, into the still-sharp teeth that were still cutting while the other side were not.
 |
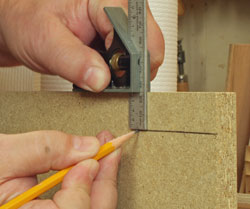 |
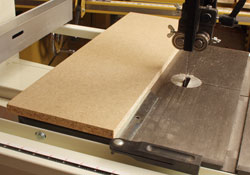
The board (left) needs to have at least one straight edge and be as long (or a bit longer) than the table is wide. draw a straight cutline (right) parallel to and 1" in from the straight edge. Click images to enlarge |
|
The point of the last paragraph is that if the band saw is not set up properly and/or does not have a good quality, sharp blade installed and tensioned correctly, the chances of accurately adjusting for drift are minimal at best. Because all band saws and blades differ in how they are set up, we will assume that you have gone through this procedure on your saw, according to the manufacturers instructions and specifications.
You can try one quick fix, though it is not always successful. If the drift is to the right (from the operators perspective, adjust the blade slightly forward (towards you) on the upper wheel. If the drift is to the left, adjust the blade slightly towards the back on the upper wheel. Making this small adjustment tweaks the blade slightly which can help "steer" it to compensate for drift. It is fast and easy so worth a try.
How Much Drift?
The first thing we need to know is how much drift the band saw has. To do that we need a flat piece of board, at least as long as your band saw table is wide. The board needs to have at least one straight edge that can be placed on the right side when making the test cut. We are going to use the edge of the band saw table and that straight edge of the board to measure the drift angle.
 |
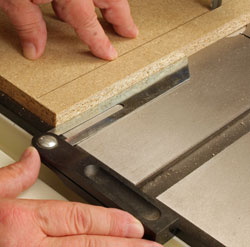 |
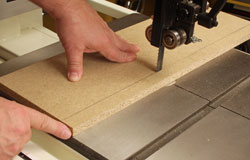
Make a freehand cut (left) and stay on the cutline as close as possible! Stop the cut when the edge of the board passes over the front edge of the table. Hold the board in place firmly. Place the angle finder (right) against the front edge of the table and put its blade against the edge of the board. Then lock the blade in place. Click images to enlarge |
|
Using a combination square draw a straight line parallel to the right edge of the board, 1" in from the edge. Carefully make a freehand cut along this line, keeping the board flat on the table and concentrating on following the line. Take your time and get this cut as perfect as you can. When the end of the board reaches the edge of the table (on your side of the saw), stop the cut, hold the board in that position and shut the band saw off. It is important to prevent the board from moving at all! If necessary, clamp the board to the table to prevent changing its position while measuring.
Put one leg of an angle finder against the straight edge of the table in front of you and set the blade to match the right edge of the board and then lock its blade in place. This tells you the drift angle your band saw has. It is not important to know the specific number of degrees because you will use the angle finder to make the correction on the fence.
Skew the Fence
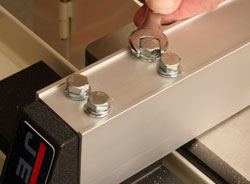 |
Make the adjustment to your fence and recheck (fence locked down) with the angle finder. Your fence may vary in how it adjusts so check the owners manual. Click image to enlarge |
Since there is little that we can do about blade drift at the blade, we adjust the fence to match the drift angle to essentially cancel it out. Most factory or aftermarket band saw rip fences have some form of mechanism for alignment. The system on the factory-supplied JET rip is common but yours may be different. Check your owners manual for specific directions for adjusting your fence.
Remove the wood if you have not done so already. Move the fence so that it is fully on the table and lock it down. Lay the angle finder on the table, its lower leg against the straight front edge of the table. Slide it over so the blade is against the fence and check to see if it and the fence are parallel. If not, the gap you see is the amount of change your fence needs to compensate for blade drift.
Adjust the fence so that its face matches the blade of the angle finder. Lock that adjustment, lock the fence in position again and the check to be sure the fence still matches the angle finder blade. If they match, you are done! If not, repeat the fence adjustment until its face matches the angle finder.
The Future
Video Tutor |
Unfortunately, this is not a "do it once and forget it" kind of adjustment. Because there are so many variables in a band saw, not the least of which is changing blades, you will have to repeat this process in the future. The good news is that once you do it a time or two, checking and then correcting a fence for blade drift goes very quickly. Save a few appropriate-sized board cutoffs and keep your angle finder handy!
Have a comment on this story? - Email Me!
Back to the Tips & Tricks Directory
All written, photographic and drawn materials are property of and copyright by NewWoodworker.com LLC 2000-2019. Materials may not be used in any way without the written permission of the owner.