This is a Veteran Owned site
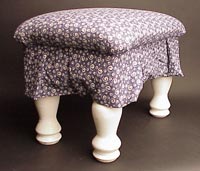
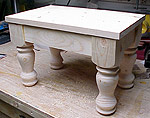
"Bulldog" Foot StoolA fun, useful, weekend projectText, photos and design by Tom Hintz OK, my Bulldog footstool does not have the Far Eastern fluidity of line David Marks (DIY Woodworking) touts, and His Normness (The New Yankee Workshop) might not be enthralled by the proportions. Nevertheless, my wife likes it, and I had a good time building it. I was looking for a project that involved my new lathe when my wife saw a footstool in a catalog and got an idea. We arrived (she told me) on a set of dimensions and I was off to get the lumber. This entire project is built from common knotty pine. Since the legs and frame are to be painted, and it is not intended to support much weight, there was no need for more expensive wood. LegsBlanks for the legs were glued-up from pieces cut from one eight-foot-long construction-grade 2X4 stud. The stud was cut into 11-inch-long pieces, then the wide sides passed over the jointer to sweeten the gluing surfaces. To minimize the chances of an explosion while turning the pieces with the most knots or defects were put together when glued. After scraping the excess glue from the joints, the legs were ripped square on the table saw, and then cleaned up on the jointer. The "bad" ends, that would remain square, were marked and the center of each end located and center punched. I also took the time to make pencil lines 3 ½-inches down from the top of each leg at all four corners. These lines mark where the square portion of the leg stops and the turning begins. Turning the Legs
I should warn you that this is my first project involving turned parts. I am happy with how it turned out, but there are "lapses in professionalism" in the legs. They may not be readily visible, but I know they are there. You will notice the description of the turning process is rather sparse. Though I am quickly becoming comfortable (keep both eyes open most of the time) with woodturning, I am still surprised when a bead comes out round on both sides. You don't need to copy my technique just yet. I started the turning process by making ½-inch-deep cuts with a dovetail saw (hand operated, yes I do have one) where the square portion of each leg ends to prevent major splintering. The lower portion of the legs were turned round and the transition to the square section rounded slightly. The design for the turned portion of the legs is part free form, part plan, and then substantially altered by accident. The design is a conglomeration of several turnings I have seen. I shamelessly, copied parts of a few different designs and incorporated them into these legs. After turning the first leg without serious problem, (read catches) that leg became the pattern for the remaining three. After turning the round portion of a leg to a cylinder, I held the first leg up to it with the lathe running slow and marked important locations with a pencil line. I have seen His Normness use this form of lay out often and figured this was a good time to copy his technique.
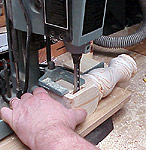
I also discovered that His Normness apparently has more practice than I do. Layout lines or not, my fledgling turning skills succeeded in producing four somewhat different profiles. The differences are not large, in fact if you measure the high and low points with calipers, they are very similar between all four legs. The problem is that somehow those similarly sized points vary slightly in vertical location on all four legs. Next up was cutting the mortises in the legs for the rails that hold them together. I used a ¼-inch chisel in my Delta mortising machine, and set the fence to produce a 1/8-inch-wide reveal when the legs and rails were assembled. The mortises are all 2-inches long, ¼-inch wide and 9/16-inches deep. RailsThe rails for this stool are very straight forward. All are 2 ½-inches wide. The long rails are 11 ¾-inches long, and the short rails 5 ½-inches long. These lengths include the ½-inch-long tenons on each end. I used the table saw and tenoning jig to cut the tenons. For more on that procedure see my story on making mortise and tenon joints in the tips & tricks section of this site.
After dry-fitting the leg and rail assembly, yellow glue was applied to the joint surfaces, the frame assembled and placed in clamps. After measuring the diagonals to be sure it was square, it was set aside to set up. Corner blocks were later glued and brad-nailed in place to add stiffness to the frame and to provide bosses through which the screws that secure the top would pass. Finishing and UpholsteryMy wife applied primer and a white top coat to the legs and frame. Since this piece will be used strictly indoors, there was no need for further protection. She made and applied the fabric skirt, then turned to the platform. The platform was covered with batting and a foam pad, then the fabric cover. All of these components were stapled in place. The upholstered platform was attached to the base with 1 ½-inch-long drywall screws through elongated holes in the corner braces. The Bulldog foot stool took a little more than a weekend to complete before finding it's way into our living room where it is used daily. I doubt there is $20 in the materials needed which makes this project not only fun, but also a real cost saver if you needed a foot stool in the first place. Sorry. Plans are not available for this project. Do you have a comment about this page? - Email Me!
|
All written, photographic and drawn materials are property of and copyright by NewWoodworker.com LLC 2000-2019. Materials may not be used in any way without the written permission of the owner.


