
This is a Veteran Owned site
![]()
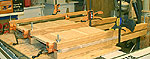 |
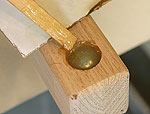
Clamping cauls help you make flatter panels and eliminate a bunch of corrective sanding! Click image to enlarge |
Building and Using Clamping Cauls
The easy way to make flatter panel glue-ups
Text & Photos by Tom Hintz
Clamping cauls are nothing more than rigid wooden bars that are clamped to panel glue-ups, one on top and another directly below it, to keep the individual boards aligned to each other. It is important to remember that cauls are not clamps but rather tools designed to improve the quality of panels glued up using long bar and pipe clamps.
The important features of clamping cauls are rigidity, length and width.
The overall length of a caul impacts its ability to resist flexing in use making it important that they be only as long as needed. We can also “shorten” longer cauls by adding speed clamps at the edge of narrower panels.
While width does influence rigidity, a wider caul is less likely to leave indentations in soft wood. A wider “footprint” also helps keep the boards of a glue up aligned with minimal pressure.
Making the Blanks
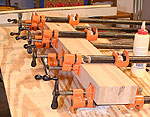 |
Ganging the blanks for all three cauls makes better use of the pipe clamps plus produces straighter cauls." Click image to enlarge |
While virtually any species of hardwood can be used to make cauls, I like red oak because it is both rigid and relatively cheap. I tried using poplar and while it is technically a hardwood, it is at the bottom of the stiff range and needs to be oversized considerably to be effective as a caul.
If you have stock thick enough to make the cauls in one piece, that is an option. However, I like to glue up two ¾”-thick pieces as they seem a bit more rigid. Despite the grain running in the same direction, it varies in each piece which tends to increase their resistance to flexing.
My cauls used in these photos have finished dimensions of 40”-long by 2”-tall and 1 ½”-wide. You can make cauls longer or shorter but I find this length more than adequate for my shop. Also, if you work on a large surface and have the handles of your clamps over it, consider making the bottom cauls tall enough to allow the clamp handles to turn freely. Because cauls are cheap and easy to make, many woodworkers make several sizes. Later, in the Use section we look at how to use the length specified in this story on narrow jobs effectively.
Begin by cutting the pieces (2 per caul) from ¾”-thick stock, 2 ¼”-wide by 40 ½”-long. Apply glue to matching faces and glue two pieces together to make one caul blank. To make better use of my clamp supply, three glue-ups were ganged and clamped together in one set of clamps. After aligning the sets, light pressure was applied to the clamps while I used a dead blow mallet to make sure all of the pieces were flat on the pipes. Once all of the pieces were seated, the clamps were snugged up and the glue allowed to dry overnight before trimming and final shaping.
Cutting the Cauls
 |
Rounding all of the edges prevents marking the panels and makes the cauls nicer to handle. Click image to enlarge |
Joint one edge of the glue-ups (with the glue seam) to make it flat and straight. Use that edge against the fence at the table saw and rip blanks to 2 1/32”-tall, allowing material for a clean up pass over the jointer or through a planer. Finally, cut one end square and use that end against a gauge block to make the final sizing cut to bring all of the blanks to 40”-long. Using the gauge block insures all of the blanks are identical and makes drilling the bolt holes accurately easier.
A ¼”-radius roundover bit was used to ease all edges. This helps minimize marking the wood being clamped and makes the cauls user friendly.
Look the caul blanks over and mark the smoothest face on each so it can be oriented towards the wood being clamped when assembled. This is especially important if you dug the wood used to make the cauls out of the scrap bin and it has a knot or other defect on one edge that could leave an imprint in the material being clamped.
Installing the Hardware
 |
 |
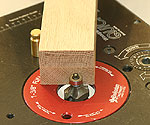
The recess (Top) insures the caul will sit flat on a bench. (Bottom) Adding epoxy locks the bolt in place. Click images to enlarge |
Carriage bolts 3/8”-diameter by 7”-long were used to make the cauls in this story. That length gives a 3”-thick working capacity, which exceeds most clamping needs. If you make glueups with thicker material, longer bolts or even threaded rod can be substituted to increase capacity as needed.
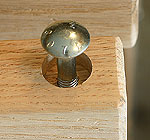
I use wing nuts for applying clamping pressure but anything from plastic knobs to nuts turned by a wrench can be used. A large, flat washer should be placed between that nut or handle and the wood to prevent it from digging into the wood. In addition, the washer makes it easier to turn.
Mark the outside edge (away from the clamping surface) on each caul, 1” in from the ends. One caul from each set will become the bottom piece, which is drilled differently than the top half. The bottom cauls get a 7/8”-diameter by ½”-deep hole drilled on the mark at the centerline to recess the bolt head so the caul can sit flat. Install a 3/8”-diameter drill and make through holes at the center of those recesses. Note that the 3/8”-diameter through holes are on the bottom cauls only!
Insert the bolts through the bottom caul halves, add a couple flat washers and a nut. Turn the nut down to draw the square shoulder under the bolt head into the wood until the head is seated fully in the recess.
With the bolt heads facing up, drop enough epoxy into the recesses to fully cover (or close) the bolt heads. This helps lock the bolts in place so they can’t fall out during use.
The top halves of the cauls are drilled (through hole) at the same mark but using a 7/16”-diameter drill. This slightly oversized hole eliminates binds, making assembly and use of the caul easier. Assemble the top halves of the cauls onto the bolts and make sure they move freely. If necessary, open the through holes in the upper cauls to insure free movement.
Finishing
 |
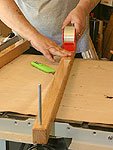 |
Applying a good, non-wax finish (Left) makes a good base for the protective tape (Right) and for the coats of wax applied to the entire cauls later. Click images to enlarge |
|
Since cauls are used in contact with fresh glue, it is important to prevent them from becoming part of the panel. Applying a coat or two of a good quality finish helps that somewhat plus limits dimensional changes in the cauls due to humidity in the shop. Any good quality finish works but beware of materials such as shellac that often contain waxes that could make it difficult to install the tape in the next step. I used clear polyurethane on the cauls in the photos, allowing it to dry 24 hours before moving on to the next step.
Apply a continuous strip of 2”-wide packing tape to the contact surface of each caul and rub it down to be sure it is fully adhered to the wood. The tape resists glue somewhat but also provides a replaceable surface if needed later on.
Finally, apply a good coat of non-silicone wax to all of the caul surfaces as the first line of defense against glue (on your hands and drips) and the cauls are ready for use. Between the packing tape and wax, dried glue flakes off easily. Just remember to clean the cauls after each use to prevent squeezing an imprint of dried glue into the surface of the next job.
Using Clamping Cauls
 |
With the panel at the near end of the cauls, the handle of common pipe clamps turns without interference. Click image to enlarge |
Lay the bottom halves of the cauls out on the bench. Most often I arrange the cauls to have one along either end of the panel and one down the middle. If the panel being glued up is more than three or four feet long, adding another caul and dispersing them evenly across the panel may produce better results.
Apply glue to the edges of the boards being joined and lay them in position on the bottom cauls, the edge of the panel against the end of the cauls closest to you. Install the top halves of the cauls along with a flat washer and nut on each bolt. Tighten the nuts just enough to be sure the cauls are in contact with the wood. Check the alignment of the boards and tighten the cauls as needed to bring the boards into alignment with each other.
If there is more than a few inches of empty caul at the rear, place a hand operated speed or C-clamp at the rear edge, reaching inwards on the panel as far as possible to squeeze the caul together there. That shortens the span and prevents the caul from arching up and rocking the last board up.
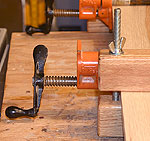
 |
When the panel is shorter than the cauls, use a speed clamp (C-clamp also works) at the back side to shorten the span. Click image to enlarge |
Install the pipe or bar clamps and apply just enough pressure to raise beads of glue at the joints. Even with the cauls tightened, the clamps will close the joints easily. Check the cauls to be sure they have remained snug and are holding the boards flat and allow the panel to dry completely.
When the glue has dried, remove the clamps and cauls and clean away any dried glue clinging to the caul surface. If you waxed the cauls well, the glue will pop right off.
After several uses the glue may begin adhering to the cauls better. Clean them up and add a fresh coat of wax and they will be ready for several more uses.
Clamping cauls are a great tool to help produce flat panel glue ups but they cannot remedy every situation. There may still be some amount of unevenness between the boards but the amount of sanding needed to flatten those joints will be far less than if cauls were not used.
Have a comment on this article? - Email Me!
All written, photographic and drawn materials are property of and copyright by NewWoodworker.com LLC 2000-2019. Materials may not be used in any way without the written permission of the owner.