
This is a Veteran Owned site
| |
|||||||||||
Table Saw Surface Maintenance
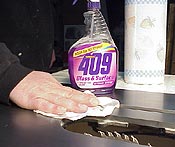
Protecting your investmentText and photos by Tom Hintz As tough as cast iron surfaces are, we need to maintain them to protect our investment. eglect cast iron surfaces and they can deteriorate quickly, and compromise safety even sooner. Periodic maintenance of the cast iron parts is a necessary part of keeping our equipment in good operating condition. This procedure is easy and relatively quick, meaning you have no excuse not to do it. New SawsIf your saw is new, the cast iron parts probably were covered with a sticky grease intended to protect the metal from moisture and the rust that would soon follow. Before using the saw, this coating must be removed. The recommendations for what to use to strip the grease from cast iron are endless. Kerosene is often prescribed, as is mineral spirits. While these will work, they also can produce highly volatile fumes. If your shop is in or attached to the house, or around any possible ignition source, using these materials represents a very real danger of fire. Fortunately, most grease-cutting household cleaners are also effective. When I unpacked my Jet table saw, I used 409 household cleaner and paper towels to clean the grease from the cast iron parts. When you encounter a stubborn buildup, try a product called Goof-Off. It is marketed as a stain remover that painters use to clean small errors. I dabbed it on a particularly tough section, let it stand a few minutes, and then literally wiped the buildup off.
Cleaning Cast Iron TablesNote: If you have painted steel wings, or aluminum parts, do not use abrasives or steel wool on them. Clean with a normal paint-safe household cleaner and rags. Once they are waxed, they clean up very easily.During normal use table saw surfaces develop buildups of sap, pitch and other residues from the wood we work with. If not removed regularly, these buildups can make it difficult to slide wood across the surface. This not only affects accuracy, but can also be a safety issue. If a sticky surface causes a piece of wood to cock, kickout can result. The tools of choice for removing surface contamination from cast iron surfaces are steel wool and low-abrasion nylon pads. It may be tempting to whip out the palm sander and some 220-grit paper, but don't do it. We want to remove the contamination, not cast iron. In most cases, a little elbow grease applied to the steel wool or pad, along with a mild cleaner will do the job very well. I have used 409 household cleaner and WD-40 with good results.
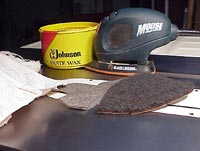
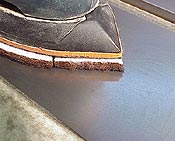
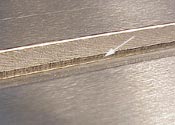
I have heard of people using very fine wet/dry automotive sandpaper but have not tried it myself and do not plan to. When cleaning my cast iron the first time I accidentally found a tool that makes the cleaning process easier, more effective, and does so safely. My wife gave me a "Mouse" sander last year. Despite initial skepticism, I would learn it not only sands wood very well, it, along with the custom-fit steel wool and abrasive pads that came with it, worked very well for cleaning my cast iron. Whether using the steel wool or abrasive pad, I spray a little WD-40 on the cast iron surface as a lubricant/cleaner. Rather than bearing down on the sander, I let it float over all but the toughest areas to be cleaned. When the residue is stubborn, a small amount of pressure is all that is needed. Remember to clean the miter slots also. The rails of our jigs and miter gauges can compress sawdust and other debris into the corners of the slots. The resulting buildup will hamper the smooth operation of whatever slides through them. I use one of the nylon pads and a little WD-40 to scrub any contamination from the miter slots. When the surface is free ofresidue, I spray the entire surface down with the 409 cleaner and then wipe clean with paper towels. I repeat this last step one more time to be sure all of the oil and cleaning debris has been removed.
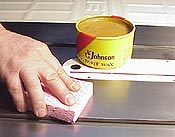
Types of WaxTo maintain a rust-free and slick surface between cleanings, (or to develop one on a new surface) most woodworkers apply some kind of wax to the cast iron surface. If you have steel extension wings, they receive the same wax treatment as the iron parts. Though nearly all woodworkers agree on the need for waxing, the type of wax is the subject of much discussion. Some advocate using automotive wax, but many advise against this type of product. Many automotive wax products contain silicone that may be a good idea on the fenders of your car but could transfer to wood. Once silicone gets onto wood, it is very difficult to get off, and almost impossible to apply finish over. Sanding often spreads the silicone rather than removing it. Some "brew" their own wax, often consisting of a combination of bees wax and various fluids such as mineral spirits. This process requires heating and mixing the materials before use, something I would rather not do. These concoctions have been around for many years and probably do work, but I use a more conventional product. The most common alternative in use today is Johnson's paste floor wax. It is relatively easy to apply, durable, and does not contain silicone or other additives that may complicate finishing wood. This same wax can be used on all your cast iron surfaces, painted extension wings, router table tops, the backs of jigs or wherever we want wood to slide easily.
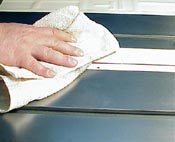
Waxing The SurfaceApply the paste wax in thin coats to the entire surface and let dry. Then, use a clean piece of old towel or cheesecloth to buff the surface out. The first time I waxed my new Jet table saw, I applied three thin coats. After that, the surface cleaned easily and one or two coats of wax does the job. A word of caution: Once you clean the surface, be sure to apply the wax. Leaving the freshly cleaned surface bare is an invitation to corrosion. When I build a new sliding jig, I sand the surfaces smooth and wax the side that is exposed to the machinery surface. I also apply fresh wax to my jigs whenever they feel like they are beginning to drag. Cleaning ScheduleCleaning and waxing the work surface on a regular schedule will keep it looking and performing like new. Keeping the surface clean and waxed also helps improve safety. Once a month is the most common cleaning schedule and should suffice for most hobbyist woodworkers. If you use your equipment frequently, shortening the time between cleaning and waxing might be necessary. If you notice work pieces beginning to resist sliding, stop, clean and wax the surface before something bad happens. Remember that any work surface on which you slide wood will benefit from waxing. I regularly clean and wax my aluminum jointer tables at the same time I maintain my drill press, band saw and table saw tables. Also, see our review of the TopSaver System! Do you have a comment about this page? - Email Me!
|
All written, photographic and drawn materials are property of and copyright by NewWoodworker.com LLC 2000-2019. Materials may not be used in any way without the written permission of the owner.