
This is a Veteran Owned site
| |
||||||
Table Saw Dial Indicator Jig
Shop-made jig to keep your saw performing at it's best.Text and photos by Tom Hintz The alignment of the table saw blade and fence with the miter gauge slots is crucial to the performance and safe operation of a table saw. Keep your saw aligned for safety and it also will perform at it's best. The difference between a good and bad alignment, as prescribed by the saw manufacturers, is so tiny, the only effective tool for measuring these tolerances is a dial indicator. Since the miter slots are non-adjustable, we use them to locate the dial indicator and base the measurements determining blade and rip fence alignment from them. Though we could use one miter slot to check the blade, and the other to reference the rip fence, I use the left slot for both to insure consistency. You should check the miter slots to be sure they are parallel to each other as well. Generally they are, but it doe not hurt to check. To take these measurements accurately, we need a good dial indicator and a jig that locates it in the miter slot. There are commercially made dial indicator jigs, specifically designed for this task. If building this jig is at all daunting, you may want to consider purchasing one of those. SafetyI should not have to remind you, but will anyway. Unplug the saw whenever working with or around the blade. You only think you are fast enough to get out of the way if the motor starts unexpectedly.
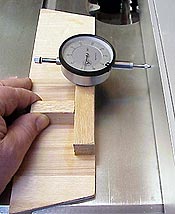
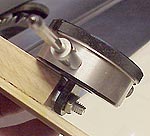
MaterialsThe key to this jig is to limit side-to-side or rocking play to the absolute minimum. I used a strip of oak, 12-inches-long, and just wide enough to fit snugly in the ¾-inch-wide miter slot for the basis of this jig. This fit is critical so make sure it is right. Using such a long rail in the slide does a lot to eliminate side play. Also, this rail should be slightly thinner than the slot is deep. We use the slot to locate the jig laterally and the table surface to locate it vertically. If the rail contacts the bottom of the miter slot, it can create a high spot that allows rocking of the jig, which ruins accuracy. Please note that the dimensions used for this jig are intended for use on my Jet contractors saw, with my dial indicator. The dial indicator is fairly close to the blade intentionally. When checking the rip fence, it is moved close enough to the dial indicator so the plunger is compressed roughly half of it's travel. Also, the size and location of your dial indicator's mounting lug could force you to alter how I mounted mine. Building the Jig
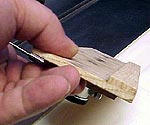
I cut a piece of luaun plywood 2 7/8-inches wide and 12 inches long. The ends are cut at a 15-degree angle to help the jig slide easily on the table surface. I glued the oak rail to the long side of the plywood. Also, the edges of the plywood bottom were beveled slightly with a rasp, and then sanded to further reduce the chance of the jig "catching" as it slides on the table surface. A block of oak, 3 ½ X ¾ X ¾ inches makes up the mounting lug for the dial indicator. A ¼-inch hole was drilled into the block along the horizontal center and a ¼-20 lag/stud screwed in. I ran the lag portion of this screw completely into the oak so a ¼-20 jam nut could be tightened against the oak face to lock the stud in place. After checking to be sure the dial indicator fit on the mount properly, I glued the mount to top of the plywood, opposite of the oak runner. A two-inch long piece of ¾ X 34 –inch oak was glued 90-degrees to the mount to form a handle with which the jig is moved on the table. When the glue has dried thoroughly, install the dial indicator and test the jig in the miter slot to be sure there are no "hard" spots as it slides back and forth. I used a finish sander to get the jig close, then "lapped" it in by pushing it back and forth in the miter slot. If there is excess friction between the oak runner and cast iron slot edges, the iron wins every time. Running the jig back and forth fits it perfectly to the slot. To insure maximum accuracy during use, I have found that applying a small amount of pressure down and towards the blade or fence removes any play there may exist between the jig and the miter slot. This might take a little getting used to but it works very well. When satisfied with the function of the jig, remove the dial indicator and give the jig a final sanding. Applying a couple coats of paste wax to the bottom (I used Johnson's paste floor wax) helps insure smooth operation of the jig. If you are not familiar with using a jig like this move on to "Table Saw Alignment." Do you have a comment about this page? - Email Me! |
All written, photographic and drawn materials are property of and copyright by NewWoodworker.com LLC 2000-2019. Materials may not be used in any way without the written permission of the owner.