
This is a Veteran Owned site
| |
|||||||||
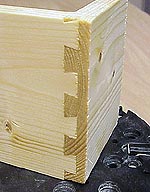
The Depth of Dovetails
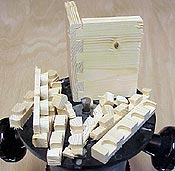
Text and photos by Tom Hintz Dovetail joints have been a favorite of woodworkers for decades. Our predecessors cut these intricate joints using nothing more than hand tools, applied with extraordinary levels of patience and skill. Today, we have the luxury of routers and dovetail jigs. While these modern tools certainly make this process easier, they do not guarantee perfect results. Proper setup is crucial to good results. For our purposes here, we will assume we are cutting dovetail joints on a drawer. There are many other uses for dovetails, but essentially the same procedures, and problems, apply to virtually all of them. The first problem many novice dovetail-makers encounter is remembering which parts go where in their jig. For a long time I kept the instruction diagram laid out in front of me whenever using my dovetail jig. To help identify the parts and their placement I always cut the drawer bottom groove and labeled each piece with its place in the finished drawer before moving to the dovetail jig. Eventually, the image of a drawer turned inside out locked onto one of the memory neurons in my brain and the process became a bit easier.
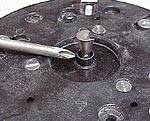
It is very important to be sure you are using the collar and bit specified by the jig manufacturer.Substitutions seldom work so if you do not have the correct tools, get them; there will be no good dovetail joints until you do. Read any dovetail jig instruction book, or ask about dovetail joint fit on a woodworking forum and depth of cut will be discussed. Some woodworkers have difficulty grasping the full importance of bit depth. It is not uncommon for a frustrated woodworker to insist the joint they produced is too far off for a simple change of bit height to be the answer. More often then not, that is exactly the problem. I had to set up a new router for use with my dovetail jig, and thought I would take note of the steps I went through. I followed the jig manufacturers instructions step-by-step, including their recommendations for initial bit depth. It should be noted that most dovetail jig manufacturers indicate their bit depth recommendations are an approximation. In most cases, you will have to adjust this specification to obtain good dovetail joints.
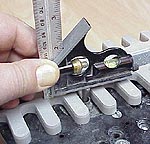
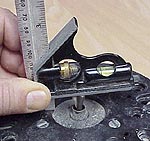
After setting up the jig, I installed the recommended dovetail bit and carefully set it to 3/8-inch depth. My jig specifies this depth is measured from the template, not the router base. I set my depth with a combination square so I laid the template on the router base and measured from that surface. Your jig may require measuring depth from the routers base. The first dovetails this setup produced were not even close. The biggest hammer I have in the shop was not going to drive these together. According to the troubleshooting section of the jigs manual, this condition indicated the bit was too deep. I reduced depth by the suggested 16th-inch, cut a fresh end on my test pieces and made another set of dovetails. Now the dovetails would go approximately halfway together with considerable persuasion indicating the bit was still too deep. I reduced bit depth by 16th-inch and repeated the procedure. This time the dovetails literally fell together, and with room to spare. Now it appeared the bit was too shallow. After several adjustments and more test cuts that alternated from a little loose to a little tight, I was very close. My dovetails were just a little loose. I increased bit depth by a tiny amount, almost imperceptible on the routers depth scale, and tried it again. This time I had perfect dovetails. They were tap-together tight and the overall depth of the joint (how close to flush the sides were) was nearly perfect. I always knew setting up to make dovetails was a time-consuming procedure, but, like many of you, seriously underestimated how critical bit depth was. Throughout this procedure, I changed nothing but bit depth. The jig remained untouched after the initial setup, but yet I made a significant change in the resulting joints.
To eliminate this time-consuming part of making dovetail joints, many woodworkers have a dedicated router, with the optimum bit depth set. Many will not use this router for anything other than making dovetails. The bit is not removed or the depth setting changed until it wears out and needs replacement. You may not be able to afford a dovetails-only router in your shop, but realizing the importance of bit depth and the sensitivity to change, can help make setup faster. I kept the final test pieces and marked them with the bit depth, measured from it's base. These pieces will be used as "gauges" when I need to cut dovetails in the future. The distance from the base to the bit end will be used to get me close. Matching bit height to fit the test piece will get me closer. Then, a test cut or two should complete the process, and confirm the depth is right. If you are having difficulties with dovetail joint fit, the following are general things to check. As always, follow the instructions provided by the manufacturer of your dovetail jig.
Setting your router up to cut precise dovetails can be frustrating, especially the first few times. Once you get a feel for adjusting bit depth to correct a condition, the process gets easier, and faster. Of course, with a dedicated router, life is easier yet. |
|||||||||
Do you have a comment about this page? - Email Me!
|
All written, photographic and drawn materials are property of and copyright by NewWoodworker.com LLC 2000-2019. Materials may not be used in any way without the written permission of the owner.