This is a Veteran Owned site
Garden FenceText, photos and design by Tom Hintz
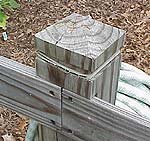
I had recently purchased a shiny new 10-inch radial arm saw and realized this was the opportunity to make good use of it, and score a dado blade at the same time. After returning with a load of pressure treated lumber and a new dado blade I began laying out my fence design. The wife would have been happy with posts that stayed put and rails nailed to them. However, I thought the project deserved more attention to detail. Sinking the rails into dados to achieve a ¼-inch reveal was just the beginning. I also remembered someone on a TV home improvement show (Norm Abram?) using the dado to cut a wide groove just below the tapered top of each post. A few hours and lots of dado-dust later I had the posts ready to build my fence. We had purchased one gate but I thought having access from either side of the garden was desirable. In my best "just like Norm" mode, I traced the pickets from the purchased gate and whipped out a reasonable copy. Since I knew better than to lobby for a gas-powered posthole digger I attacked the job of sinking 14 fence posts into our hard Carolina clay that suffices for topsoil. Eventually all the posts were in place, the rails screwed into their dados, the gates hung and the wife happy about the nice looking fence around her garden. I made a mental note that digging postholes could be an unpleasant by product of woodworking if I was not more careful in future project discussions. Do you have a comment about this page? - Email Me!
|
All written, photographic and drawn materials are property of and copyright by NewWoodworker.com LLC 2000-2019. Materials may not be used in any way without the written permission of the owner.


