
This is a Veteran Owned site
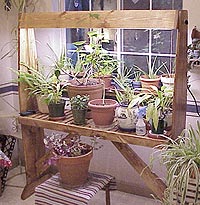
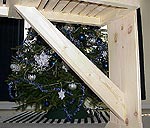
Indoor Grow-Light StandText, photos and design by Tom Hintz My wife, Beth, is an avid gardener who does not allow trivial things like winter impinge on her passion for growing things. Recently she showed me a few indoor grow light stand designs, all based on 2x2 or 2x4 frames, designed for circle saw, hammer and nail construction. Since my yet-to-be-designed version of the grow-light stand would reside in our house, aesthetic improvements were necessary. A functional improvement or two would also be nice. Still lacking a sound engineering concept, I was off to the lumber store. In my best seat-of-the-pants design mode I stood in the "good lumber" isle considering materials. Pine triumphed over more expensive options in part because there is a considerable amount of wood in this project and though I wanted it to look nice, a grow-stand is not living room furniture. With a sufficient load of pine, I headed back to the shop. The overall dimensions of my grow-stand were dictated in large part by the four-foot light fixture. Other considerations were placing the plant shelf 30-inches from the floor and providing a sufficient range of height adjustment for the light fixture. The "standard" models accomplished height adjustment through use of the chains supplied with the light fixture. Even I could be less crude than that.
I began construction with the light housing. From the start, I envisioned a flared wooden shroud concealing the industrial-looking light fixture. I found that angling the sides of the shroud 24-degrees fit the reflector hood close enough to allow for attaching it to the inside of the shroud with screws later. The overall length of the shroud worked out to 52 ½-inches when space was allowed for the light fixture housing, the pull switch and a small air-gap on either end. The finished width at the top is 5 ¼-inches and 9 1/8-inches across the bottom of the shroud. Overall, the shroud is 4 ¾-inches tall. I ripped a 2x6 down to size for the top of the shroud and cut the sides from 1x6 stock. All long edges were ripped at 24 degrees. These angles would match the sides to the top and produce a flat bottom on the shroud. The flat end caps had their sides cut at 24 degrees. A ¾-inch-wide by3/8-inch-deep dado runs down the vertical center of each end cap in which oak slider rails would be affixed later. A similarly sized dado would be cut in the side panels of the stand. While fluorescent bulbs give off very little heat, the ballast within the housing does get warm. To prevent this heat from building up within the shroud I provided ventilation. Several 1 ¼-inch holes were drilled in the top of the shroud to allow heat to escape. I also routed ½-inch wide by ¼-inch-deep vertical grooves (round nose bit) at several points along the sides of the shroud to allow air to flow past the reflector hood. The "chimney effect" of the warm air escaping through the top will draw cool air through these grooves and around the ends of the fixture to produce a constant air exchange within the housing. After finishing, the light fixture was mounted inside the shroud with small wood screws through the edges of the reflector. The cord exits the shroud on the backside of the shroud through another 1 ¼-inch hole.
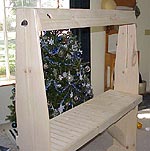
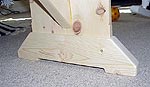
The end panels of the stand were cut from 1x12 ponderosa pine boards. After trimming the length to 60 inches, they were ripped to 10 ¾-inches wide. A 1 ¾-inch-long tenon was cut at the bottom of each panel to fit mortises in the feet. Shoulders of 1/8-inch on the sides and ¼-inch on the ends define the tenon from the end panel fields. To accommodate shroud adjustment a ¾-inch-wide by 3/8-inch-deep dado was cut down the center of each panel (inside surface) beginning at the top, running down 25 inches. I then centered a ¼-inch spiral router bit in the dado and cut a 20-inch-long through slot that starts 3-inches from the top. To be sure it is centered I made a pass from either side of the panel. The small amount of additional width of the slot insures the ¼-inch stud would slide easily when adjusting the height. The side panels taper to 5 ½-inches-wide at the top, beginning 25-inches from the top. I found I could cut one side of the taper with my tapering jig, but the angle needed to duplicate the taper on the other side was extreme. I used the cut sides to trace cut lines on the other sides of the panels, and then cut them with a jigsaw. Those cuts were then sweetened with a belt sander with both sides clamped together to be sure they were identical when finished. The feet are 18-inches-long, cut from 2x6 material remnants ripped to 4-inches-wide. Using my dado blade I cut away the center 12 inches of the bottom edge, 3/8-inch deep. This produced "feet" that would help the stand rest firmly on mildly uneven floors or carpet.
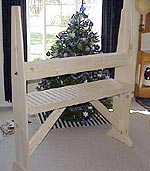
Using a 3/8-inch chisel in the mortising machine, I cut a mortise about ½-inch wide by 1 7/8-inches deep, centered in the feet. The mortises are 9 ¾-inches long. The feet were attached to the side panels with glue only. The fit of this mortise and tenon joint is tight enough that mechanical fasteners will not add any security. The frame for the shelf was built from 1x2 ½-inch stock with a 1/2x1/2-inch rabbet in the top (inside) edge, cut on the table saw. The shelf is 50 ½-inches long and 14 ¾-inches wide. The corners are joined with rabbets, glued and screwed. Rather than solid material, I opted for slats to form the shelf surface. I ripped ½-inch-thick strips from a 2x6, and then cut them to approximately 12 7/8-inch long at the RAS. I took my time making the first slat, setting a stop block on the RAS bed to make cutting the remaining slats a very quick operation. Each slat has a spot of glue and a 1 ½-inch-long finish nail at each end. I used a scrap from the ripping operation approximately 3/8-inch-wide as a spacer when installing the slats. This was purely a guess but worked out very well. I centered the first slat at the center of the shelf and worked my way to the ends. The last slats on either end were centered in the remaining space and are visually perfect. The shelf is attached to the side panels with glue and screws. I decided not to cut a dado in the side panels because of the surface area available on the shelf ends combined with the support of the braces would be more than sufficient to retain the shelf. Because the shelf is rather long, I wanted to add support in the form of braces from beneath. I cut 30-inch-long lengths of 2x6, then tapered them (with the tapering jig on the table saw) so the large end is 5-inches-wide and the narrow end 2 ½-inches wide. I had to be stylish somewhere!
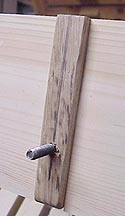
I held the braces in their approximate locations and marked where they met the underside of the shelf. Pieces of 1x6 pine were inlaid across the width of the (underside) shelf rails. The braces were then glued and screwed to the side panels and supports on the shelf. The stand became rock solid as a result. To complete the stand I installed ¼-inch hangar bolts in 3/4x3/4 pieces of oak that were glued into dados running down the center of the shroud end caps. This stud protrudes through the slot in the side panels. A large fender washer, a normal sized washer and a plastic knob provide clamping power to lock the shroud at the desired height. After sanding the stand was turned over to Beth for finishing. The wipe-on poly did seem to work as advertised; though halfway through the first coat, we were beginning to wonder. With the second coat applied, the wood began developing a nice sheen. The problem with a wipe-on polyurethane is rubbing it into the very complicated surface of this project. There are many areas that are much easier to get at with a brush than a rag. For this reason only, Beth doubts she will use the wipe-on poly on similar projects in the future. However, she does look forward to using this product on projects with more even surfaces. With finishing complete, I installed the light fixture within the shroud, and then hung the shroud in the stand. Beth loaded some plants and it was in use. Closer to spring she will begin growing plants from seeds for transplanting in the garden. Sorry - Plans are not available for this project. Do you have a comment about this page? - Email Me!
|

All written, photographic and drawn materials are property of and copyright by NewWoodworker.com LLC 2000-2019. Materials may not be used in any way without the written permission of the owner.