
This is a Veteran Owned site
![]()
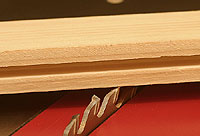 |
Using a standard 1/8"-wide blade, you can cut perfectly centered grooves for panels on your table saw. Click image to enlarge |
Cutting Centered Grooves on the Table Saw
A simple, fast and accurate technique
Text, photos and video by Tom Hintz
Posted – 12-6-2007
Safety: Cutting grooves on the table saw requires removing the blade guard and splitter. Despite the relatively small blade exposure the use of a good push handle or similar device remains mandatory to protect yourself.
Cutting small grooves that hold flat panels doors or bottoms in smaller projects is a common task that can be done on a table saw equipped with a standard blade. Often, these grooves are centered on the thickness of the stock, a task that is very easily done on the table saw. When done correctly, cutting these grooves is also very safe.
Setup
The only trick to setting up to cut a centered groove is to be sure the blade is at the correct height and that it is as close to centered on the stock as possible. With a little care, eyeballing this setup and looking at the blade and wood straight on makes setting the fence for the first cuts easy.
 |
Center the blade on the stock by eye. Take your time and you can get very close. The second cut in the sequence will center the groove perfectly. Click image to enlarge |
Using a featherboard to be sure the stock stays snug against the fence helps both accuracy and safety. Remember that after adjusting the fence for subsequent cuts, the featherboard will also have to be adjusted to maintain its contact with the wood.
Making the Cuts
Note: I use a piece of scrap with the same thickness as the project wood to confirm the initial and subsequent setups before actually cutting the project pieces.
At each fence setting, including the initial one, two passes are made on each piece being grooved. Push the piece over the blade making a full length cut, turn it end for end and run it over the blade again. Repeat this two cut sequence on all of the pieces for the project. The second cut insures that the groove is precisely centered on the wood.
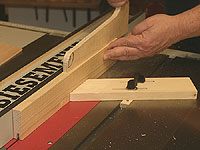 |
Use a push handle to move the stock across the blade! Make one cut, turn the piece end for end and repeat the cut. Click image to enlarge |
If you had the cut closely centered on the wood, the groove will almost certainly be too small for the piece that fit in it. Carefully bump the fence away from the blade slightly for the next cuts. Remember that the amount of change made to the fence is doubled by the two cut process that keeps the groove centered. Making very small adjustments is all that is needed in most cases.
Make another set of cuts in the scrap to be sure that the groove is not too wide. When satisfied with the fence position, re cut all of the project pieces. If the piece to be installed in the groove still does not fit correctly, make another small fence adjustment and repeat the process.
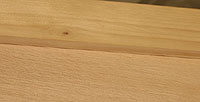 |
When sized right, the panel slips into the groove easily without extra room to rattle. Click image to enlarge |
The goal is to size the groove so that the piece to be installed in it slips in easily without excess clearance. Like any other interior panel, the pieces that fit into the grooves will normally float free with no glue used to secure it. Getting the right fit is important.
Splined Miter Joints
This grooving technique is frequently used to install splines in the mitered joints of a frame or similar project. It is important to note that trying to guide the mitered end of the wood over a table saw blade by hand is very dangerous not to mention highly inaccurate.
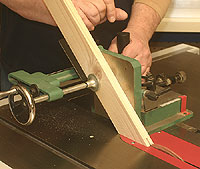 |
When grooving a mitered end, a tenoning jig is the only safe way to control the wood and make accurate cuts. Click image to enlarge |
The only safe - and accurate – way to make mitered grooves is to use a tenoning jig with the capability to secure the wood at the necessary angle. Since most tenoning jigs are guided by the miter slot rather than the fence all adjustments are made at the jig.
With the wood secured in the jig, the mitered end flat on the table surface, center it on the wood as close as possible and make the first pass. Since many tenoning jigs do not allow reversing the wood and securing it properly, using its adjustments are used rather than the fence. Make this first cut in all of the project pieces, all facing the same way. (See the video to make this point clearer)
After the first cut, look at the groove to see if it is centered. When making adjustments to widen the groove, adjust the jig so the next cut is taken to enlarge the groove in whichever direction is needed to more closely center it. With a little care, you can get the groove almost perfectly centered, certainly close enough to make detecting any error by eye almost impossible. Make the second cut on all of the project pieces and check the width. If it must be enlarged, repeat the adjustment and re cut all of the pieces until the panel fits into the groove properly.
Video Tutor |
This grooving process is very helpful, particularly when making flat panel doors or dust panels/frames. This grooving process is also the basis for tongue and groove joinery. It is simple and very accurate but best of all, no special tooling is needed. Be careful, take your time and perfect fitting, perfectly centered grooves are easy to make.
Related stories on NewWoodworker.com
Building Tongue and Groove Doors
Setting Table Saw Blade Height
Have a comment on this story? –Email Me!
Back to the Tips & Tricks List
All written, photographic and drawn materials are property of and copyright by NewWoodworker.com LLC 2000-2019. Materials may not be used in any way without the written permission of the owner.