
This is a Veteran Owned site
| |
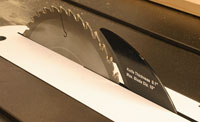 |
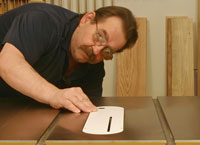
Installing a zero-clearance insert is safe and easy if you do it the right way. Click image to enlarge |
Installing Table Saw Zero Clearance Inserts
It's simple to be safe and do it right
Text, photos and video by Tom Hintz
Revised - 3-27-2008
Installing a ZCI (zero clearance insert) in a table saw is a common task. Not surprisingly, if you frequent woodworking Internet forums, you have seen more than one idea on how this is to be done. Unfortunately, some of the advice offered is outright dangerous and gives the folks who actually make ZCI's nightmares. The good news is that installing this useful accessory correctly - and as safely as possible - is easy.
By the way, ZCI are available for stacked dado sets as well. See the section at the end of this story for tips on the minor differences in the procedure.
Getting Ready
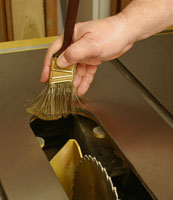 |
Before anything else, clean the throat cavity so the insert can sit flat on the bosses. This area should also be cleaned regularly as dust will become trapped under the insert and could tilt it. Click image to enlarge |
Because there is virtually no clearance along the sides of the blade, installing and adjusting the insert in the throat cavity is the first step. Take your time and get this part of the installation procedure right because the consequences of being lax can be painful and expensive.
First, make sure that the throat cavity is absolutely clean. If there is any dust or buildup, you want to get rid of that now. This should also be part of your regular maintenance because if the ZCI is held even slightly crooked by dust or debris, the blade can catch on it and bad things will ensue. Dust can (and will) work its way under the ZCI so take it out once in a while and clean the area out.
Make sure that you have the right blade installed. I always cut my ZCI for a full kerf blade. I hardly ever use thin kerf blades but if I need one, it will work with the full-kerf slot in the ZCI. Also, make sure that the blade is actually at 90-degrees to the table surface. Sounds dumb but you wouldn't be the first one to cut a ZCI at an accidental angle.
Also, make sure that you have the insert installed facing the right way. Better ZCI's have a relief cut in the underside directly above the blade. This relief provides clearance between the insert and blade so you can start the saw to make the cut. Make sure that the relief is directly over the blade before making any adjustments to the ZCI.
Fit and Adjust
 |
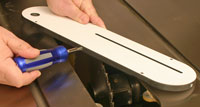 |
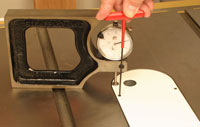
Next, adjust (left) the insert so that it is flush with or SLIGHTLY below the table surface. Also, turn the adjuster screws out (right) to eliminate side-to-side and front-to-back play. The insert should drop in but not rattle back and forth within the cavity. Click images to enlarge |
|
First, use the leveling screws to make the insert flush with or slightly below the table surface. By slightly below I mean in the 0.001" range. This is more to insure that the ZCI is not above the surface where the wood could catch on its edge. When you think you have this setting right, make sure that the ZCI does not rock front to back, side to side or across the corners by pressing downward directly over alternate adjusting screws.
Next, adjust the insert to fit the throat cavity. Most inserts have screw-type adjusters on two or more edges. Back those adjustments out so that the ZCI drops into the cavity with no front to back or side to side play. This can take a little fussing but is worth the effort.
Go back over both height and fit adjustments once more to be sure one process did not compromise the other setting. Once the insert is cut to fit the blade, changing either of these setups (or installing another blade) will mean having to re cut the blade slot to be sure it clears properly.
Using a stick, reach under the table and turn the blade to make sure it clears the ZCI. If your saw does not lower the blade sufficiently to clear the ZCI you can use a 7 1/4"-diameter circular saw blade (with a 5/8"-diameter arbor to match the table saw arbor) of the same width as your normal table saw blade. With the smaller circular saw blade installed you can make the initial cut, lower it fully and then replace it with your 10" blade to finish cutting the slot. Be sure to use the board clamped over the ZCI for the entire operation!
Restraining the Insert
 |
 |
I have seen frightening suggestions for restraining inserts from putting the fence over them (left) to holding them down with your fingers (right) while making the cut! Fences can lift and I shouldn't have to say anything about how dumb holding it with your fingers is. Click images to enlarge |
|
Here is where the biggest controversy often erupts in Internet forum discussions about installing ZCI's. This is also where ZCI manufacturers cringe, get a little dizzy and frequently utter long strings of words their Mothers would not be proud of. That is because some of the ZCI installation advice offered by the so-called "forum experts" can be absolutely frightening. Compounding the danger is the fact that the people asking these questions are often very inexperienced with a table saw and simply do not understand the forces available. It is painfully obvious that some of the aforementioned "forum experts" have even less of a clue.
One frequent bit of advice is to just park the table saw fence over part of the insert to hold it down during the cut process. The problem is that most fences these days do not lock down at the rear. If the blade catches while cutting the ZCI, the fence can be thrown up and because it is attached on your end, it will pivot towards you. Now you have the insert and the fence coming your way. It is also very easy to put the fence over where the blade will come through the ZCI, killing the blade, damaging the fence and maybe you if things go seriously wrong.
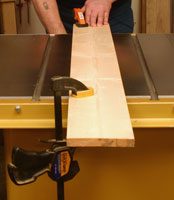 |
The good news is that virtually all zero-clearance insert manufacturers agree that clamping a board over the insert while making the cut is the best plan. It is easy, safe and the smart thing to do! |
A few others have recommended holding the ZCI down with a push stick while making the cut. The dumb factor of this idea is magnified by the fact that while holding the ZCI with a push stick, you have to bend over to crank the blade up to make the cut. That means that your face is now roughly at ZCI level and the push stick is probably moving on, or off of the ZCI. Here also the push stick can be in the path of the blade as it comes through the ZCI. And, this is not the dumbest I have seen!
The one that really stunned me was a fellow who holds the ZCI down with his fingers while raising the spinning blade to make the cut. He says he has never had a problem and knows where the blade will come through. Both assertions are foolhardy and stupid, perhaps not in that order. If this idea does not set off your "way too dangerous" alarms, you do not understand the problem.
Nearly all ZCI manufacturers recommend clamping a board across the top of the table saw, covering the ZCI entirely. A sturdy (no big knots or cracks) 3/4"-thick board will work just fine though many use 1 1/2" (actual thickness) material and there is nothing wrong with that! The really important thing is that the board must be clamped securely to the table saw at both ends and that it covers the ZCI.
Making the Cut
 |
Actually making the cut is simple. Raise the blade slowly, lower and raise it again occasionally to cool and clear the blade. Click image to enlarge |
(If your saw has a riving knife, make sure the ZCI insert is compatible. Also, the riving knife must be removed for cutting the slot.)
The idea is to start the saw and slowly crank the blade up. Sounds easy enough. The only real trick is to take your time. I like to lower the blade occasionally to let it get some fresh air to cool the cutting edges and sling out any dust that might be trapped in the gullets.
The next trick is how high to raise the blade. On some saws, the blade washers are rather large in diameter and may contact the underside of the ZCI before it reaches the maximum cutting height. In that case, I guess you redefine your definition of "full height" to slightly lower than where the washers contact the ZCI. In most cases, there will be plenty of blade exposed for most rational cuts. If not, you might have to investigate smaller diameter blade washers if the manufacturer has them available.
As you might expect, the large diameter blade stabilizer washers can be a real pain when used with a ZCI. If you are using a good quality blade, you won't need blade stabilizers anyway.
See the Process! |
Click the image above to see a video on installing a zero-clearance insert. (Approximate 5 minute runtime) |
When the blade has been raised fully and has cut the slot, lower it fully and then raise it again. I do this a couple of times just to be sure the slot is fully cut. Nearly all trunnions have just a touch of side to side movement during the raising and lowering process, often too little to measure accurately. However, that tiny extra motion will widen the slot just slightly, letting the blade spin freely with minimal contact with the sides of the slot.
Shut the saw down, let the blade stop and remove the board. Remove the ZCI and check it over for chips or frayed material around the slot. Sometimes the edge of the slot will have a small ridge that can be wiped away with a couple strokes with some fine sandpaper.
Clear the throat recess of dust and debris, re install your new ZCI and you are ready to get to work!
Stacked Dados and ZCI
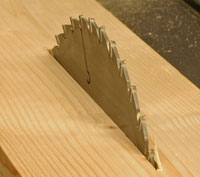
Some manufacturers offer ZCI blanks that are specifically designed for use with stacked dado sets. The Leecraft (my favorite ZCI manufacturer) ZCI blank in the accompanying photos shows the wider relief cut in its underside to accommodate the dado set.
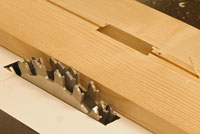 |
Installing a zero-clearance insert for a stacked dado set is virtually the same. This process is shown in the video as well. Click image to enlarge |
Your biggest chore is deciding how wide to make the stack for cutting the slot. I set my stack at a full 3/4" because I usually bury some of it under a sacrificial fence. Also, the remaining open area around narrower stack widths is not a problem for me. Think about this setting before cutting the ZCI!
Regardless of the width of the dado stack, the instructions for setting the ZCI blank up and cutting the slot remain the same. The only caution is to lower the dado stack more frequently during the cut process to help it dissipate heat and to be sure dust is being ejected.
Dado stack above-table height is generally much lower than a regular blade. Unless you have specific needs for running a dado stack at or near its full height, make the ZCI cut with the blades slightly higher than your normal cut height to insure clearance. Naturally, if you need to raise the dado stack higher, you will have to clamp a board over the ZCI and enlarge the opening as needed.
See my review of the Leecraft ZCI blanks - Click Here
Have a comment on this story? - Email Me!
Back to the Tips & Tricks List
All written, photographic and drawn materials are property of and copyright by NewWoodworker.com LLC 2000-2019. Materials may not be used in any way without the written permission of the owner.