
This is a Veteran Owned site
 |
You will probably have to adjust your jointer outfeed tables initially but remember that the outfeed table is NOT an every day tuning mechanism! |
Hands Off Jointer Outfeed Tables!
How not to adjust yourself out of the ballpark
Text, photos and video by Tom Hintz
Posted - 3-3-2007
For some reason jointer outfeed tables get blamed for virtually anything that goes wrong on this simple machine. If you watch the woodworking forums, regardless of what the original jointer problem may be, sooner or later someone will recommend raising (or lowering) the outfeed table to cure it. So far I have not seen anyone recommend turning the outfeed table sideways but I wouldn't be surprised to see it. It would be about as effective.
 |
 |
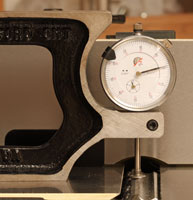
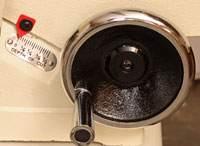
I always use my dial indicator (left) to set knives to the outfeed table or to check that the outfeed table is flush with the knives. Many jointer instruction manuals show this procedure using a good straightedge (left) which will work also. The dial indicator is more accurate because it clearly shows any error. If you notice in the photo at left, this outfeed table is off by 0.001"! Click images to enlarge |
|
I realize that it is possible for the outfeed table to be set wrong. This is a setting that we need to check and correct when needed. Nearly all manufacturers specify that the knives must be set even with the outfeed table surface. The outfeed table may need to be adjusted slightly to bring it into alignment with the cutting edge of the knives when they are at the top of their arc. Once this setting is correct, lock the outfeed table in place and then LEAVE IT ALONE! There are very few operations that require moving the outfeed table from this setting. This should be one of the things you check during regular maintenance but unless you are carrying the jointer around by the tables, it should not change significantly or need frequent adjustment.
When replacing or sharpening the knives, they are aligned with the outfeed table during installation. In most cases that is the easiest way of insuring that all of the knives are parallel to the outfeed table surface and all at the same height which insures that they work together. Using the outfeed table as the reference point makes it far easier to install the knives correctly. When they work equally, wear is distributed equally and the knives cut longer between sharpening.
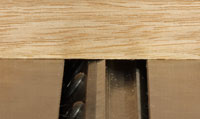 |
If the knife at the top of its arc is not flush with the outfeed table surface, it simply cannot cut a straight edge on the wood. Click image to enlarge |
If you stop and think about how a jointer works, having the outfeed table flush with the knives (at the top of their arc) just makes sense. It really can't work properly any other way. If the surface of the outfeed table is not flush with the knives, there is no way that it can straighten an edge or face. Once the straightened edge gets onto the outfeed table, we want the rest of the board to follow so the knives can continue cutting the rest of the edge straight. If the outfeed table is higher or lower than the knives, that simply can't happen.
Solving Problems
If you are having a problem with the cuts produced on your jointer, checking the setup of the machine, including the outfeed table relation to the knives is a good thing. Adjusting outfeed table height in an attempt to correct problems with a cut is a sure way to complicate things and begin the downward spiral to a totally miss-aligned jointer.
 |
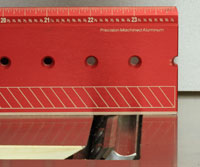
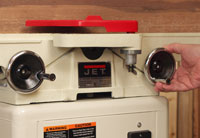
There is a reason that the infeed table has a scale that shows its position relative to the knives and the outfeed table does not. the infeed table is made to be adjusted during use, the outfeed table is adjusted to correct its relationship with the knives and for very rare specialty operations. Click image to enlarge |
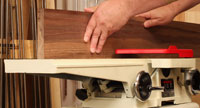
The jointer is a very simple machine but one that depends heavily on technique to produce the best results. If you are having problems with tapering of the board, accidental bevels or cutting arcs (up or down), there is a very good chance that your technique needs tweaking rather than the outfeed table.
We also have to remember the capabilities of a jointer. Because it only works with one side of the wood at a time, it has no way to know if it is cutting a taper or not. Take enough passes and it is very likely that the wood will begin to taper. Apply pressure in the wrong place while making cuts and you can accelerate that tendency to taper or wedge the wood. The trick is to learn to apply pressure correctly as the wood moves across the jointer and then take it to the planer to make parallel faces. See my story on the jointer in the Basics section (link below) that goes into the procedures I more detail.
It is also important to take light cuts and a feed rate that is slow enough to let the jointer do its job. I set my jointer to take about a 1/32"-deep cut and locked it down. That was a year or so ago and I have not changed it since. It might take a few more passes to finish an edge but I know I am not straining the machine or the wood and I don't waste wood.
 |
You absolutely should check the outfeed table to be sure it is set correctly. After that, confine table adjustments to the infeed side! Click image to enlarge |
Learning to get the feed rate correct is a matter of practice and looking at the results. One way to tell you are going too fast is to find ripples in the jointed surface. That is a good indication that you are forcing the wood into the knives a little too fast. The outfeed table height is fine by the way. You just need to slow the feed rate slightly.
Conclusions
The moral of all this is that the outfeed table is not the answer for most cutting problems on the jointer. Technique is way more likely to be the issue. We need to check the outfeed table alignment to be sure it is flush with the knives but that's it. Setting the outfeed table above or below the knives will only complicate the matter and put you farther away from the solution.
Related Story
Have a comment on this story? - Email Me!
Back to the Tips & Tricks List
All written, photographic and drawn materials are property of and copyright by NewWoodworker.com LLC 2000-2019. Materials may not be used in any way without the written permission of the owner.