
This is a Veteran Owned site

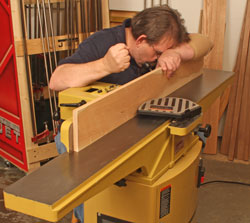 |
I know it's frustrating but just because your jointer tends to taper the wood doesn't mean it's busted - or out of adjustment. Click image to enlarge |
My Jointer Cuts Tapers!
Of course it does, but relax, it’s not busted
Text, photos and video by Tom Hintz
Posted – 11-28-2008
The jointer is a very old, frequently used but mysterious woodworking machine. It looks so simple yet is highly technique dependent. The most common misconception about the jointer is that it is capable of intentionally cutting parallel surfaces. Lots of woodworkers are surprised when after taking a few passes on the joiner, they find that the board is getting thinner at one end than it is at the other. If you take one or two passes to true up a surface, the taper is not likely to be severe. Take several passes and tapering can be rather pronounced.
Even more confusing is that with a properly adjusted fence, while the jointer is accurately producing surfaces that are square to each other, one or both can be tapered. The result is surfaces that can be perfectly square to each other but not parallel. I have had absolutely astonished people send me photos of this phenomenon. It comforts some of them to hear that years ago, before someone enlightened me, I also sat next to my jointer amazed at the square corner I had created on a now tapered piece of wood. There is a logical explanation.
 |
 |
The jointer works off of its tables (left) and cutter. There is nothing to follow the opposing face so it has no idea if it is cutting one face parallel to the other. You can reduce the amount of taper by limiting the number of cuts and keeping the pressure as much on the outfeed table (right) as possible
Click images to enlarge |
|
No Reference
The reason the jointer cannot cut parallel surfaces is that is has no way to follow the opposing surface. It only “sees” the surface that is on the beds and passing over the cutterhead. It uses that single point of reference to cut that surface flat and straight but it has no idea about how that cut relates to the opposing surface.
Where the table saw has the rip fence against which we can place the jointed edge so the blade can trim the opposing edge parallel, the jointer has nothing. Where a planer has the table surface against which we put a jointed face so the knives above it can cut the opposing surface parallel to it, the jointer has air. Even worse, in place of these straight and stable guiding surfaces, the jointer has us pushing down on the (hopefully) jointed surface being cut. It is also safe to assume that more than a few are also applying that downward pressure in the wrong place at the wrong time. The fact that a jointer tends to taper the board should come as no surprise.
Limiting the Taper
 |
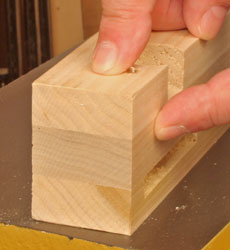 |
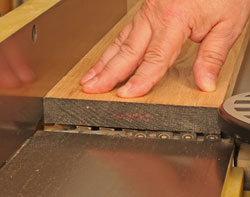
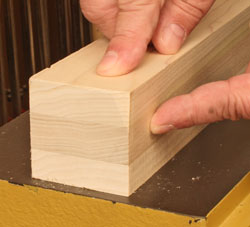
These photos are of the same stick of wood. I am pointing to the side that were jointed straight and square to each other. the end on the left remains square but after several passes on one edge you can see how rectangular the opposite end of that piece of wood is. those edges are perfectly square to each other but not the least bit parallel. Click images to enlarge |
|
Of course, the jointer must be set up according to the manufacturer specifications to work correctly in the first place. We want the jointer operating efficiently so it can straighten the surface with a minimum loss of wood. Contrary to some woodworking forum “experts”, there is no magic setup that will coerce the jointer into suddenly becoming capable of cutting parallel surfaces. I have seen suggestions to raise the knives, lower the knives, lower the outfeed table, raise the infeed table (yes, in the same suggestion…) and just about everything else this side of standing on one foot with a pickle in your right (hip) pocket. What works best is having the jointer set up according to the manufacturer instructions and specifications.
Another key to limiting taper is to use good technique. Concentrating downward force on the infeed table rather than the outfeed table, especially late in the cut can dramatically increase tapering. Using excessive downward pressure on either end of a board is a sure way to induce tapering. The idea is to guide the board over the jointer knives with the least amount of downward pressure necessary and to focus that pressure on the outfeed table when enough of the board is jointed flat. For more on jointer technique, see the Jointer Basics link at the end of this story.
Jointer and Planer
 |
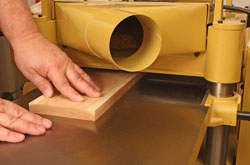 |
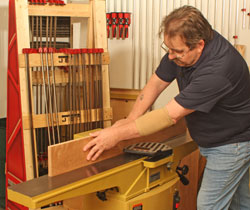
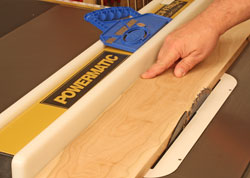
The table saw (left) has the rip fence to guide the machined surface so its blade cuts the opposing edge parallel to it. the Planer (right) has the flat tables and its knives mounted parallel to the table. PUt the jointed surface on the table and the planer cuts the opposing face flat, smooth and parallel to the face against the table. Click images to enlarge |
|
The only way to get truly parallel wide surfaces is to joint one surface flat and straight and then take the wood to the planer. Put that jointed surface on the planer bed and let the planer knives cut the opposing surface flat and parallel to the one you jointed. When working with the edges, joint one edge straight, go to the table saw and put the jointed edge against the rip fence. You can then trim the opposing edge parallel to it with a simple rip cut. If the wood is thick enough, you may be able trim the second edge in some planers with the wood going through on edge but follow the recommendations of the planer manufacturer on this! I normally use the table saw for trimming edges.
So why not just use the planer to straighten the wood AND make the opposing sides parallel at the same time? A planer is not designed to do the jointers work, like removing defects from the long axis of a board. If the board has a twist or bow on its long axis, the relatively narrow surface directly below the planer knives and feed rollers means it will duplicate most if not all of that twist or bow. Also, the amount of pressure necessary for the planer to control the wood means it can flatten the wood against the tables during the cut only to spring back to its original shape as it comes out from under the rollers. The opposing surfaces will be parallel but all or most of the defect will remain. The jointer should be used to remove the twist or bow on one surface and then the planer can make the opposing surface flat and parallel to it.
Video Tutor |
I know it would be nice if the jointer could make opposing surfaces flat, true AND parallel but it will not, can not and won’t. You can try the “secret setup” ideas but it is unlikely you will accomplish anything other than screwing up what probably was a properly working jointer. You can minimize a jointers tendency to taper with good technique and proper setup. Some folks have built all sorts of Rube Goldberg looking jigs and fixtures trying to get a jointer to act like a planer but even the moderately functional ones are major league compromises. Some are impressive looking, some are outright dangerous but I have never seen one of these devices come close to matching the performance of a real planer.
In the end, we just have to accept reality. The thickness planer is a standard fixture of any decent woodworking shop for a reason. It is the machine that is designed to make surfaces parallel while it reduces thickness. One of the jointer functions is to create the machined surface that lets the planer do its job.
Sometimes life is simple if we just let it be.
Related Content
Jointer Problems, Causes & Fixes
Have a comment on this story? Email Me!
Back to the Tips & Tricks List
All written, photographic and drawn materials are property of and copyright by NewWoodworker.com LLC 2000-2019. Materials may not be used in any way without the written permission of the owner.