
This is a Veteran Owned site
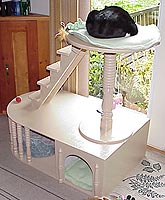
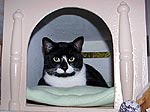
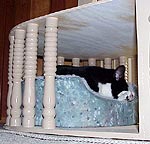
Kitty CondoLathe-Induced Design ExtravaganceText and photos by Tom Hintz What happens when you try to build what could have been a simple kitty condo in a shop with a new lathe? 18 columns, a total of 158 beads and 19 balls, among other spindle fanciness, highlight the excesses resulting from a near total lack of design control. Let's hope the cats are impressed. Base CabinetThe base cabinet is made from 7/16"-thick plywood with the top and bottom panels being 36" long and 22" wide. A 22" radius was formed on one end, cut with a hand-held jig saw while both pieces were clamped together. Before removing the clamps, the edges were matched and smoothed with a belt sander. The CubbyThe right end of the base cabinet has panels that create an enclosed cubby with inside dimensions of about 12" wide and 21½" long. The cubby's long panels (front to back) are 11½" tall, and set into a ¼"-deep dado near the middle of the base and a rabbet at the right end. This produces an even 11" between the top and bottom pieces, sized for the short columns to be added later. The front and rear end caps were cut to fit within the new openings. All
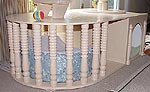
of these parts are glued and brad-nailed in place. To increase the strength of the cubby, which supports the tall column, 1" triangular braces were added to all four corners, and along the top edges. The triangle pieces are 5" long, cut from oak pieces being trimmed for an unrelated lathe-bound project. An arched doorway 7" wide and 8" tall was cut into the front panel of the cubby. The rear panel faces a glass exterior door so a 1¼" X 7½" horizontal slot-style window was cut to allow the cats to spy on the backyard wildlife. The inside of the cubby was coated with white primer only and will be decorated with a custom-made pad courtesy of my wife, Beth. TurningsThis project includes 18 turnings, 16 of which make up the left boundary of the base, one large column supporting the top platform, and a split turning that makes up the decorative half-columns flanking the cubby entrance. All blanks for these turnings came from common 2X4s. Knowing that most of the blanks would be rather short meant picking through the stack of 2X4s was somewhat easier. I could focus on fewer knots rather than finding increasingly elusive straight pieces of lumber. A little judicious trimming eliminated nearly all knots from the finished blanks, which made the turning easier for my novice skills.
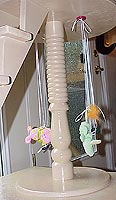
The 16 smaller column blanks were 11" long and 1½" square. I made a guide stick, also 11" long, on which the layout was marked along one edge. After rounding each blank to a cylinder, transferring the pattern to the blank was quick, easy, and a practice that in most cases assures consistency in the finished parts. Fledgling turning skills once again showed themselves and I was able to make a few mistakes anyway. Those "mistakes" were installed along the back edge of the finished project. The large column was made from two lengths of the 2X4, laminated with their grains opposing (bark sides together) to enhance stability. The blank was trimmed to 22½" long and 3-inches square. The final in-the-round dimension would be just under 3". The blank for the split turning was made from two 10½"-long pieces of ¾"-thick pine board cut 1½" wide. I applied Titebond II to both mating faces, and then placed a single thickness of common newspaper between them before clamping. When the glue dried, the ends were trimmed square, bringing the overall blank length to 10" in the process. The final design for the turnings was inspired by from my daughter, Jenny. Our cats continue to go through the scratching motions on various things around the house even though they have been claw-free since they were kittens. Jenny thought a series of beads on the upper portion of the turnings might attract the cats scratching urges. I needed (and still need) practice making beads with the skew chisel, so the plan was struck. Exactly how I arrived at nine beads per column was less than scientific. It just looked right.
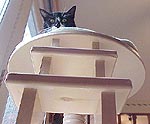
The tall column was patterned after the shorter versions, but with 14 beads instead of nine (looks again) and all other dimensions expanded to accommodate it's size. The split turning was actually something I was playing with before beginning this project. I came across the already finished pieces while building the kitty condo, held them up alongside the cubby door, and presto - instant ambiance. After assembling the upper and lower base sections and cubby, the short columns were added. They are spaced roughly 2¼" on center to avoid the cats getting their heads stuck between them. You should alter this spacing to prevent the same thing with cats in your home. Since these columns are the structural support for the entire left side of the base, I used a dab of glue and a 1¼"-long drywall screw on each end of each column. All of these screws are set into shallow countersinks. Those on the upper surface were filled with spackle and sanded smooth prior to finishing. Perhaps a little overkill, but the result is strong and rigid. Upper PlatformThe upper platform, which mounts to the top of the large column, is 19-inches in diameter, and cut from ¾"-thick plywood to resist flex and warping. A slightly smaller (13" diameter) round plywood (7/16"-thick) base, attached to the bottom of the column, provides adequate surface area to insure secure attachment of the column to the base. The column is attached to the upper and lower plywood pieces with 1¼" diameter tenons, ¼" long that fit into recesses in the plywood pieces. Glue and three screws in each end (one centered, then one on either side of that) make a very rigid joint that should withstand whatever force the cats may generate when jumping up onto the platform. Stairway
I thought long and hard about how to further support the upper platform, while providing a way for the cats to get up there when jumping was too much for their occasionally lazy attitude. A ramp was considered first but it would have to be rather steep and might represent a problem to clawless cats. Then I noticed the ease with which cats negotiate other stairs in our house and the dilemma was resolved. Because cats climb stairs in short hops rather than walking up them like us, the risers, at 4¾" are exaggerated compared to the 3½" X 7" treads. The treads look a bit narrow, but the round paws of a cat have more than enough area available. The angle at the top and bottom of the stair stringers for this project is 36 degrees. That angle places the bottom stair far enough from the cabinets edge to give the cats room to maneuver easily. The stair stringers are attached to the underside of the top platform with glue and screws. The bottom of the stringers was glued only as the predominant forces will be downward. FinishingI decided to finish this piece myself, mainly because the official finishing department, my wife, Beth, was busy with other things at the moment. I should have waited.
To seal the wood, I first applied a coat of Kilz water-based primer. I used a good bristle brush, anticipating the difficulty of coating all those turnings. The contortions necessary to prime inner portions of the short columns convinced me an alternative painting method would be necessary for the topcoats. To this day, I fear I may have primer on my body in unusual places. The only legitimate alternative to a brush for this project was spraying. I do not have power spraying capabilities in my shop so four cans of gloss, sand-colored enamel were used. Spraying was much easier than using a brush, but still not a walk in the park. I applied two coats to the interior surfaces, then moved to the outside, applying three coats to those surfaces. A note of caution: Despite the enamel feeling totally dry, most paints require several days (varies greatly depending on humidity and temperature of the environment) to completely cure chemically. Until then, some paints emit an odor cats appear to be less than fond of. Our cats avoided the new condo for a few days, then sniffed their way closer and began using it, about a day after I could no longer smell the paint. Is this kitty condo over-designed? Absolutely. There were many construction options which the cats probably would have liked as well. I suspect the majority of pet house design is intended to please the owner more than the pet, anyway so I indulged myself, satisfying some of the "must turn" urges in the process. Lathes are an addictive machine. Do you have a comment about this page? - Email Me! |
All written, photographic and drawn materials are property of and copyright by NewWoodworker.com LLC 2000-2019. Materials may not be used in any way without the written permission of the owner.