
This is a Veteran Owned site
| |
||||||||||||
Laying Out An ArcIt's easier than you think.Text and photos by Tom Hintz Arcs are a common feature in woodworking, but laying them out correctly for your project can lead to uncommon frustration. I suspect there is a mathematical formula to accurately find the correct pivot point, and that someone will send it to me. If the formula involves more math than entering my pin number at an ATM, I want an easier way. With a little simple geometry, (VERY simple, I promise) laying out an arc with the precise contour you want, regardless of size, is easy. The method described here involves drawing several lines, finding the center of two of them, and then connecting the dots. Even I can handle that so you can also.
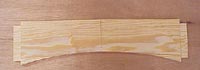
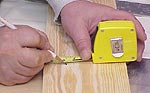
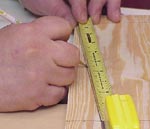
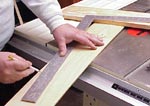
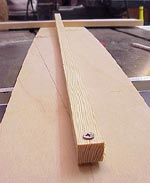
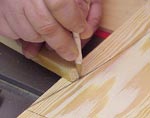
Two important pieces of information are necessary, the length of the arc, and the amount of rise at the center. Remember that the arc will be cut into the portion of a board between whatever material is reserved for jointery. Before laying out your arc be sure to mark off the portions of your piece used for jointing. If you are going to cut tenons on the ends of this piece, lay out the arc first, cut the tenons, then cut the arc, especially if you are using a band or jig saw to make the arc cut. We will assume that your arc ends at the bottom of the board, as they usually do. If you would like to end the arc above the bottom edge of the board, base the procedures below off of a horizontal line that connects the end points of the arc. In addition, we assume the arc is centered between the ends of the board. 1. First, we have to locate the end points of the arc. If the arc is to run all the way from end to end (remember the joints) we can use the lower edge of the board where it meets the lines marking where the jointery begins. If you want the arc to end before the end of the usable board, mark that distance on each end. 2. Draw a vertical line at the center point, 90 degrees to a horizontal line between the arcs end points. You will need to extend this vertical line well below the workpiece. Attach a piece of scrap several feet long to the back of the workpiece extending downward with its center aligned with the workpiece center. Draw a line down this additional piece along it's centerline. 3. Measure up the center line (above a line through the arcs end points) and mark the high point of the arc. 4. Draw a straight line connecting the arcs top and the bottom left end of the arc. Find and mark the center of this diagonal line. 5. Using a square, draw a line (90 degrees to the diagonal line drawn in Step 4) from the diagonals center point and extend it until it crosses the vertical line extended down from the arcs center. That intersection is your pivot point to draw the arc. To actually draw the arc you can use a tight string anchored at the pivot point with a pencil tied at the proper length to hit your upper mark. You could also use a length of wood strip in place of the string or build a wedge-shaped jig to use at your band saw if you have several pieces to cut. As you experiment with this process, you will find it very easy to do. You will also notice that the shallower the arc, the farther down the centerline the pivot point will be. This process is accurate and easy, once you do it. It sounds far more complicated when written out like this than it really is. Try it and you will be making perfect arcs every time. The ability to accurately lay out arcs will make building many different projects more fun, and provide better results. Do you have a comment about this page? - Email Me! Back to the Tips & Tricks List
|
All written, photographic and drawn materials are property of and copyright by NewWoodworker.com LLC 2000-2019. Materials may not be used in any way without the written permission of the owner.