
This is a Veteran Owned site
 |
||||||||
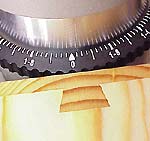
Leigh Jig TipsText and photos by Tom Hintz The quality and precision of the Leigh D4 dovetail jig leaves little room for improvement. The tips that follow work for me, in my shop, but you have to decide if they are beneficial in your use of the Leigh D4. None of these tips actually improves the output the D4 is capable of, but rather prevent an error make some things easier for me. When in doubt, follow the Leigh instructions. Square StockSet up and use the Leigh D4 correctly and this jig cuts extremely precise joints that have little if any slop in them, particularly with hardwoods. That means there is virtually no "adjusting" the alignment of the pieces during assembly. Cut dovetails in the end of a board that is not square and that error is transmitted along the length of that piece. Depending on the length of the piece, the error could be magnified considerably at the other end, reducing the chances of your project coming out square. The upside is that with square-cut lumber, the D4 cuts perfect joints that work just as hard to keep your project properly aligned. Take your time preparing the stock before cutting dovetails and the results will be rewarding. Reading ScalesThe Leigh instruction manual and video both advise viewing scale graduations straight on to avoid small errors. Take this advice to heart. The D4 is extremely accurate, and the scales allow tiny adjustments to perfect joint fit. However, read the scales at an angle and you could compromise this accuracy and make repeating a set up virtually impossible. I experimented reading scales at varying angles and found Leigh is absolutely correct. Read the scales from a straight on perspective and everything works as anticipated. Bit Depth and the Porter Cable 690
When adjusting bit depth to perfect the fit of a half-blind joint I found the adjustment ring on my Porter Cable 690 router very effective. The pieces I was working with would go together, but tighter then I liked. I set the adjustment ring on zero, and then raised the bit two graduations, about 0.04-inch. That change produced a perfect tap-together fit. As with all dovetail jigs, bit depth changes necessary to correct fit problems on the Leigh D4 are tiny. Using the routers built-in depth indicator is the easiest way to quantify the changes made. Get used to using this function and dialing in the right bit depth gets easier every time you do it. Bridges
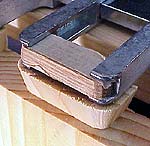
When separating the D4's finger halves to create your favorite layout, the gaps between those halves must be filled when they exceed 1/8-inch according to the instructions. These bridges prevent accidentally routing out areas intended to remain untouched. The bridge pieces must be ½-inch-deep and about 0.261 to 0.263-inches thick to fit in the finger cavities snugly. The length is determined by the layout. The best plan here is to cut hardwood strips at the correct width and thickness, and cut your bridges from them. Once the saw is set up, I cut several long strips from which I can cut bridges in the future. Save your bridges after use for when a similar layout allows you to use them again. If you have ¼-inch-thick stock laying around, I found that a layer of masking tape on the top and bottom surfaces sizes them up enough for an interference fit that keeps them in place. Sliding Dovetail Setup
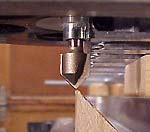
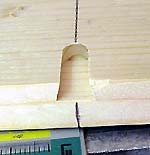
Of all the operations the Leigh jig is capable of, setting up for sliding dovetails is one of the less exact. We can improve on the set up for cutting the groove with a simple procedure. Plus, this technique works with any bit/bushing combination that is compatible with the Leigh jig. Be sure to check that the bit rotates freely without contacting the jig before plugging the router in! Cut a 45-degree angle across one end of a ¾-inch-thick piece of stock that will be used as both a setup tool and later, the vertical support. The other end of this piece should be square. Install this board in the vertical clamp; the 45-degree end up, slanted away from the jig. Make sure you have the collet installed in the router that will be used with your choice of dovetail bit. Temporarily install a pointed bit in the router. There are purpose made centering bits, but any bit with a point, such as a v-groove bit, does the job. Install the sliding dovetail guide bar in the finger assembly, set the router in place, with the guide bush against the bar. Adjust the bit so the point is just above the point of the angled end of the vertical support. Adjust the finger assembly in and out on the support arms as needed to align the tip of the bit with the tip of the vertical support wood. Tighten the finger assembly and double check to be sure the point of the bit remains aligned with the point of the set up board. Read and record the position of the finger assembly at the indicators. Keep this information, labeled with the dovetail bit and bushing this particular setup works with. To use any other bit and busing combination you will need to go through this set up procedure using that specific bushing. The vertical support wood can be used with either the square or angled end up. I like using the pointed end as it makes aligning the layout line for the dovetail groove easier, and probably more accurate. Place the board in which the sliding dovetail groove will be cut into the horizontal clamps, aligning the layout mark with the edge (or point) of the vertical support board. With the finger assembly on the marks determined in the set up procedure, the bit cut a groove perfectly centered on the layout line. Follow the Leigh instructions for cutting the male sliding dovetails. If I stumble across additional techniques that make using the Leigh D4 easier, I will add them to this page. The more I use the D4, my hopes of improving on the techniques associated with it diminish. But, you never know. Do you have a comment about this page? - Email Me! |

All written, photographic and drawn materials are property of and copyright by NewWoodworker.com LLC 2000-2019. Materials may not be used in any way without the written permission of the owner.