
This is a Veteran Owned site

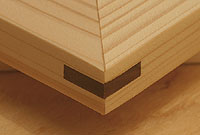 |
Whether used to strengthen or visually enhance a joint, splines can be very useful if they are made right. Click image to enlarge |
Making & Using Splines
Grain direction is the key
Text & photos by Tom Hintz
Posted – 1-7-2007
Before super-strong modern adhesives and easy-to-use biscuits came along, woodworkers frequently used shop-made splines to reinforce some forms of joinery. Splines were also used to aide alignment and in some cases, to close the gap between loose-fitting boards. The ability to create straight, square mating surfaces combined with drastically improved glue strength has substantially reduced the need for splines in today’s woodworking. However, there remain situations where this technique can be useful, providing they are made correctly.
Grain = Strength
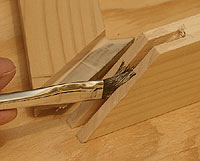
For a spline to add strength to a joint, its grain must run across the joint, not parallel to it. Flex a piece of thin wood along the grain and it snaps easily. Now, take one of those pieces and try to snap it with the grain running from hand to hand. The difference is dramatic.
 |
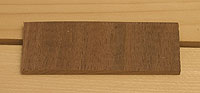 |
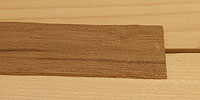
With the grain running parallel to the joint, this spline joint (left) is likely to be weaker than a clean butt joint. With the grain running across the joint, (right) this spline would add considerable strength to the joint. See the Video Tutor below for a demonstration of this strength difference. Click images to enlarge |
|
The same fragility of grain structure makes installing even a properly formed spline along the edges of long boards to create panels minimally useful. Even if the spine is perfectly made, fit and glued all we have accomplished is making what should be a simple joint far more complicated. The result is a joint that in many cases is weaker than a properly glued edge joint.
Also, because of the necessary grain direction, finding material of sufficient width to make splines that are long enough to use in panel glue ups is next to impossible. Using multiple shorter splines is an option that might work but should make you consider the benefits of using biscuits, a glue line router bit or even a shallow tongue and groove joint.
Spline Uses
Adding splines to relatively narrow miter joints adds considerable strength because the grain of the wood into which it is installed runs diagonally to the spline. If the groove is properly cut in both pieces, the spline also aids in alignment of the pieces, which can make assembly far easier. When contrasting wood is used to make the spline, it can add an attractive visual feature to the joint. Projects like picture frames or even boxes with mitered corners represent some of the more common situations where splines remain a very good alternative.
 |
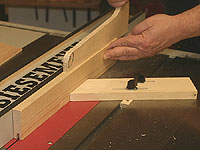 |
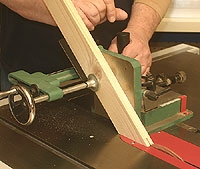
A good tenoning jig (left) is the only safe (and sane) way to cut spline grooves in mitered ends. Click image to enlarge Long splines can be set into centered grooves (right) cut on the table saw. Click images to enlarge |
|
A less common use of splines is to close the gap between boards used to make the floor of flower or sand boxes. These boards are generally relatively thick and well supported around the perimeter and do not depend on glued edges for strength. In these instances, the spines are installed without glue to allow the boards to expand and contract freely but still close the gap between the boards to prevent the dirt or sand from escaping. Some woodworkers will add a few spots of glue to one side of the spline to “freeze” it in place.
Sizing Splines
There are many theories on determining the size of a spline for a given joint. The most common seems to be using a spline thickness equal to 1/3 of the thickness of the wood into which it will go. For example, when joining ¾”-thick pieces, a spline ¼”-thick is about right.
The depth on the spline into each of the pieces being joined is generally 2/3 of the thickness of the pieces being joined. Using the same ¾”-thick wood, the spline depth would be approximately ½” into each piece. To be sure the pieces being joined close fully, the spline has to be cut slightly less than 1”-wide. In this case, “slightly” means just that. To maximize effectiveness, (and glue area when used) the spline fit must be near perfect in both thickness and width.
Preparing the Pieces
 |
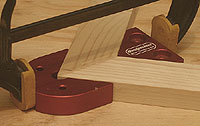 |
(left) Apply a thin, even coat of glue to all surface, including the spline. These Miter Clamps from Woodpeckers (right) work great for clamping 90-degree corners. Click images to enlarge |
|
Centering the groove for the spline in the thickness of the pieces being joined provides the most strength overall and is actually the easiest to do in most cases. Since most splines used in the average wood shop will be around ¼”-thick, I use a standard 1/8”-wide kerf blade in the table saw to make them.
Adjust the blade height to the depth of groove needed. Set the fence so that the blade is as close to centered on the stock as possible. Make one cut down the edge of the piece, turn it end for end and repeat the cut. This automatically centers the groove.
If the spline does not slip into the groove, move the fence away from the blade slightly and repeat the two cuts on each piece. Remember that the distance the fence is moved is doubled when the cuts are made so very small adjustments are needed.
The width of the groove should allow the spline to slip in easily without slop. This fit leaves enough room for glue while keeping the piece perfectly aligned. Test fit the pieces together with the spline in place to be sure the joint closes fully.
Video Tutor |
Cutting the groove in mitered ends for assemblies such as frames is dangerous if attempted by hand. The only safe way to cut these grooves is with a substantial tenoning jig. (See our story Cutting Grooves on the Table Saw for more on cutting grooves.)
Gluing and Assembly
When the splines are glued, use a small acid brush (or similar) to apply a thin but consistent coat of glue to all surfaces of the grooves and the spline. Slip the spline into one piece, slip the other piece over the spline and repeat for the remaining pieces if there are more. Put the assembly in clamps and apply just enough pressure to close the joints and raise small beads of glue along the joint line. Make sure the pieces are flat in the clamps and allow to dry.
Though splines are used less frequently these days, knowing how to create them remains a good skill to have. In addition to strengthening some types of joints, splines made from contrasting wood are frequently added ass a purely visual feature. The key is knowing when a spline is beneficial and when it is just more work.
Related Stories on NewWoodworker.com
Cutting Grooves on the Table Saw
Woodpeckers Clamping Solutions Review
Have a comment on this story? –Email Me!
Back to the Tips & Tricks List
All written, photographic and drawn materials are property of and copyright by NewWoodworker.com LLC 2000-2019. Materials may not be used in any way without the written permission of the owner.