
This is a Veteran Owned site

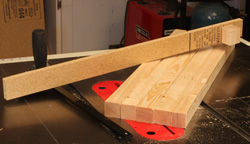 |
This jig is dead easy to make but an produce dead on accurate cuts at your table saw. Click image to enlarge |
Repetitive Cut Miter Gauge Jig
Repeatable accuracy on your table saw
Text, photos and video by Tom Hintz
Posted - 6-28-2011
Having to cut a number of pieces to the same length is a common task with woodworkers and DIY’ers. Carefully measuring and cutting each piece can get you close but being able to cut all of the needed pieces exactly the same length is a whole bunch better. Being able to cut a large number of pieces quickly is also nice.
You can buy aftermarket miter gauges that have extendable fences and adjustable flip-stops but if you still have the miter gauge that the factory sent along with your table saw we can make a simple but totally accurate jig ourselves.
Pick a Length
 |
 |
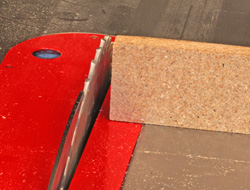
Remember that the fence face has to clear the blade (left) in the configuration it will be in for the cuts. Here I have the fence already tilted to 6-degrees. When measuring for where to install the stop block make sure that you are measuring from the edge of the blade, not the end of the fence! Click images to enlarge |
|
This jig is easy enough to make that you might just want to build them as you need them. Or you can make up a longer one and relocate the stop block as needed later on. The important thing is to keep the length manageable for your saw and miter gauge. The jig in this story was built around making porch rails that are 1-1/2”-square and 27”-long with a 6-degree cut on each end.
I want to give myself a little room so I cut a ¾”-thick board 30”-long and 2-1/2”-tall. This fence face should be a little taller than the miter gauge fence itself so you can hold the wood against it easily. With the miter gauge in its slot next to the blade I put the fence face against it and make sure that it will clear the blade, in this case with the blade at a 6-degree angle. Then I screw the fence face to the miter gauge through the holes nearly all miter gauges have just for this purpose. Make sure that the screws are not so long that they come through the front of the fence face where they can damage the wood held against it.
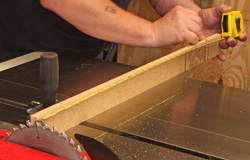
With the fence face screwed in place I get out my artists triangle to make sure that the miter gauge is set 90-degrees to the miter slot. Taking the time to check this makes sure that you are making pieces with truly square ends.
Stop and a Spare
 |
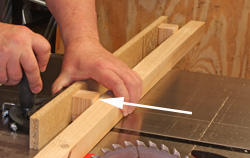 |
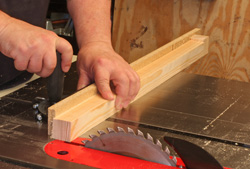
The stop block (left) insures that the final cut is perfect every time. To make the initial cut to clean up the first end we need to cut a similar block (arrow, right) that we can use as a spacer. That way the workpiece is parallel to the fence face and the first cut is correct. Note that I place the block where I normally hold the stock with my hand. No need to get close tot he blade with this block. Click images to enlarge |
|
The stop block for our jig can be cut from just about any piece of wood but a chunk off of a common 2X4 works fine. I want this piece wide enough that I use drive two screws to secure it to the miter fence board. I usually insert the screws through the miter face board I made just because it is easier.
Because we often want to cut one end square or as in this case, to a 6-degree angle before we make the final cut to length we need a way to hold the piece parallel to this jig during that first cut. The simplest way is to just cut a second block from the 2X4, also a few inches wide. We can place this block against the board fence where our hand is holding the work piece. That way it is against the stop block and this spacer block which holds it parallel to the miter gauge fence. We can make the first end cut, remove the work piece and the spacer block, turn the workpiece around and put the freshly cut end against the stop block to make the second cut that brings it to finished length. This takes longer to explain than to do so see the video below.
Video Tutor |
When cutting pieces like the rails in this story that have an angle on both ends marking which side should be up when the second cut is made could help prevent some mistakes.
This is a simple but very effective shop-made jig that you can use often. Even cutting the sides for a box-based project can make good use of this jig. Unless the sides are exactly the same length there is no way for the box to come out square. The few minutes it takes to make up this jig could save lots of time and wood later on!
Have a comment on this story? –Email Me!
Back to the Tips & Tricks Directory
All written, photographic and drawn materials are property of and copyright by NewWoodworker.com LLC 2000-2019. Materials may not be used in any way without the written permission of the owner.