
This is a Veteran Owned site
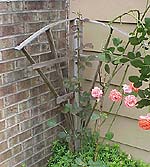
90-Degree TrellisText, photos & Design by Tom Hintz This project came from my need to justify the new brad-nailer and compressor I came home with one day. It turned out nice despite being the first trellis I attempted. The trellis is made from a 6ft. 2X6 pressure treated board. I ripped ¼-inch strips from the board until it was about 4-inches wide. Using my recently purchased jointer, I carved 45-degree flats on either side of what would be the face of the main trellis stand. I screwed the outer trellis strips to the base, and then attached the upper bows to the top of the post with glue and the brad-nailer. I bent the outer strip out to the end of the top slat, then glued and nailed the joint, repeating the process on the other side. Add a couple of cross strips to suit and it is done. This was my first try with polyurethane glue. If you look at the joints closely, you can see I had no concept of how much the glue expanded during the curing process. However, I did learn that once this glue cures, the only way to get it off is to cut it off, so I left it as a reminder in the future. Do you have a comment about this page? - Email Me!
|
All written, photographic and drawn materials are property of and copyright by NewWoodworker.com LLC 2000-2019. Materials may not be used in any way without the written permission of the owner.