
This is a Veteran Owned site

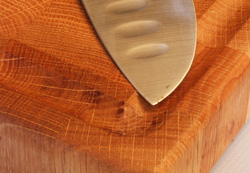 |
Whether you are routing a juice trough like this or a decorative groove around a project, this simple procedure can have a dramatic impact on your work. Click image to enlarge |
Perimeter Routing
Eye-pleasing decorations on the router table
Text, photos and video by Tom Hintz
Posted -
Adding a decorative groove around the perimeter of an object can dress it up considerably. Sometimes these grooves can be functional like the juice troughs I will create on a pair of cutting boards in the accompanying photos and video. The problem is how to create what appears to be a continuous groove around the entire piece but set in from the edge. And doing that without actually starting on the edge.
This is the kind of work that router tables were born to handle. Of course there is considerable technique involved because this routing happens with the piece upside down on the bit so we can’t see it happening. That puts a premium on layout unless you are blessed with some kind of x-ray vision. Yeah, that’s what I thought so we’ll look at the layout and technique stuff here.
Height Then Inset
The shape of the bit used can make measuring the fence setback rather difficult. I have found it easiest to make test cuts in scrap wood to establish the correct bit height that gives the look I want. While making these test cuts I can also be sneaking up on the correct fence position. Most often the inset of the groove from the outer edge is not great but it should be noticeable to the eye. For the juice troughs I am making here I tried a few distances in from the edge and settled on ½” as producing the best look.
 |
 |
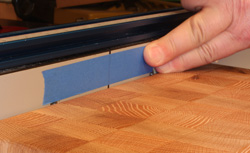
This strip of tape (left) just above the surface of our workpiece is given two marks. One indicates the beginning or right side of the bit (right) and the other the left side cutter location. these will let us start and stop exactly where we need to create a continuous groove. Click images to enlarge |
|
Remember that depending on the bit profile being used there could be some handwork to give the corners a finished look. I am using a bull nose bit so the inside corner of my juice troughs will be square while the outside corner will have the same radius as the bit. This same effect occurs with nearly all bit profiles so you need to plan ahead on how you will deal with the inside corners if you change them at all. It really is your call on whether to carve the outside corner to better match the inner corners. Keep in mind that any work you add to the outside corners may extend them closer to the perimeter of the work piece and that could compromise the appearance to some extent. In my case I decided to leave the inside corner as it was cut to maximize the useable cutting surface. Besides, I kind of liked the round outer corner offset by the square inner corner.
The important thing here is to use test cuts to be sure you like the bit depth and the look of the corners. If you wait until you make the real cuts in the workpiece the chances of ruining a bunch of wood go way up.
Establish the Boundaries
To cut the grooves precisely we have to be able to “see” exactly where the cutting edges begin and end the cuts. The only practical way to do this is to extend those precise locations of the cutting edges up the fence to where we can see them with the workpiece of the table surface.
 |
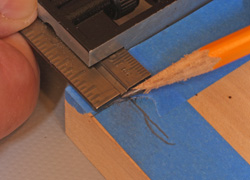 |
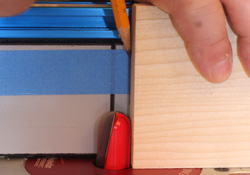
We only need the tape in the corners (left) but I have learned the hard way that a continuous strip is easier to put on and to get off. I decided on a 1/2" setback so set my combination square and made the marks (right) at each corner. These will line up with the marks on the fence to show me where to start and stop the cuts. (See the video below for a demonstration) Click images to enlarge |
|
Lay the workpiece against the fence and place a strip of tape on the fence face just above the upper surface of the workpiece, extending the tape a couple inches to either side of the bit. Remove the workpiece and turn the bit so that the cutting edges are on a line parallel to the fence face. If the cutter has more than two cutters you will have to turn the bit so that one edge is at its maximum on the side being marked. Then turn the bit so another edge is on the other side to make that mark on the fence. Place a small square or a piece of wood with a perfectly square end against the left cutting edge and draw a line on the tape directly above that edge. Repeat the process on the other side of the bit. This establishes the beginning and end of the cutting zone.
Put a strip of tape around the edge of the workpiece on the bottom surface. I use a combination square to draw lines at all four corners showing the offset I want between the edge and the beginning of the groove. It is a good idea to repeat this process on a piece of scrap so we can make a final test cut to be certain the resulting groove is where we want it and has the appearance desired. After making the test cuts and being satisfied with the results make sure that the fence and bit height are locked in place.
Make the Cuts
Note: This procedure is much easier to do once you get the feel of doing it so I strongly advise making a test piece that is roughly the same size as your workpiece. Go through the whole procedure on the test piece and only after getting comfortable doing that, move on to the real workpiece.
 |
|
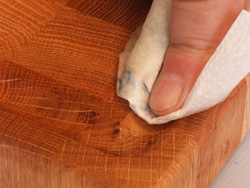
There will probably be a little hand work (left) to smooth the transitions between cuts but usually not much if you hit your marks. Please don't tell anyone that you saw me using hand tools! After the cleanup you can sand the groove and apply finish! Click images to enlarge |
|
To make these cuts we need to hold the wood against the fence with the left end raised above the bit. The idea is to slowly plunge the piece down over the bit so that the start line on the workpiece aligns perfectly with the end of cut line to the left of the bit. Then we move the workpiece right to left, always held against the fence until the end of cut line on the workpiece aligns with the start of cut line on the fence to the right of the bit. At that point we lift the right side of the workpiece straight up off of the bit. Stopping the movement of the workpiece, shutting off the router and waiting for the bit to stop can be dangerous if you have to use one hand to shut the router off. There is also a good chance of creating a major burn mark on the workpiece before the bit stops turning. I made some relatively light burn marks even though I didn’t wait for the bit to stop but they sanded out easily. Repeat the process on the remaining three sides.
Finishing Labor
If you took your time and did the layout right you should have a continuous groove near the outer edge of the workpiece. If you stopped and started right you will find surprisingly clean corners that look like the router never stopped moving. You probably will have to do so some carving and sanding to blend minor transitions between the cuts but with a little work the results can be dramatic.
Video Tutor |
If a complicated router bit profile was used the carving and sanding can be far more complicated. I have seen some nice work where the woodworker found that the corners did not meet properly so they made a jig to route a circular relief at each corner that really dressed up the project and hid the mistake at the same time. This is no time to abandon your creative side whether you made mistakes or not. Adding your own little flourish can be easy but add a very good point of interest to the project.
Part of the attraction of woodworking is doing things the way we want. Every skill we learn can be applied in many ways to many projects. In addition to learning new skills we have to learn to apply those in unexpected ways can give our projects our own special look.
Have a comment on this story? –Email Me!
Back to the Tips & Tricks List
All written, photographic and drawn materials are property of and copyright by NewWoodworker.com LLC 2000-2019. Materials may not be used in any way without the written permission of the owner.