
This is a Veteran Owned site
| |
|||||||||||
Table Saw Panel Raising JigText and Photos By Tom Hintz
I normally make raised panels on the router table with my large-diameter Jesada bits, turned by a 3 ½-horsepower Craftsman router. However, there are times when using this jig on the table saw is better, like when working with plywood or MDF for shutters and other outdoor projects. Also, there are many woodworkers who just like raising panels on the table saw. Versions of this panel-raising jig have been used by woodworkers for decades. The dimensions can be adjusted to fit your project needs and equipment, but the basic idea remains the same. The jig holds a panel blank on edge so it can be safely pushed over a tilted blade. The jig pictured in this story is made for a right-tilt table saw. If your blade tilts to the left, simply reverse the orientation of the side panels. Remember that the dados for the horizontal brace have to be cut on opposite sides of the side panels as well. That may sound over simplistic, but I have made just such an error.
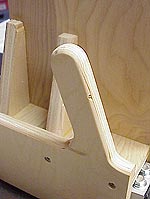
MaterialsPlywood is the material of choice for most parts of this jig. I use ¾-inch-thick plywood for everything except the retaining cleat. Also, I like using smooth-sanded varieties such as birch that provides an even clamping surface. The only hardwood I used in building this jig was a strip of oak for the retaining cleat on the back edge of the clamping panel. I chose oak because this is a relatively narrow part that benefits from its strength. ConstructionThe most important parts of this jig are the clamping face and the horizontal brace. The clamping face must be 90-degrees to the saw table, stable, and sized according to the parts you plan on machining. The jig built for this story has a clamping face 16-inches tall and 8-inches wide, meant for a large number of plywood shutter panels I have on my to-do list. Both dimensions can and should be adjusted to fit the panels you anticipate making. The height of the clamping panel must be sufficient to provide adequate support and clamping surface. The width is more critical. Make your clamping panel wide enough to adequately support the work piece as it passes through the blade. In this case, too long is better than too short. The panel opposite of the clamping face has a handle formed into it's top. I like the feel and control the handle provides. Plus, the handle forces you to keep at least one hand far away from the blade.
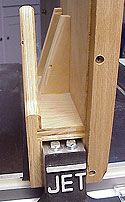
My handle begins one inch above the horizontal brace, is 1 ½-inches-wide and 5-inches tall. You may have to adjust these dimensions according to what feels best to you. The angle at which the handle leans forward is up to you. I held my fist out and "questimated" the most natural angle which turned out to be about 22-degrees. Before assembling the jig, round over all of the upper edges of the handle-side panel and sand smooth. The height at which the horizontal brace is placed is determined by the dimensions of your fence. My JetFence has bolt heads protruding up from it's top near the operators end. I raised the horizontal brace high enough to clear them with about 1/8-inch to spare. Some like the horizontal brace to actually slide on the top of the fence. I want it to float above the fence with the bottom of either vertical panel sliding on the saw table. Either will work as long as the overall fit is correct.
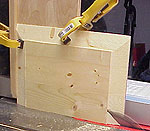
I cut the dados that retain the cross brace in both side panels ¼-inch-deep. To find the width of the cross brace I measured the fence width, added ½-inch for the dados, and then added an extra 1/8-inch to allow for "tuning." Dry fit the cross brace in the sides and try the jig over the fence. After each fit I shave just a bit off the cross brace until the jig fits the fence closely, but still slides smoothly. A coat of Johnson paste wax on the inner surfaces of the completed jig will help as well. To assemble the jig, glue and screw (countersunk) the horizontal brace into the side panels, then lightly clamp it over the fence. I slip a piece of notebook paper between each of the jig sides and the fence, then place a clamp on the jig at the horizontal brace with very little pressure applied. The clamp is there just to insure the assembly does not lean or spread while the glue sets up. The paper between the jig and fence helps insure a proper fit. After the glue dried on the basic assembly, I added two elongated corner braces running from the clamping surface onto the horizontal brace. These add considerable strength and rigidity. For added safety, I rounded the edge of the corner brace closest to the handle just in case a kickback tries to push it back into my knuckles. I found a strip of oak, 1 1/8-inches-wide and 13 ½-inches long, glued, and screwed it to the rear of the clamping face with about 1/3-inch exposed. This strip acts as a guide and stop when the work pieces are attached to the jig. This strip does not take the place of clamps! It does add support, but clamps on the front and back edges of the work piece are necessary. Using the Raised Panel JigI have cut panels in jigs similar to this with various style blades. As long as the blade is sharp, it seems to make little difference. You might want to experiment to see if you have a preference.
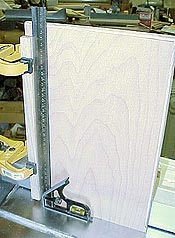
First, set the angle and height of the blade. I use a 15-degree angle with a blade height between 1 ½ and 2 inches. This has worked well with wood ¾-inch and thick. You may want to play with these settings depending on the look you want the thickness of your material. Determining the fence-to-jig distance is the toughest part of using this jig. The idea is to get the fence, with the jig in place, set so that the blade tips slice through the panel surface as the piece is run through. Eyeballing will get you close, but running a test piece of the same thickness stock is the only way to guarantee the setup is correct. One mistake I have seen woodworkers make is to try to set the fence so that the bottom edge of the raised panel fits into the groove of the rails and stiles. If this edge needs to be reduced, do it with a shallow rabbet on the back side of the panel later. You may also want to run a very shallow rabbet on the front edge as well to produce a flat that fits in the rail and stile grooves. The blade will leave a small undercut around the edge of the panels center. Some like the additional shadow line this undercut produces, others trim it flat. This is strictly a matter of taste. However, if you choose to trim this undercut, bring the blade back to vertical and use a test piece to get the fence and height settings correct or you could quickly ruin your panels.
|
|||||||||||
Do you have a comment about this page? - Email Me! Back to the Tips, Tricks & Lessons List
|

All written, photographic and drawn materials are property of and copyright by NewWoodworker.com LLC 2000-2019. Materials may not be used in any way without the written permission of the owner.