
This is a Veteran Owned site
![]()
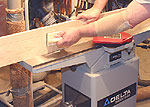 |
Taking the time for a little preparation work can make life for and at the jointer much easier. |
Preparing Wood for the Jointer
Saving wood, time and money
Text & photos by Tom Hintz
Posted – 8-16-2006
While the jointer is capable of flattening most bows or warps, trying to remove substantial defects is a great way to waste wood and accidentally taper a board. We can make the jointing wood with major irregularities easier, faster and minimize loss by reducing the defect with a little prep work before taking the wood to the jointer.
While the procedures described in this story are most often used with rough-cut lumber we occasionally see serious defects in milled lumber. In either case, these procedures can make producing straight, square wood faster and easier on you and your machines.
 |
 |
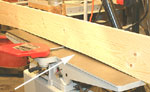
The point of the procedure described here is to make a big defect (left) into a much smaller one (right) that is easier to deal with at the jointer. This bit of preparation can save lots of wood and frayed nerves. Click images to enlarge |
|
When applying this technique to rough-cut lumber, it is possible to align the new edge with the grain more closely. This can be important with fine woods that are to become important visible features of a project.
Bad Edges
Though a jointer will eventually straighten just about any edge, regardless of how badly it is deformed, that process can remove far more wood than is necessary. If we make a rough-cut before going to the jointer, most of that defect can be removed. Though not perfectly straight, the resulting edge will be much easier to perfect on the jointer with little further loss of wood and less chance of seriously tapering the board.
 |
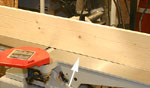
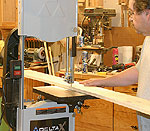
Lay out a cutline that eliminates the majority of the waste. You can then make that cut with any hand-held saw. Click image to enlarge |
Most pieces of rough-cut wood have one edge that is relatively straight and can often be used as-is on the jointer. Then that jointed edge can be placed against the fence at the table saw to cut the opposite edge straight and parallel to it. However, if there is more than ¼” of total defect over the length of the piece, I make a straightening cut using the procedure described below.
Another way to minimize the amount of defect to be dealt with is cutting the board down closer to the length needed for the project. This cut is particularly helpful with long boards that have a bow in them though it can be used with edge defects as well.
If the board has a ½” total defect, cutting it closer to the needed dimension can substantially reduce the amount of wood that has to be removed to straighten the edge. When breaking long boards down I cut them to the needed length, plus one inch to allow trimming them to size after jointing and planning to be sure the ends are really square to the edges after they are machined.
Laying Out a Trim Cut
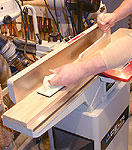
 |
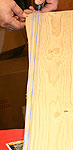
Though following the layout line as closely as possible, a little deviation can be removed at the jointer far easier than the original defect. I like the bandsaw for this cut when the pieces are sized right for it. The only tool you shouldn't use is a table saw if you do not have the Jointer Jig mentioned in the text. Click image to enlarge |
Depending on the length of the wood, a long straight edge or snapping a chalk line can be used to mark the target edge just inside the defect. While most often this first cut line is set to minimize the amount of wood to be removed; it can be angled a bit so the finished edge is more closely aligned with the grain of the wood. Then, simple tools such as a circular saw, bandsaw, jigsaw or even hand planes can be used to remove the majority of the waste wood, making the edge much straighter. This new “raw edge” can then be taken to the jointer to perfect the edge with considerably less effort and loss of wood. Reducing the defect also makes jointing longer pieces far easier and more accurate because it indexes to the outfeed table more quickly.
Caution: While it may be tempting to run a crooked board through a table saw to remove a defect, without a straight edge to place against the fence, the risk of a kickback is very high.
However, a table saw can be safely used for this cut with a jointing jig that provides an artificial straight edge to run against the fence. The other edge of the board can then be safely trimmed very straight and ready for the jointer.
|
 |
Whether cutting on edge or a wide face, preparing the board beforehand can make jointing a perfectly flat surface much easier to do with less wood loss. Click images to enlarge |
|
While prepping boards before jointing works best on the edges, major defects on the wide faces can sometimes be reduced with a hand or powered portable plane. Admittedly, this is more difficult for most of us that are not proficient with hand-held planes but the effort can make truing the face on the jointer easier with less overall loss of thickness.
It would be nice if all of the wood we buy came with jointer-ready edges but that is not reality. Rough-cut wood represents a substantial cost savings but only if we can prepare it accurately for use. This simple technique makes the process of machining wood faster, easier and very often saves wood.
For more on using a jointer –Click Here
Have a comment on this story? –Email Me!
Back to the Tips & Tricks Directory
All written, photographic and drawn materials are property of and copyright by NewWoodworker.com LLC 2000-2019. Materials may not be used in any way without the written permission of the owner.