
This is a Veteran Owned site
 |
Resawing really is a simple process that just takes a little getting used to, along with using solid technique and equipment. Click image to enlarge |
Resawing on the Band Saw
A little patience and a little practice make good results
Text, photos and video by Tom Hintz
Posted - 8-25-2008
Resawing boards along their thickness is a unique capability of the band saw that lets woodworkers create eye-catching features like book-matched glue ups, custom thickness boards, veneers and more. A good quality, properly tuned bandsaw and high-end blades are important when resawing. However, use bad technique and the best hardware available won't save you.
Expectations
While some band saw blade manufacturers claim their blades make super smooth cuts, don't expect sawn surfaces that won't require planing and/or sanding. A band saw just is not designed to produce true finish-quality cuts.
 |
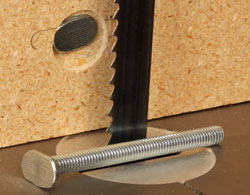 |
A flat piece of board (I like MDF because it stays straight) can be added to the band saw fence (left). I use T-bolts (right) to attach the wood face to the fence because a very shallow recess gets the head below the surface. Click images to enlarge |
|
The only reasonable plan is to resaw pieces a bit oversize to allow the extra wood necessary to complete processing the piece. Most use a planer to smooth the resaw cut and to make that surface parallel to the other side. At the same time, the planer reduces it to the desired thickness. Just how thick to cut the piece in the first place depends on the accuracy of your band saw - and you. Until you become familiar with the resaw technique and your band saws "personality", thicker is better. I used to add 1/4" to the final thickness I wanted. Now that I am more comfortable with my band saw (also have a better band saw) and how it cuts, cutting the pieces 1/8" oversize (thickness) is plenty.
Fence Types
One of the quirks of band saws is that they often resist cutting parallel to a straight fence with any real precision. While some fences can be adjusted to compensate for this "drift" that setting usually is not applicable to different blades or even the same blade as it begins to dull. Some find a straight fence, perhaps augmented with a taller auxiliary face, to be adequate for cutting thin slices from a board. There are no constants here. You have to try it on your band saw and see if you are satisfied with the results
 |
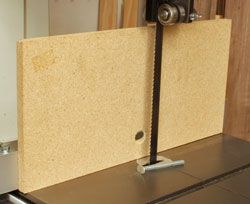
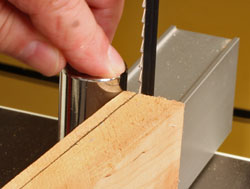
The resaw post is very popular because it is easy to setup and use. Click image to enlarge |
A simple and effective alternative to the standard rip fence is a resaw post. As its name suggests, this is essentially a round "post" that attaches to the band saw rip fence. There are other versions that differ somewhat in the shape, but most will have some form of a curved face that emulates the post. The post edge should be 90-degrees to the table surface and adjusted on the fence so that the center of the post is aligned with the cutting edge of the blade.
The resaw post keeps the wood square to the table surface and limits the cut to the distance between it and the blade. The round shape of the resaw post allows it to be used as a pivot. A line is drawn on the top edge of the wood indicating where the cut is to be made and the resaw post (and fence) is adjusted so the blade aligns with that mark when the wood is held against it. The operator then holds the wood against the resaw post and guides the wood through the blade pivoting it on the resaw post as needed to stay on the cut line.
This sounds far more complicated than it is. With a little practice you develop the feel for what it takes to pivot the wood on the post to cut surprisingly straight slices from a board with little problem. Once you get used to this cut, cleaning the pieces up with a planer and sander goes very fast.
Blade Design
There are roughly as many opinions on what qualities make a good resawing blade as there are woodworkers. Wider blades are favored more than narrow blades by most. Generally, low teeth-per- (TPI) counts like 3TPI are used more than fine-tooth blades in the 8 TPI and up range. I say generally because lots of woodworkers resaw with whatever blade is currently in their saw. If that blade is in good condition there may be method to their madness.
Low tooth counts are faster cutting but typically produce a rougher surface finish. Higher tooth counts cut slower but leave a smoother surface. As long as the blade being used is sharp and you adjust the feed rate to suit the tooth count being used there is a good chance that it will work. This is especially true when making one or two relatively short resaw cuts. If you are resawing several pieces or making long cuts, (to me "long" is more than 24", insert your critical length here) one of the low tooth count designs is likely to be a better performer and may stay sharp longer.
 |
 |
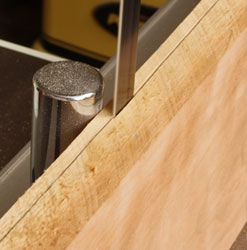
Setting up the cuts is a simple matter of getting the fence the right distance from the blade. When using the resaw post we draw a cut line to follow (left) along the wood. The resaw post is set so with the wood held against it (right) the layout line meets the blade. Click images to enlarge |
|
If you are undecided, my best advice is to contact the manufacturer of your favorite band saw blades and tell them the type of wood and the depth of the resaw cut being made. Let them suggest the blade design that best fits your job. I use Timber Wolf blades exclusively and have never been steered wrong by the folks answering their order line phones. I tell them what I want to do, what wood, what band saw I have and they tell me what blade to use. It is a simple process and they have been dead on every time so I do not argue!
Setting Up for the Cut
First, make sure that the face of the fence or the edge of resaw post against which the wood will be held is square to the table surface. Some fences have provisions for adjusting this, others require you to adjust the guide rails or shim the fence tube itself. Check the owners manual to see if an adjustment is available.
|
 |
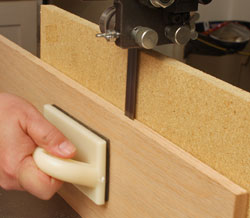
To use the flat fence, (left) just hold the stock tightly against the fence face as you move it across the blade. Keep the push block BEFORE the blade! To use the resaw post, hold the wood against the post and "steer" the end of the board to guide the cut line into the teeth of the blade. (right) This takes very little practice to get the feel of and yields a very nice cut. Click images to enlarge |
|
Also, with standard rip fences, it may be wise to clamp a block of wood behind the free end of the fence to be sure it does not flex during the cut. You can put considerable pressure on the fence holding the wood against it. Band saw fences are generally not designed to withstand much pressure.
Resaw posts generally mount directly against the fence face. The theory is that if the fence face is square, so is the resaw post. In the real world, check it anyway. If the resaw post itself must be corrected, adding tape to its rear surface where it contacts the fence may be your only (but effective) option.
Whichever fence design is used, setting its distance to the blade is simple as long as you understand where to measure from - and to. Just as on the table saw, we have to measure from the fence to the edge of the blade closest to the fence. Measuring to the center of the blade will put you a quick 1/16" off even if done perfectly, a little more if you are mortal. Make sure that you are looking at the blade and measuring device straight on to get the most precise setting.
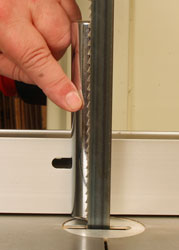
When using a resaw post or curved fence piece, it is important to measure from the top of the arc where it is closest to the blade. We also want to be sure that the top of the arc is aligned with the teeth of the blade, not the body. The cut is actually made at the teeth so we want the pivot point aligned with them.
Making the Cut
If you are using the face of the rip fence as a guide your job is easy. Keep the wood firmly against the fence face and feed it into the blade at a rate that lets the teeth do their job without bogging the saw down. A little slower is always better than a little faster on a band saw. Feed the wood into the blade too fast and you can easily cause the blade to wander unnecessarily. Also, an overly fast feed rate can generate excess heat that will damage the blade itself. Take your time and let the blade do its work.
Video Tutor |
Using a resaw post (or curved fence attachment) is more technique dependent but once familiarity is gained with its use is far more versatile for resawing. It usually takes a little practice to become familiar with this technique but before long you will get the feel of guiding the wood so the blade stays on the cut line.
I have found that using a rubber-soled push block, like those that often come with jointers, makes it easy (and safe) to keep the wood firmly against the fence or resaw post. It is important to keep the push block on the wood BEFORE it reaches the blade. Applying pressure to the side of the wood at or after the blade can close the kerf and cause binding. That binding will over heat the blade and can easily cause it to wander. This forces you to reposition the push block frequently but it goes much smoother than you might expect with a little practice.
Whichever fence style is used, keeping your fingers off of the end of the wood when it approaches the blade is very important. It is surprisingly easy for the blade to break through the end of the wood unexpectedly and if your fingers are there, bad things will happen before you realize the error. Using a push stick, a scrap of wood or a push handle will let you keep the wood moving at the desired rate yet keep your fingers out of harms way.
Learning to resaw accurately brings additional design opportunities to your shop. It can also help save money by allowing you to produce custom thickness wood to properly fit your design ideas. This is a simple process that does require a little learning time but pays dividends forever.
Visit the Timber Wolf web site - Click Here
Have a comment on this story? - Email Me!
Back to the Tips & Tricks List
All written, photographic and drawn materials are property of and copyright by NewWoodworker.com LLC 2000-2019. Materials may not be used in any way without the written permission of the owner.