
This is a Veteran Owned site
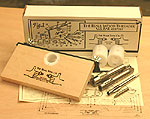 |
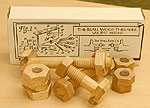
The Beall Wood Threader Kit comes with everything you need to thread wood and set your imagination free. Click image to enlarge |
Beall Wood Threader Kit
Where imagination used to end
Text & Photos by Tom Hintz
Usually, we buy a new jig to add a specific feature to our woodworking. The Beall Wood Threader Kit goes far beyond that if you can turn the "what if" part of your brain loose. The ability to cut matching inside and outside threads is a form of joinery that can be applied to your projects in ways limited only by your imagination.
The Kit
The Beall Wood Threader is available in several configurations but the most popular includes taps and threading inserts for ½", ¾" and 1"-diameter dowels. Also included are the router/threading platform, a multi-size nut layout template, Allen wrenches and instructions.
My initial impression of the Beall Wood Threader Kit was that it might be too simple to meet expectations. After using it, I found that simplicity, born of thoughtful engineering resulted in an easy-to-use tool that works as advertised, and better.
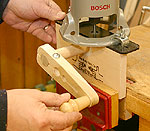
Shop-Made Handles
 |
Making the wooden tool handles is easy, and they work great! Click image to enlarge |
The Beall Wood Threader Kit includes a separate instruction sheet with diagrams showing how to make tap and crank handles that make using the kit easier. A common metalworking tap handle with sufficient jaw capacity will work fine. However, the dowel handle is must have tool that is as easy to make as it is to use.
I made both handles in an hour using hardwood cutoffs from my scrap bin. A coat of finish and my now mandatory Beall Wood Buff treatment and they were ready for use.
Threading Platform
 |
The mounting platform can be clamped in a vise or drilled and screwed to a solid surface. Click image to enlarge |
The heart of the Beall Wood Threader Kit is a maple clamping face fit with a metal router mounting plate and a changeable threading inserts for ½", ¾" and 1"-diameter dowels. All dowel sizes use the single veining bit (1/4"-shaft) that is also included.
The ¾"-thick by 4"-tall and 8 ¼"-wide maple clamping face can be secured in a vise or drilled and bolted to a sturdy surface. The vise method works but attaching the Threading Platform to a flat surface eliminates the vise handle and forward jaw, which often allows threading shorter pieces.
The router is secured to a 2"-wide by 9"-long metal plate that is factory-installed on the top edge of the clamping face. A pair of clamping plates, bolts and wing nuts allows installing virtually any router or laminate trimmer.
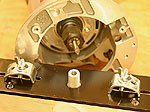 |
The clamps and centering bushing make setting your router up on the Beall Wood Threader platform simple. Click image to enlarge |
A centering collar is included and makes that all-important part of router setup a no-brainer. The only way to mess up is to forget to remove the collar before use.
The changeable inserts are mounted to the bottom of the router mounting plate with a single screw. That screw and a flat along the top of the inserts index them to the Threading Platform. The centering collar fits directly into the insert to align the bit perfectly.
The inserts have lead-in collars, sized to control appropriately sized dowels as they enter the jig. The back halves of the inserts are threaded to support and feed the dowel as it is turned.
Template & Taps
 |
The template makes producing accurate nuts simple. Click image to enlarge |
The heavy-gauge, die-cut plastic template has two multi-size arrays that cover nut sizes from 1/16" to 3". This template will work with the included threading sizes as well as any other Beall threading tools you may add in the future. Each size array has a small diameter hole at the center that allows using an awl to precisely mark the center of the pilot hole.
The template can be used to draw out each nut individually, or to make templates for often-used nut sizes. The outer dimension for each nut is clearly marked and makes ripping stock to the correct size easy.
 |
The taps have a removable pilot bushing that allows cutting threads in a relatively shallow hole. Click image to enlarge |
The taps themselves are nicely machined and have a removable pilot bushing that insures starting the threads so they are square to the wood. When threading a blind hole, the pilot bushing can be removed after cutting a few threads to continue threading down to about 7/16" of the bottom of the hole. The taps can be used without the pilot bushings if the stock is too thin to accept the pilot bushing but getting the threads square to the hole is totally up to you.
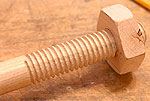
In the Shop
Using the Beall Wood Threader is surprisingly easy. Aside from bit depth, the process of cutting inside or outside threads is largely a matter of turning the tap or dowel. The nuts and bolts in the photos are the products of my first efforts with the Beall Wood Threader Kit.
Grain Orientation
An important thing to remember is that threads cannot be cut into end grain as the threads simply snap off at the grain line, as we should expect. Get this one restriction firmly in your head, as it is the only substantial consideration when designing a threaded component or project.
Making Nuts
 |
Tapping several nuts in a strip before cutting them apart is easy and accurate thanks to the pilot bushing on each tap. Click image to enlarge |
Since a threaded nut is needed to check bit depth, I made several of them first. Two pieces of stock were ripped to 1 ¾" (nuts) and 2" (bolt heads). After tracing the nut outlines and punching the centers, 7/8"-diameter pilot holes drilled on the center marks.
The instruction call for countersinking the holes before tapping to make starting the tap a bit easier and to add realism. I tried it both ways and making a quick pass around the holes (before tapping) with a bearing-equipped chamfering bit is easy and a good idea.
With the strips clamped in a vise, I tapped each nut. I found that running the tap through a second time was quick but seemed to “dress” the threads nicely. After all of the holes were tapped, the nuts were cut out on the band saw, just leaving the layout lines. To finish the nuts, the faces were sanded back to the layout lines.
Later, I used a piece of dowel with a short set of threads cut on the end to spin the nuts by hand against my belt sander to round the outer edges. (I am currently building a simple fixture for this process that will make it more consistent.)
Setting Up the Router
 |
Setting bit height to cut perfect threads that fit the nuts correctly took three tries the first time. I suspect this will get easier with a little experience. Click image to enlarge |
I used a Bosch 1617 router in a fixed base (plastic baseplate removed) during testing of the Beall Wood Threader but virtually any router or even laminate trimmers work great. The ¼"-diameter veining bit and small amount of wood being removed do not require big horsepower. A fine bit height adjustment system is very useful because the difference between too shallow and too deep when cutting threads is very small.
Finding the optimum bit height is a simple matter of trial and error. I began with the bit just touching the dowel and made a test cut. After trying to screw a nut onto the threads I lowered the bit 1/64" and repeated the process. It took three test cuts to set the bit height the first time but I suspect this will go faster with a little experience. Bit height must be re-set when changing dowel sizes.
Actually cutting the threads is very simple. Turn on the router, insert the dowel and while holding slight forward pressure, turn the dowel smoothly. As the bit cuts the thread, it engages the threads in the rear of the insert and pulls the dowel across the bit at the correct rate. The inserts have a collar that guides the dowel but holding it relatively square to the insert helps insure very clean threads.
When the dowel has been threaded as far as you want, shut the router off and turn the dowel back out. The process is very easy.
The Nuts & Bolts of Woodworking Book
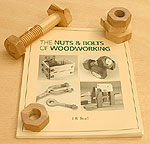 |
This book written by JR Beall, the inventor of this jig, shows many ways to apply this capability. Click image to enlarge |
Written by Beall Wood Threader inventor, JR Beall, this book (Street price $14.95, 12-19-2005) is filled with tips and tricks for making threaded projects from desk clocks to tables, toys, quilt racks and more. While the projects within its pages are very useful, they are even more valuable as demonstrations of the capabilities of the Beall Wood Threader and how they can be applied to an unending range of projects. Armed with the skills learned from this book, you are the only limiting factor when designing projects that use this technology.
Conclusions
 |
These are the first projects made with the Beall Wood Threader Kit. It is easier than it looks! Click image to enlarge |
The Beall Wood Threader Kit is not only fun to use, it enables a large range of design options for your projects. The kit components are very well made, making the street price of $139.95 (12-19-2005) a long-term investment. Other taps and threading inserts from the Beall collection can be added without having to re-buy the basic parts of the kit, extending its effectiveness even more.
If adding unexpected features to your projects or exploring a new area of woodworking is attractive to you, the Beall Wood Threader Kit is for you. The simplicity of use, combined with built-in accuracy mean the only thing limiting the application of the Beall Wood Threader is your imagination.
Visit www.bealltool.com
Do you have a comment on this review? - Email Me!
All written, photographic and drawn materials are property of and copyright by NewWoodworker.com LLC 2000-2019. Materials may not be used in any way without the written permission of the owner.