
This is a Veteran Owned site
![]()
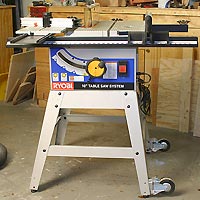
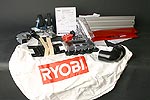
Ryobi BT3100 10" Table Saw ReviewFeature-packed accuracy at a bargain priceText & photos by Tom Hintz New woodworkers looking for their first table saw often have a small budget to work with, or want to limit the expenditure to see if they will enjoy the hobby. The Ryobi BT3100 Table Saw System (aptly named, by the way) fits both criteria, and more. The Ryobi BT3100 has become a very popular alternative to saws in the $500 and up range. In addition to its price, the Ryobi BT3100 features an impressive combination of features not often found on the higher priced competitors. Adding to its attractiveness is that the Ryobi BT3100 is available at Home Depot stores where prospective buyers can see and touch it in their own neighborhood before committing their money. To see what the Ryobi BT3100 is all about, I picked one up at my local Home Depot, in my Toyota Camry, not a small feat I might add, and brought it back to my shop. For a full account of getting the Ryobi BT3100 home, assembling and setting it up, see the companion story, "Setup and Assembly of the Ryobi BT3100 Table Saw." Initial ImpressionsThe Ryobi BT3100 is an interesting departure from the more traditional cast iron competition. The combination of features, enhanced by a modular design sets the Ryobi BT3100 apart from other saws in more ways than just the $300 price tag. I was surprised by the lack of plastic and by the degree of engineering that went into this machine. There were many opportunities to cut corners in the design and manufacturing of the BT3100 but Ryobi chose not to take advantage. Out of the Box
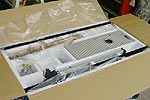
The Ryobi BT3100 comes in a well-designed shipping carton that protects its contents very well. I noted no damage or parts shortage during assembly. I also found that my Ryobi BT3100 was set up very well right from the factory. A notable feature of the Ryobi BT3100 is standard SAE fasteners used throughout the machine. This is an important feature for those who do not have a set of metric sockets, wrenches and metric Allen wrenches. All of the factory-installed fasteners I encountered in assembly and setup were also standard SAE sizes. Throughout assembly and setup, all of the individual parts and sub-assemblies fit perfectly with no tweaking or fitting required. InstructionsThe Ryobi BT3100 instruction manual is easy to understand and follow. The manual has instructions written in English, French and Spanish, each in their own section rather than the very confusing interlaced style some manufacturers continue to use. Throughout the manual Ryobi includes nicely drawn, large-scale illustrations that are of considerable help during assembly, setup and maintenance.
The manual guides users through the assembly process in a logical, well thought out sequence. The average buyer should have no problem assembling the Ryobi BT3100 correctly. The only change I would suggest would be moving the setup procedures to the beginning of the Operation section that begins on page 21. As it is now, there are three pages that discuss safety and basic saw operation, including the types of cuts, in front of the setup and alignment pages. It would be easy for someone new to woodworking to assume the saw was ready to use when they reached the end of the assembly section and find a description of the cuts the saw is capable of. Granted, users should read the entire manual before assembling any machine, but reality clearly indicates many do not. Make sure you complete the setup and alignment instructions that begin on page 24 before plugging the Ryobi BT3100 in for the first time. Set UpThe Ryobi BT3100 is different from most saws in that all of the primary adjustments are referenced off the blade rather than a miter slot, which the Ryobi BT3100 does not come with. (An accessory table section with dual miter slots is available.) The instructions for adjusting the Ryobi BT3100 are clear, easy to follow and do not require a fist full of odd tools and the flexibility of a contortionist to accomplish. While my Ryobi BT3100 was almost perfectly set up as it came from the factory, I went through all of the procedures in the instruction manual just to be sure. I think this is a good practice for any piece of equipment. Following the instructions through the setup procedures not only gives you peace of mind, it teaches a better understanding of the machine and how it operates. The only adjustment my Ryobi BT3100 really needed was to eliminate a small amount of lateral play in the sliding table. I located the section that deals with the sliding table and found adjusting the eccentrics that control this play was a quick job. My fence was also very slightly out of line so, I adjusted that according to the instructions and was able to achieve a slightly tailed out (at the back) setup that I have come to like with my fences. Checking the alignment of your saw should be a regular part of the maintenance plan. Put the manual in a safe place where you can find it! Modular Table Design
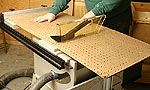
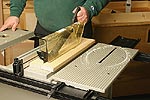
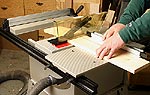
One of the unique features of the Ryobi BT3100 is the three-part table surface, the fixed table surrounding the blade (22" by 7 ¼"), the sliding table (22" by 10 1/8") and the accessory table (22" by 7 ¾"). Both the sliding and accessory tables can be positioned anywhere on the fence rails, swapped from side to side, or removed completely. The sliding table has a simple push-lock that secures it on the sliding mechanism, aligned with the stationary table. Both moveable tables are secured to the fence rails with finger-operated clamping levers. Arranging the table sections to best fit the material being cut can be done in seconds, giving the operator a wide range of options with which to create a stable platform. The fence rails can also be shifted left or right, increasing the versatility of the Ryobi BT3100 even more. The fence rails are secured to bosses on the fixed table with finger-operated lever locks. Move the rails full right to get a 30-inch rip capacity or full left for a maximum of 31-inch capacity on that side of the blade. When cutting large sheet stock on traditional saw tables, the material can hang off the edge and slip below the fence during the cut, creating a potentially dangerous situation. The Ryobi BT3100 lets the operator place either or both of the moveable tables wherever needed to fully support the material, preventing it from drooping under the fence regardless of where the fence is located. Try that with one of the high-buck cabinet saws!
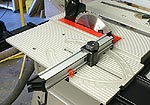
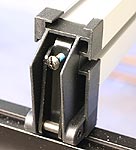
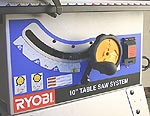
The sliding table has a removable miter guide that can be adjusted to 45-degrees from center forward and back. It has a dual scale cast into the surface so the miter guide can be used with the sliding table mounted on either side of the blade. The cast in scale appears very close but depending on how you look at the graduations, the setting can be slightly off. I have found it easiest to get dead-on miters by setting a common angle finder with a protractor or similar tool and then using that to set the miter fence. The miter guides distance from the blade can be adjusted at the fence itself and by repositioning the sliding table on the fence rails. Blade Guard and SplitterInstalling or removing the guard/splitter mechanism requires raising the blade fully and tilting it 30-degrees to gain access to the two bolts with the included wrench. As guard/splitter installations go, this one is not bad. The splitter is centered behind the blade by inserting it between a series of leaf shims. The retaining bolts are in slotted holes that allow adjusting the clearance between the splitter and the blade.
While the anti-kickback pawls are effective, their teeth are very sharp and the springs rather strong. Throughout my tests, they tended to scratch the surface of the wood as it passed under them. The scratch is not severe, but noticeable. The FenceThe Ryobi BT3100 rip fence is 23 ½" in length and made from a rigid aluminum extrusion with slots on the sides and top that allow attaching jigs and fixtures. The fence locks at both the front and rear rails with a single front-mounted lever. The dual locking is effective and makes for a very stable fence. The front rail has an easy-to-read scale that corresponds with a fine-line indicator on the fence that can be positioned on either the left or right side of the locking handle. Motor
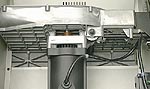
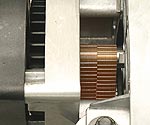
The Ryobi BT3100 is powered by a 15-amp (120 volt) motor that spins the 10" blade at 4800 RPM. Unlike most of its competitors in this price range, power is delivered to the blade through a pair of V-belts that help reduce noise and vibration. The motor, driving the supplied thin-kerf carbide tipped blade, seems to have plenty of power when the wood is introduced at a reasonable feed rate. When cutting a variety of hard and soft woods I did not notice a discernable loss of blade speed. During testing of the Ryobi BT3100, I cut several feet of 2 ¾"-thick cherry along with a bunch of 7/8"-thick walnut, oak and maple. All of the cuts were clean with no burning or hesitation. While the Ryobi BT3100 is not a powerhouse, it seems to handle all of the tasks the average home woodworker is likely to encounter with ease. Arbor and DadosThe 5/8" arbor has spacers on it that can be used in various combinations to accommodate most wobble or stacked dado blade sets. I used an 8" stacked dado outfit set to ¾" with no problem. Before operating any dado blade on this or any saw, be sure to check for adequate clearance at all points around the blade. The design of the arbor system allows this saw to make a 3 9/16" cut with the blade in the vertical position. Dust Collection
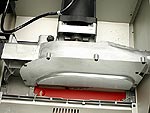
The Ryobi BT3100 blade is enclosed below the table in a metal shroud that directs dust back to a 2 ¼"-diameter port at the rear that moves with the blade when tilted. Enclosing the blade this way substantially reduces the amount of area from which dust is extracted, making even medium-powered shop vacs surprisingly effective. Some dust will still come over the top of the blade, as it will on all saws, but the Ryobi BT3100 dust system is one of the most effective I have seen. ControlsA single hand wheel on the front of the cabinet controls blade height and angle, switched between those modes by a lever at it's base. The tilt mechanism has adjustable stops at 90-degrees (vertical) and 45-degrees. On my Ryobi BT3100, the 45-degree stop was off slightly from the factory but I was able to reset it with little trouble.
Making accurate height and angle adjustments is easy, and they stay put during operation. The On/Off switch has a full cover that must be lifted to start the saw; pushing anywhere on the cover shuts it down. The switch is located at the right side of the cabinet front which can be a little awkward at times depending on where the operator stands. The Ryobi BT3100 is not alone in this by any means. No matter where the switch is placed, it will be awkward for some percentage of the operators. In the ShopAs soon as I had it ready to operate, I rearranged my shop, making the Ryobi BT3100 my primary table saw. Since then I have used it exclusively in the building of several projects and have found the Ryobi BT3100 to be both accurate and more than sufficiently powered.
The supplied blade (36-tooth, carbide tipped, 2.5mm kerf) made very clean cuts that were virtually glue-ready. In fact, I did a small panel glue up, ripping the pieces on the Ryobi BT3100 and skipping the trip to the jointer. The panel came out flat with an even, thin glue line. I applied a light coat of Johnson's Paste Wax to the table surfaces, fence sides and the sliding table runners. Wood slides easily on the table, something I was a bit concerned about when I first saw the powder coated table surfaces. The miter guide locks securely in place and feels very stable in use. Because the face of the miter guide is bare aluminum, wood has a tendency to slip a bit when making high angle cuts. A strip of abrasive tape on the face of the miter guide would make this an even more accurate tool. The Ryobi BT3100 may be most remarkable in it's adaptability. The modular design makes it easy (and fast) to reconfigure the working surface to fit the job at hand. I had to cut dados in a cabinet side that required extending the fence and rails full right. On a traditional saw, the end of the plywood at the fence would be hanging off the fixed table a considerable distance and could slip beneath the fence ruining the cut and possibly initiating a kickout. On the Ryobi BT3100, I simply moved the sliding table to the right side next to the blade table and the accessory table out near the fence. The wood was solidly supported over its entire length and very easy to move across the dado blade accurately. Overall the Ryobi BT3100 is slightly noisier than my Jet table saw, but certainly not to the point of distraction. It is also surprisingly smooth running despite weighing just over 100 pounds, stand, sawdust and all. I have always been wary of equating the smoothness of a machine to its weight. Extra weight does absorb vibration, but the Ryobi BT3100 proves my theory that if the machine doesn't vibrate in the first place, extra weight is just extra weight. Conclusions I have to admit that the Ryobi BT3100 Table Saw System surprised me. I knew very little about it other than I was getting enough email on it to pique my interest. Once again, the masses were right.
The Ryobi BT3100 Table Saw System is a very capable machine at a bargain price for the hobbyist woodworker. It is surprisingly accurate and the modular concept makes it far more versatile than I would have anticipated regardless of the purchase price. The sliding table draws a lot of attention but there is more to this saw. It is very accurate and seems surprisingly well built. The value of the Ryobi BT3100 to the hobbyist woodworker is not a well-kept secret. A visit to www.bt3central.com, a heavily visited website run by Ryobi saw owners (not Ryobi) that focuses on Ryobi table saws, and the Ryobi BT3100 in particular, is proof of its popularity. The vast majority of the messages are from happy users with remarkably few relating problems or disappointment. Though its price suggests the Ryobi BT3100 is a "get your feet wet" temporary machine, long-time Ryobi BT3100 users consistently argue otherwise. Many have been using the Ryobi BT3100 and the previous version for years and continue to tout its performance. It is very hard to argue with a woodworker who is happy with a machine. If cast iron and big motors are what define a table saw to you, the Ryobi BT3100 probably is not on your short list. However, if you want accuracy and versatility at a bargain price, the Ryobi BT3100 Table Saw System, waiting at a Home Depot near you, deserves a hard look. I think finding a more versatile, more accurate table saw with a price tag anywhere close to the Ryobi BT3100 is going to be a very, very tough job. Note: This saw seems to have gone out of production. Do you have a comment about this page? - Email Me! |

All written, photographic and drawn materials are property of and copyright by NewWoodworker.com LLC 2000-2019. Materials may not be used in any way without the written permission of the owner.