
This is a Veteran Owned site

 |
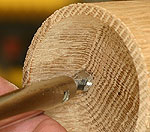
As is so often the case, a simple idea solves a complicated task. The Termite makes end grain hollowing fun! Click image to enlarge |
The "Termite" End Grain Hollowing Tool
Making a tough task easy
Text & Photos by Tom Hintz
Hollowing into end grain has always been one of the more frustrating turning procedures but Oneway Manufacturing (Stratford, Ontario, Canada) has come up with an easy to use tool that makes this and other tasks surprisingly easy.
The Kit
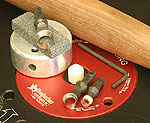 |
The Termite kit includes everything you need to use and sharpen the included bits. Click image to enlarge |
The Termite tool comes packaged with a 21 ½"-long handle (15 ½") and shank, (7 ½") a #1, 3/8"-diameter bit (#2161), a #2, ½"-diameter bit (#2162), hex wrench, grinding (sharpening) block, grinding stone and dressing stick. A larger #3, 5/8"-diameter bit (#2163) is also available. The different bit sizes are designed primarily to regulate the amount of wood removed.
At first glance, all of the pieces in the Termite kit appear well made and the bits sharp as they come from the Oneway factory. If you already own Oneway tools, this will come as no big surprise.
How It Works
 |
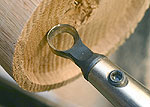 |
Those who take the time to read the simple instructions will know the photo on the left shows how the Termite is supposed to be used. Those choosing to skip the instructions might try the wrong presentation shown in the photo on the right and find that this is about the only way to make the Termite catch. Click images to enlarge |
|
The concept behind the Termite is deceptively simple. It is essentially a shear cutting tool but the unique circular shape of the bit, when used correctly, is virtually catch free and produces remarkably smooth cuts in virtually any material.
The circular Termite cutter is presented to the wood with the hole on the horizontal plane rather than up and down. It is this orientation of the round cutting edge that allows it to cut so cleanly, and catch free. Turning the bit at a slight angle, the hole not quite horizontal, makes the Termite a little more aggressive but it still cuts very cleanly.
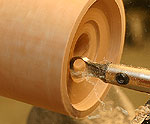 |
Cutting fine ribbons of wood from even dry oak is possible with the Termite. Also, notice how far the tool overhangs the rest. The Termite is surprisingly resistant to the chattering this induces in many tools. Click image to enlarge |
The angle at which the cutting edge is presented to the wood allows it to slice the wood fibers with virtually no tearing or chipping. In fact, throughout my testing, the only way I could get the termite to tear the wood was to purposely present the cutter to the wood at a substantially incorrect angle.
The tapered end of the shank in which the bits are secured means that the tool rest is set back more than you may be accustomed to. The instructions call for 1 ¼" to 1 ½" of the tool ahead of the rest. In use, the Termite did not feel sensitive to reaching a little further. It will chatter if you extend too much of the shank over the tool rest but even that seems reduced, probably due to the shape of the bit.
The circular shape of the Termite cutting edge means the actual contact area is small. That translates into a surprisingly small amount of force needed to make a cut. Once you learn to move the Termite through the wood rather than applying pressure against the wood as with some other tools, using the Termite is very easy. While the Termite bits like to be swung through an arc, they work equally well when pulled or pushed in a straight line once the depth is established.
When the amount of effort needed to make a cut increases, it is almost certain that the cutting edge needs freshening. The difference in feel from sharp to dull is easy to notice with a little experience using the Termite.
Sharpening
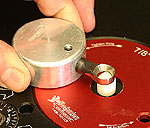 |
Using the included holder and grinding stone, sharpening the Termite bits is fast, easy and very effective. Click image to enlarge |
The circular shape of the Termite bits require special attention. The puck-shaped grinding block and grinding stone supplied with the Termite kit make freshening the bits very simple and fast.
The grinding stone has a ¼"-diameter shank and is meant to be used with a router (mounted in a table) to achieve the 16,000 to 30,000 rpm range necessary for the stone to work properly. A drill press, even a fancy one, is not even close to being fast enough to work.
The grinding block has a hole and set screw that holds the bits just as the tool shank does. The hole is located in the block so that the cutting edges on both sides of the bit can be freshened by simply turning the block over.
To sharpen the bit, install it in the grinding block and the stone in the router. Adjust the height of the stone so its tip is just above the centerline of the bit. Start the router and move the bit in a circular motion to grind the inside edge. Flip the block over and repeat on the opposite edge. All three bit sizes can be sharpened with the supplied grinding block with minor stone height changes needed for each bit.
Note: Only the inside edges are ground for sharpening. The outer surfaces are factory ground to a specific angle that requires no maintenance. Grinding the interior surfaces is all that is needed.
In The Shop
Video Demo! |
Using the Termite is surprisingly easy, providing you read and follow the instructions. The round shape of the cutters makes it appear that they will work fine with the hole pointed up and down. Those who skip reading (or believing) the instructions find out (very quickly I suspect) that this is how to make the Termite catch. Apply the Termite to the wood with the hole on the horizontal plane, as per the instructions, and it is all but impossible to have a catch.
I also found that the double-sided bits makes cutting in both the push and pull modes rather easy. After angling the cutter to establish the depth of cut, moving the handle so it is more square to the cut surface allows you to move the cutter along the wood, often producing a near perfect surface finish. With a little practice, it is easy to cut very smooth, flat bottoms in goblets or other hollowed projects.
 |
The relatively small size of the Termite bits and how they are used makes cutting very small-radius corners in hollowed projects easy. Large radius corners are easier yet if you want those. Click image to enlarge |
I also found the Termite to be very easy to use on the interior sides of a hollowed project. Being able to take light, clean cuts so easily allowed me to form goblet sides thinner than ever. Not having to worry about a catch in this delicate process also does wonders for your confidence.
The outside edge of the Termite bits are ground at a small angle, forming a sort of bevel that helps establish the handle position. Though the bits cut well "on edge," rubbing this outside bevel really smoothes out the cuts. Riding the bevel also seems to stabilize the cut depth, allowing exceptionally straight surfaces to be produced.
The relatively small size of the Termite bits and the angle at which they are used allows cutting transitions from the bottom to the sides with a surprisingly small radius. The Termite also likes cutting when swung through an arc, making it just as easy to produce fully rounded interior shapes in hollowed projects.
 |
Turning goblets of virtually any shape is simple with the Termite, but that is just the beginning. The more you use this tool, the more uses you find for it. Click image to enlarge |
While the Termite is touted as a hollowing tool, I found it also cuts very cleanly on exterior surfaces. While "playing" with the Termite, I turned the goblet (In the photo at left) with the long arc stem shape, using only the Termite to form both the interior and exterior. The inside and outside surfaces needed only light sanding (320-grit) before finishing.
I also used the 5/8"-diameter bit to make final cuts in an ambrosia maple bowl to see how it handled that dreaded end grain that always seems to stand up. The Termite produced an almost sand-free finish after taking two light finish cuts.
Conclusions
The Termite is a uniquely designed tool that makes one of the more frustrating turning chores much easier. It produces remarkably smooth surfaces when hollowing end grain but also makes many other cuts just as cleanly. Learning to use the Termite is easy if the instructions are read and followed. The simplicity of the Termite means very little practice is needed to get the feel of using it.
If there is a down side to owning the Termite, it is how frequently you reach for it. Since getting the Termite, I find myself using it whenever a previously difficult cut is encountered. In many cases, the Termite did a better job than more traditional tools at producing a smooth surface.
 With a price of only $79.95 (2-29-2006) for the Termite Kit (#2176) that includes two bits and the sharpening tools in addition to the handle, this is a very good value for the woodturner even if it is only used for end grain hollowing. I suspect that you, like me, will find many other ways of using the Termite to extend that value even more.
Have a comment about this review? – Email Me!
All written, photographic and drawn materials are property of and copyright by NewWoodworker.com LLC 2000-2019. Materials may not be used in any way without the written permission of the owner.