
This is a Veteran Owned site
![]()
 |
Routing a simple recess along the bottom edge of box-type projects creates "feet" that help it resist rocking on surfaces that are slightly less than absolute flat. Click image to enlarge |
Routing Box Project Feet
Sitting flat when the surface isn’t
Text & photos by Tom Hintz
Posted – 1-1-2007
Many projects are supposed to sit on a flat surface without rocking. The problem is that even if the bottom of the project is absolutely flat, the surface on which it is placed often isn’t. Despite a nifty piece of woodworking precision, you wind up looking inept. There is a simple answer that helps cure the rocking syndrome while stepping up the appearance of the project at the same time.
Routing recesses along the bottom edge of a project creates feet at the corners that helps it straddle small high (or low) spots that are commonly found in counters or furniture tops that can appear totally flat visually. Creating these feet goes a long way towards eliminating rocking in all but the more severe cases.
Making this technique even more attractive for woodworkers of all experience levels is that all you need is a router table (with a fence) and a straight bit with cutters that are longer than the project material is thick. This operation cannot be done safely with a hand held router.
Setup
 |
These layout lines, drawn on the fence make it easy to create equally sized "feet" that not only help prevent rocking but give the project a more finished look. Click image to enlarge |
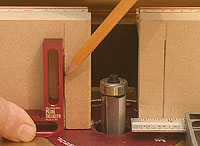
With the straight bit installed in the router table, adjust its height so that the cutters engage the full thickness of the wood. Many straight bits (like the Infinity #06-690 used in this story and video) have a guide bearing at one end of the cutters. Be sure to set the bit height so that the bearing does not contact the wood. This Infinity bit has an overall diameter of ¾” that produces a nice arc at the end of the cuts that define the feet. I have used this bit to create feet on several project sizes with good-looking results.
Set the fence so that the bit will make a cut approximately 1/8” deep. It is important to make multiple light cuts to reduce chipping. After each pass, adjust the fence to increase the cut depth by no more than 1/8”.
To size the feet (width) we use vertical layout lines drawn on the fence. On projects such as jewelry boxes I find that feet between 1” and 1 ½” in width look good. However, feel free to alter this dimension to produce the best look for your project. The most important thing to remember is that smaller feet work better than larger ones in terms of preventing rocking.
I use a ruler to measure out from the cutting edge and then a small square to extend the layout lines up the face of the fence. The lines are drawn to either side of the bit at a distance equal to the size of foot being made. The bit will have to be turned so that the cutter is aimed towards the layout line so be sure the router motor is unplugged from the power source!
Making the Cuts
Note: To present clear photos of this process, the demonstration in the photos and video is done using a flat piece of stock. The cuts demonstrated are actually made on the project after it is assembled. The video accompanying this story shows this process clearly. Read the text and then watch the video.
 |
While the feet are routed in the project after it is assembled and the sides sanded flat, the photos and video in this story use a flat piece of scrap so you can clearly see the interaction of the wood and router bit. Click image to enlarge |
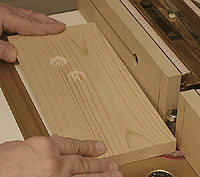
The process of routing feet is a simple two-step cut that is repeated on each side of the project. The project is routed while lying flat on its side, the bottom against the fence. By making the cuts the same way on each side, matching the corners to the vertical layout lines on the fence, equal length feet are cut on each side. Most important is remembering to route all four sides before adjusting the fence to deepen the cut for the next pass.
The first step is to make a plunge cut at the right end of the project to minimize chip out. Hold the left corner against the fence, the right side held away from the bit. Align the right corner so that when slowly plunged over the bit, the right corner meets the vertical layout line to the right of the bit. Start the router and slowly rotate the right corner into the bit until it contacts the fence. Without moving the project left or right, carefully pull it back until it clears the bit.
 |
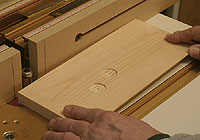 |
(left) First make a plunge cut with the right corner of the project at the right layout line. This helps eliminate chipping and tearout. (right) The second cut is made with the left corner of the project at the left layout line. The project is then held against the fence and moved right to left until the cutter enters the plunge cut made earlier. This same process is repeated on all four sides of the project. See the video and text for more details! Click images to enlarge |
|
Move the project to the right, hold the right corner against the fence and slowly plunge the left side over the bit, aligning the left corner with the vertical layout line to the left of the bit. Holding the project against the fence, slowly move it right to left to make the cut. When the bit enters the space created by the plunge cut stop and rotate the project away from the bit.
Repeat this cut sequence on the three remaining sides. When all sides are routed, adjust the fence to increase the cut depth 1/8” or less and repeat the process on all sides until the recess is at the depth desired.
Video Tutor |
In most cases, I route the recess that defines the feet to a depth of ¼” to 3/8”. The most obvious limitation in this depth is how far the floor of the project is spaced above the lower edge. I try to leave at least 1/8” of wood between the floor and the top of the recess. Cutting the recess to a depth of ¼” is more than sufficient to make the project sit flat on a surface and seems to give a nice look to the piece as well. On larger projects you may feel a deeper recess looks better but make sure the floor of the project remains fully supported!
After routing, there may be a small bump where the long and plunge cuts meet. I use a piece of sandpaper wrapped around a scrap of wood to smooth that bump away. Sanding is much safer than trying to continue the long cut until it contacts the end of the plunge cut made earlier.
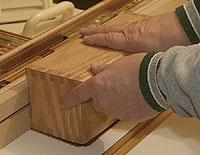
Leveling the Feet
With the routing completed, set the project on a surface known to be flat to check the feet. I use my cast iron table saw surface for this check. If the project rocks at all, place a sheet of 150 grit sandpaper (grit up) under the long foot and while holding moderate downward pressure on that corner, pull the sandpaper to reduce that foot slightly. If the project was built straight to begin with, this adjustment will be minor and accomplished with a few pulls of the sandpaper.
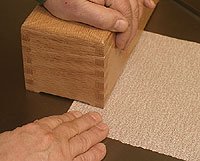 |
Put the project on the cast iron table saw surface, a sheet of 150-grit sandpaper under the long leg and then pull the paper across the leg to shorten it slightly. This is an easy-to-control procedure that makes getting a perfectly flat set of feet very easy Click image to enlarge . |
If the project has a specific spot in which it will stand, this final adjustment of the feet can be done there if you suspect that surface is not perfectly flat.
That’s all there is to it! I have used this process on many types of projects. It is very easy to do and aside from preventing rocking, adds a very nice visual element to the project. Take your time, use a good quality, sharp bit and keep the feed rate slow enough to prevent excessive chipping.
Have a comment on this story? - Email Me!
Back to the Tips & Tricks List
All written, photographic and drawn materials are property of and copyright by NewWoodworker.com LLC 2000-2019. Materials may not be used in any way without the written permission of the owner.