
This is a Veteran Owned site
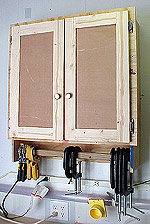
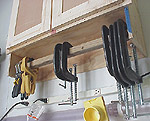
Small Wall CabinetWith small clamp rackText and photos by Tom Hintz The area beneath most wall-hung shop cabinets seemed lost to me. With all of the small hand tools and clamps we use in woodworking, I knew there had to be a way to make some use of this space. I wanted to keep the design of this cabinet simple, and the cost low, but still make use of the available space as best I could. Since the cabinet would be hung behind the workbench, height and depth were important considerations. I had the room to build a large cabinet, but most of it would be out of reach, rendering much of it useless. I also wanted to incorporate a rack on which to hang my small but growing collection of hand and "C"-clamps. The final design called for a cabinet that would be 30-inches tall, 28-inches wide and eight ¼-inches deep. While most of the cabinet area would be covered by doors, the bottom 5 inches was left open for a 2 X 2-inch wooden bar on which clamps could be hung. Another benefit of keeping the scale of this cabinet relatively small is that I was able to cut almost all necessary pieces from the 9/16-inch-thick plywood scraps left over from building my new bench and other shop cabinets. I had to buy one pine board from which the frames for the doors were cut. The construction of this cabinet is simple but strong. The bottom and two shelves are glued and screwed into ¼-inch-deep dados and the top similarly secured in a rabbet. A ¼-inch-thick plywood back is glued and brad-nailed into a rabbet.
The 2X2-inch bar is glued and screwed to the inside surfaces of the cabinet sides where they extend downward. The bar is installed with it's upper edge located 2-inches below the lower shelf. In my case, this clearance works with the clamps I intend to hang there. You may have to alter this dimension to fit our needs. A 1 ¼-inch-wide face frame was glued and nailed in place and flat panel tongue and groove doors hung on simple hinges. The strength of this kind of mounting is dependent most on how secure the cleat parts are to the wall and the cabinet. I glue and screw the cabinet segment for maximum durability. I routinely hang pipe clamps and other heavy articles on similar mounts in my shop with no problems. There are limits however and while I have not yet found them, it is a good idea to not get carried away with loading such an installation. One of the nice things about this kind of mounting is you can take the cabinet and mount with you if you move, or decide the cabinet would work better someplace else. All that remains on the wall is a pair of small holes that can be easily repaired. The size and design of this cabinet allowed me to build it almost exclusively out of the scraps left over from my shop rebuild. My total out-of-pocket expense for this cabinet was under $6. I did buy the plywood, but made this cabinet from pieces that would otherwise have gone the way of the trash man. Do you have a comment about this page? - Email Me!
|
All written, photographic and drawn materials are property of and copyright by NewWoodworker.com LLC 2000-2019. Materials may not be used in any way without the written permission of the owner.