
This is a Veteran Owned site
 | |||
Square Your Radial Arm Saw Table
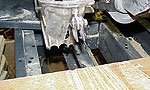
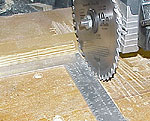
Text & Photos by Tom Hintz Recently I was checking the alignment of my shop equipment. I try to do this several times per year to insure everything is working properly. In addition, this maintenance helps prevent excessive wear and preventable failures. I consider this effort not only a safety issue, but a budgetary one as well. The longer my equipment lasts, the more money I have to obtain equipment I still want. There is lots of that left out there. While working on my radial arm saw, I decided to remove the front table to ensure the leveling mounts to which it is secured were properly set. I had used this surface as a bench recently, including whacking resistant shelves into dados with a dead-blow hammer. When reassembling the table I thought to check its alignment to the rest of the saw. One of the next steps would be going through the alignment process for the blade, much of which is based off its relationship to the fence. Since the fence is totally dependent on the front table position I thought it wise to make sure this was correct. Making sure the main arm and saw were set to zero, I lowered the blade near to the framework to which the table is secured. I found that the blade tracked almost perfectly along the center frame rail (runs front to back directly under the arm) of the saw base. I loosened the mounting bolts and adjusted the entire arm assembly slightly and the blade tracked perfectly along this frame rail. When I reinstalled the table top I checked it's position relative to the center brace and found that even with all five mounting screws snugged (not tight) down, I could move either end of the table to the front or rear by nearly 3/8-inch. Tightening the mounting screws did not bring the table back into line with the frame. This meant that if I did not purposely align it, I could secure it out of square to the travel of the saw along the centerline of its base. Since that also meant the fence, (sandwiched between this mounted front table section and clamped rear table pieces) was not square to the frame of the saw, trying to adjust the saw according to an out-of-square fence simply could not produce the best results. I carefully squared the back edge of the table to the framework of the saw, tightened the screws that secure it and rechecked it. Now, with this part of the assembly square, the rest of the alignment procedure could progress normally. As I went through the setup procedure described in the instruction manual I found that the saw was farther out of line than I had encountered before. I carefully followed the alignment procedure, in the proper sequence, through the rest of the setup routine. After completing the setup process, I made some test cuts and found the saw was cutting perfect 90-degree corners. Ripping is very straight with what appears to be far less effort by the motor. Even 45-degreee cuts are nearly perfect. I have since used the saw many hours and it continues to cut properly with square edges and little burning of the stock. While this extra step might add a few minutes to the setup process, the results are impressive. I would think it also makes the saw safer as whatever you can do to insure alignment of the blade to the fence should also reduce the tendency for kicking the workpiece out. This process worked well on my 5-year-old Craftsman saw, but you will have to judge for yourself (or better, contact the manufacturer) how appropriate it is for your equipment. As always, follow all of the recommendations of your saws manufacturer. Do you have a comment about this page? - Email Me! |
All written, photographic and drawn materials are property of and copyright by NewWoodworker.com LLC 2000-2019. Materials may not be used in any way without the written permission of the owner.