
This is a Veteran Owned site
| |
||||||||||
Standardized Dados
An old technique with new applicationText & Photos by Tom Hintz Cutting dados for odd or inconsistent wood thicknesses is nothing new. A retired cabinetmaker described Standardized Dados, a technique that he used as far back as World War II and his mentors during the Depression before that. Back then, inconsistent thickness was often caused by less sophisticated manufacturing processes and shortages related to the Depression or the war effort. Today manufacturing errors a rare but we continue to face undersized plywood and irregular dimensions of solid wood that may be caused by our own use of jointers and surface planers. The good news is the techniques used back then work just as well today. This is the woodworking version of the old adage, "Don't raise the bridge, lower the river!" The better news is you probably already have the necessary tools or can obtain them without upsetting even modest wood shop budgets. Basic SkillsTo accomplish this decidedly low-tech bit of dado trickery two basic skills are required.
First is cutting a dado, a simple task when we know the size and have properly sized tools to cut them. With the Standardized Dado process, we do. Second is cutting a rabbet. Again, a simple task that in this case, uses the same tool that cut the dado. The depth of the dado remains the same as when using conventional techniques. All that changes is the width of the dado and how we fit the stock that goes in it. The PremiseThe idea behind Standardized Dados is quite simple. Rather than adjust the width of the dado to fit the wood, we fit the wood to a known dado width. This eliminates shimming stacked dado cutters, buying special diameter router bits or making multiple cuts with a small router bit. Cutting the dado in one pass eliminates multiple setups, each of which introduces another opportunity for error.
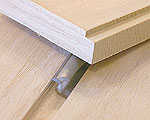
The Standardized Dado process uses a standard sized router bit or dado stack to make the dado and then that same cutter is used to form the rabbet that makes the wood fit the groove. This process is much faster and does not significantly affect the strength of the joint it creates. The ToolsChoose a router bit or stacked dado configured to cut a standard width. The key is whichever cutter is used, the groove it creates must be slightly smaller than the thickness of the wood for which the dado is being cut. For example, I often use a 5/8"-diameter router bit to cut dados for ¾"-thick or 23/32"-thick plywood. Most often, I just hold the cutter against the edge of the wood and if it is slightly smaller, I have the right tool. Lay Out the DadosLay out is done essentially the same way as with traditional dado methods. I find it easiest to measure and mark all of my dados using the bottom edge of the piece as the reference point. Because the wood fitting into Standardized Dados registers exactly with the bottom of the dado and not the top, that is the most accurate point of measurement for me.
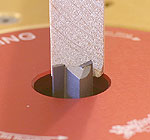
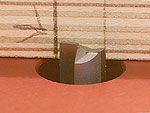
I also like to draw a line at the other side of the dados, essentially outlining them. Machine SetupWith the dados marked on the workpiece, you can then measure from either the top or bottom of the piece to the bottom of the dado for setting the router table or table saw fence. Make sure the fence setting places the cutter at the bottom edge of the dado and the groove runs between the layout lines. The cutter depth is set normally. I generally use 1/3rd of the thickness of the wood the dado is being cut in as my bit depth. Many use standard depths like ¼" or 3/8". With a good fit between the two pieces, any of these depth ideas will work in most applications. Cut the DadosInstall the cutter and set its depth. Cut the dados as you would using any other method. Fitting the CrosspiecesIn most cases, the same cutter and machine (table saw or router table) used to make the dados can be used to cut rabbets in the crosspieces that fit them to the dados. Adjust the fence and bit depth to cut a rabbet that reduces the crosspiece thickness to match the dado width. Use a piece of scrap the same thickness as the crosspieces to confirm that the depth and width of the rabbet are correct.
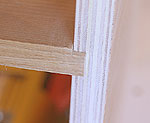
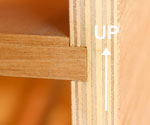
The rabbet must be cut in the top surface of the crosspiece as it will be installed in the project. This is so the full with of the wood rests on the bottom edge of the dado. While this is particularly important with plywood, it also insures maximum strength with solid wood as well. If the piece were installed with the rabbet facing down, it would be much easier for solid wood to split along the grain or plywood to separate between its layers. After cutting the rabbets, check their fit into the dados and all that remains is applying glue and assembling the project. That is all there is to the Standardized Dado technique. It is fast, easy and most often does not require buying specialized cutters, which makes it cheap as well. If you do have to buy a cutter, chances are it can be used in many other situations in addition to making Standardized Dados. In the vast majority of situations, the amount of wood removed during rabbeting will be well under ¼", usually 1/8" or less. Because of this, the strength of the joint is not substantially compromised and will only be a consideration in the most extreme situations. In those cases, as with more conventional dado joints, additional support or the addition of mechanical fastener assistance may be required. Do you have a comment about this page? - Email Me! Back to the Tips & Tricks List
|
All written, photographic and drawn materials are property of and copyright by NewWoodworker.com LLC 2000-2019. Materials may not be used in any way without the written permission of the owner.