
This is a Veteran Owned site
 |
|||||
Tips for the Porter Cable 693PK Router SetText and photos by Tom Hintz Note: I experienced the following problems with this router set. While I have personally heard from several others who had similar experiences with this particular router, that does not mean you will have them with yours. As always, follow the manufacturers instructions and recommendations when using your router.Since purchasing the Porter Cable 693PK router set, I have found it to be an excellent piece of equipment. Overall, it performs well beyond expectations. However, two small problems can be frustrating if you do not know how to get around them. Fortunately, it was not long before I heard from fellow woodworkers who had found the answers.
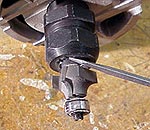
First, when installing the bit, do not seat it against the bottom of the collet. Hold the bit up from the bottom of the collet 1/16-inch. This is a good practice regardless of who makes the router and can help prevent the bit from locking in the collet. The first problem I experienced with this router was bits with a ¼-inch shank hanging up in the collet. The good news is simply loosening the collet nut all the way releases the bit. To remove the bit, break the nut loose and spin it off until it contacts the retaining clip near the end of the collet. Give the nut an additional turn by hand or with the wrench, and the bit (and collet) pops free easily. It works every time. The other problem occurs when installing the router motor in the plunge base. If the motor is seated fully in the base housing and the locking screw tightened, the locking plate and motor can be very difficult to separate.
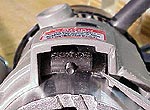
Here again, the answer is very simple. When you slide the motor into the housing hold it back so there is approximately an 1/8-inch gap between the plunge housing's upper edge and the shoulder on the motor. Make sure you maintain this gap when tightening the locking screw. When removing the motor from the plunge base, loosen the locking screw, backing it out ½-inch or more, and then push the motor in before pulling it out. Pushing the motor in breaks the locking plate free allowing the motor assembly to slide out easily. Using this procedure, I have never had a problem removing the router motor. Porter Cable, in their instructions, says when removing the router motor to remove the locking bolt, washer and nut completely and then insert the included Allen wrench and tap on the locking plate to free it. Before hearing about the procedure above, I had experienced the motor sticking in the plunge base. I was able to free the locking plate by using the procedure described in the Porter Cable instruction manual that came with the router set. Very light taps were all that was needed to rock it free and release the motor. DO NOT get carried away with a hammer on the locking plate as you could damage the locking system and the plunge housing. Do you have a comment about this page? - Email Me! Back to the Tips & Tricks List
|
All written, photographic and drawn materials are property of and copyright by NewWoodworker.com LLC 2000-2019. Materials may not be used in any way without the written permission of the owner.