
This is a Veteran Owned site
 |
||||||||||||||
Mortise and Tenon Joints Made Easy
Text & Photos by Tom Hintz For many new woodworkers, the mortise and tenon joint is both fascinating and intimidating. We see "pros" carving "tap-in-tight" mortise and tenon joints at will. Parts line up exactly as intended every time and there is never a hint of frustration, except on this side of the TV. When we make them ourselves the tenons often need to be rasped or chiseled down to size or need shims to fill the rest of the mortise. Even then, the parts are often out of alignment, requiring lots of sanding to smooth the joint. The result is a joint that is neither right nor as strong as it should be. Like many of you, I soldiered through this frustrating stage of my woodworking learning experience before stumbling across this procedure. I doubt this idea is new to experienced woodworkers, but it was to me, and may be to you. Now, my mortise and tenon joints fit snugly, are square to the workpiece and align the way I wanted. So what changed? Specifically, I cheat. Lets start with the simple things you can do to help yourself.
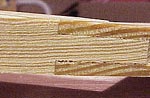
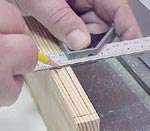
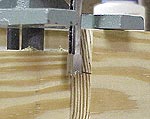
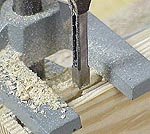
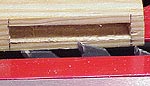
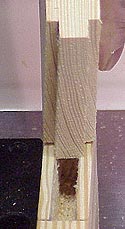
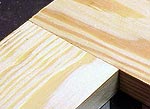
The most common ways of cutting mortises are with a router, drill press or a dedicated mortising machine. Whichever you use, the key is to get the mortise centered exactly. The easiest way to center a mortise is to make the cut from both sides of the stock. One of the benefits of this technique is being able to size the tenon to make full use of the strength available, and still get it centered. When doing my setup for the mortise, I pay attention to two things. The length of the mortise, and the material left on the outside of the mortise. The most important thing is to insure the outer wall is not too thin. When joining standard ¾ inch-thick boards, I shoot for outer mortise walls approximately 3/16 inch thick. That produces a tenon roughly 3/8 inch thick. Because of how I form the tenons, I seldom know the exact tenon thickness unless I measure one out of curiosity. The shoulders of a mortise and tenon joint need not be large. They contribute little compared to the tenon itself to the strength of the joint. For the most part, the shoulders cover any small variations where the tenon enters the mortise and, when properly fit, provide a smooth transition from one piece of wood to the other, enhancing the visual impact of the joint. When setting the depth for a mortise, I add 1/16 inch or so. It is very difficult to get the bottom of a mortise perfectly flat so a little additional depth allows for irregularities and some of the glue buildup that is pushed down the sides when the tenon is installed. The critical layout lines for the mortises are the end points. These must be accurately drawn on each piece. The sides of the tenon are set with one line down one side of one mortise, used to set the fence. Once the fence is properly set, you can cut your mortises. Remove the material between your layout lines on one side, turn the work piece around and do the same on the other side. The result is a perfectly centered mortise. As with mortises, there are a number of ways to cut tenons. Router tables, arm saws or table saws all do a good job. I use a tenoning jig for most of my tenons, but still find the setup on the table saw. For the example in the accompanying photos, I nibbled the tenons on the table saw. (Note: For discussion here, I assume you are using a table saw. A radial arm saw or router table can also be used. Adjusting the cutter or blade may differ in direction but otherwise the procedures are the same.) Lay a finished mortise next to the blade on the table saw. Carefully raise the blade so it is just below the edge of the mortise, and then lock it down. We are not trying to bulls eye the setting on the first try, mainly because that seldom works. We can always bring the blade up to trim a bit more off. Nibble the tenon back ¼ inch or so on both sides, then match the cut portion to your mortise. Usually we will be a little oversize and can now see by how much. Make a SMALL adjustment to the blade and nibble over the same area of the tenon again. Remember your adjustment is effectively doubled because material is removed from both sides of the tenon, so keep adjustments SMALL. Repeat this process until the end of the tenon just slips into the mortise. When satisfied with this setting, go ahead, cut the rest of the tenon to size, and try it in the mortise once more to confirm your setup. The tenon should fit the mortise neither very tight nor very loose. I like tenons just tight enough that it is difficult to press them in by hand. A couple light taps with a hammer should seat them. If heavier persuasion is needed you risk splitting the mortise open, especially when glue is added, which takes up a little more space and swells the tenon slightly. If the tenon is too tight, make a tiny adjustment to the saw blade, go over the entire tenon area again, and then re try the fit. We could massage the tenon with a rasp but the idea is to develop a setup that will cut all of the tenons we need. Usually very little material has to be removed to correct the fit. After you go through this process a few times, it goes faster as you grow accustomed to the adjustments needed to properly fit the tenon. If we used a simple measurement when laying out the shoulders of our tenons, setting the saw up to make the initial cuts is easy. Since most tenons have shoulders of equal sizes on either end, one setup cuts both, making this part of the process go by quickly. I like to finish my shoulder cuts on the band saw, but you can nibble them away on the table saw or radial arm saw also. With the tenons cheek cuts completed you can adjust the blade to the proper height for the shoulder cuts (this is where those simple dimensions help again), and then trim the waste with a band saw, hand saw or nibble them away on the table saw. Your tenons will fit nicely and be centered over the mortise. If both pieces of wood were the same thickness, you will have very little sanding to do. |
||||||||||||||
Do you have a comment about this page? - Email Me!
|
All written, photographic and drawn materials are property of and copyright by NewWoodworker.com LLC 2000-2019. Materials may not be used in any way without the written permission of the owner.