
This is a Veteran Owned site
Walnut BoxText, Photos and Design By Tom Hintz
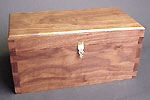
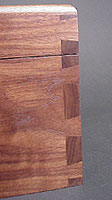
This was a commissioned project with the customer specifying rough inside dimensions material and general finish parameters. After some CAD-based experimentation with proportions I decided on finished dimensions of 14 ½"-long by 7 ½"-wide and 7"-tall. In this process I also established the cut line for separating the top from the body of the box at approximately 1 ½" below the top edge of the box. All four sides and the top panel are 5/8"-thick, planed to dimension in my shop. I was able to get stock sufficiently wide to eliminate glue-ups for everything but the floor panel. The floor of the box was glued up from 3/8"-thick stock, re-sawed from full-thickness material. Through dovetails were cut in all four vertical corners on my Leigh D4 jig. The exposed end grain of walnut tends to finish much darker than the long grain surfaces greatly enhancing the visual impact of through dovetails.
A ¼"-wide by ¼"-deep dado was cut around the bottom, ½" above the edge of the box to recess the floor panel slightly. The floor panel had a shallow rabbet cut in its perimeter to produce a lip that fit the dado loosely. The top panel was cut to match the outside dimensions of the box body. A ¼"-deep by 5/8"-wide rabbet was cut around the edge of the top panel to provide a substantial glue surface for joining to the body. After gluing in place, a 3/8"-radius roundover bit was used to ease the top edges of the box only. The vertical and bottom edges were left square. All surfaces were sanded to a 220-grit finish with all interior surfaces finish sanded prior to assembly. To enhance the grain I applied a coat of Minwax (#230) Early American oil based stain. The stain was applied with a foam brush and the excess wiped off immediately rather than waiting the five minutes prescribed in the instructions on the can. This seemed to work well at bringing out the grain without darkening the remaining wood substantially. When the stain had dried, three coats of Petri wipe-on satin poly were applied to all exterior surfaces. The interior received the same stain treatment, but two coats of the wipe-on poly. Note: Because this is a commissioned project, plans are not available. Do you have a comment about this page? - Email Me!
|
All written, photographic and drawn materials are property of and copyright by NewWoodworker.com LLC 2000-2019. Materials may not be used in any way without the written permission of the owner.