
This is a Veteran Owned site
 |
|||||||||||
Router Guide Bushings
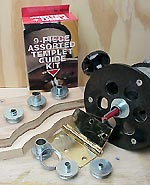
A little mysterious, but very usefulText and photos by Tom Hintz Guide bushings are simple devices that when used properly, extend the capabilities of your router. The bushing fits into the hole in the routers baseplate and is designed to follow a template, which guides the router bit, transferring the templates shape to another piece of wood. While guide bushings can be used for many tasks, they may not be the best choice for everything. Cutting a decorative edge, rabbeting and some other operations are more easily done with bearing-equipped bits. Guide bushings are seldom found in a router table, mainly because the template is smaller than the workpiece, meaning you would usually be working blind, which is not the safest way of doing things. Another benefit of guide bushings is the ability to use nearly any bit that fits through the collar. Woodworkers are constantly coming up with creative ways of using guide bushings, making them even more valuable in the shop. A word of caution about guide bushings and dovetail jigs. Most dovetail jigs require a specific bushing diameter to interact properly with their template. Often these diameters are not included in bushing sets and are usually obtained from the jigs manufacturer. Using the wrong bushing, even if the size is very close, will produce dovetails that do not fit. The Right Bushing Set
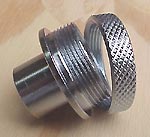
Not all routers, or bushing sets, are created equal. Though it would seem logical for all bushing sets to fit all router baseplates, that hasn't happened. The good news is that between the router manufacturers and aftermarket sources, there are bushing sets available to fit nearly all modern routers. Guide bushings have to fit the baseplate correctly to be accurate, and safe. When installed, there should be very little or no side-to-side play and the face of the threaded body should be flush with, or slightly below the surface of the baseplate. Bushing sets are available in either brass or steel. The only functional difference is that brass bushings usually can be tightened by hand, and stay tight. Steel bushings seem to vibrate loose more easily. Snugging the locking ring on steel bushings with pliers usually cures that problem. Aligning Bushings and BitsClearance between router bit and guide bushing can be very small, making alignment of the two critical. In some applications, especially when used with a dovetail template, having the bushing centered in the router base, and returning to that alignment whenever the baseplate is re-installed, is very important. Fortunately, most baseplates fit the routers accurately, but if your baseplate is slightly out-of-line, checking and correcting it is usually simple.
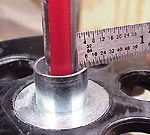
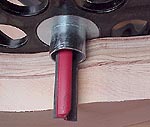
With the router unplugged, install a bushing and a router bit slightly smaller than the bushings inside diameter (ID). Check to be sure the gap between the bit and bushing is even all around. I use the depth feature on my digital calipers for this measurement but you can get it extremely close by eye. If the bit is off-center more than a couple of thousandths, try removing the baseplate mounting screws and turning it clockwise until the screw holes in the baseplate line up with the holes in the router base again. Re-install the mounting screws and check for even clearance around the bit again. In most cases, one of the possible mounting positions will center the bit within the bushing. Once the correct position is found, scratch a line in the edge of the baseplate, and router base at one of the mounting screw bosses. Then, when re-installing this baseplate you need only align these marks and the bushing will once again be centered on the bit. Template ThicknessThe major concern when designing templates is to use material that is thick enough to prevent the bushing from contacting the work piece. The largest collars in my Porter Cable (#42000) set (5/8 - 21/32 - 17/32 ID's) extend just less than 5/8" below the base. I use ¾"-thick plywood for nearly all of my templates to make sure whatever guide bushing I might use has adequate clearance. In those rare occasions when thinner template material is desirable, I use 7/16"-thick ply. I have yet to encounter a situation where template material thinner than 7/16" was necessary. Critical Distance
The most critical dimension to know when using a guide bushing is the offset: the distance from the outside of the collar to the cutting edge of the bit. This dimension is critical for placing the cutting edge where you want it on the workpiece. When making decorative cuts, like the ends of pergola rafters, a small error may be of little consequence. However, when cutting a mortise for a hinge, the template has to be exact. The most commonly used bit/bushing combinations are a ½" bit with either a 5/8" OD or ¾" OD bushing. The 5/8" bushing produces a 1/16" offset, and the ¾" OD bushing a 1/8" offset. Doing the math should give you the actual offset, but I like to double-check with a metal scale. A word of caution: I always use a ¾" OD collar with a ½" bit because of the clearance this combination affords between the cutter and collar. Depending on the wall thickness, a 5/8" OD collar may only provide 1/32" clearance between the bit and the inner wall of the collar. Such tight clearance could cause problems if chips build up in this tiny space. With shaft speeds of 10,000 RPM or more, I want the extra clearance. Making TemplatesOne of the attractive aspects of using templates is that we spend time refining one edge that is used to accurately transfer that shape to many work pieces. Regardless of the guide bushing diameter, the actual contact area where it meets the template is very small, meaning the bushing will follow, and reproduce, very small variations in the template edge to the work piece. Taking the time to get the template edge smooth and accurate pays dividends each time it is used.
When making a template, the amount of offset has to be included. Let's say we are making a template to cut a mortise for a 3 1/2" butt hinge, and the offset is 1/8". The opening in the template has to be 3 ¾"-wide (1/8" on either end) and the long side 1/8" greater than where that edge of the hinge is to be located in the workpiece. If the template is sized correctly, cutting mortises for that size hinge will be a snap until you ruin or lose the template. The math involved in making a template, more specifically avoiding it, is another reason I like using collar and bit combinations that yield an offset with a simple number. I am far more reliable when doubling a 1/8" offset than when working with an odd dimension. When using a template and router to cut a shape in a piece of wood I use bits with ½" shanks whenever possible to minimize deflection and chatter. In addition, ½" shanked bits come in much longer lengths that allow working with thicker wood. It may be tempting to cut large amounts of material from a workpiece with the router alone but doing so can be dangerous and seldom produces the best results. Use the template to trace the pattern onto the workpiece. Then, cut most of the waste away with a jig or band saw, staying roughly twice the offset distance from the line. Removing the bulk of the waste greatly reduces the load on the router, and the chance of splitting which can be dangerous. Templates can be attached to work pieces using clamps, screws, and even double sided tape. Whichever method you choose, make sure the template is secure enough to withstand the forces of the router. Also, if the template is long, it must also be secured at one or more points in the middle to prevent flexing. If the template distorts or moves, your work piece is history. Versatility, Low CostGuide bushings have many other uses such as routing patterns into the surface of wood, following lettering templates and even straightening the edge of a crooked board. Once accustomed to guide bushings, you may find other uses for them that make your woodworking a little more precise. Guide bushing sets are one of the cheaper tools you can buy. Sets start at about $15 and barring an accident, last forever. That works out to next to nothing per use. Considering the results, and the positive effect on our projects, that's a steal. Also, see our story on centering the guide bushing! - Click Here
|
|||||||||||
Do you have a comment about this page? - Email Me! Back to the Tips & Tricks List
|


All written, photographic and drawn materials are property of and copyright by NewWoodworker.com LLC 2000-2019. Materials may not be used in any way without the written permission of the owner.