
This is a Veteran Owned site
![]()
 |
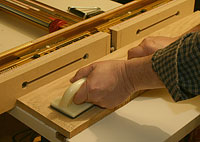
When the big machine is not available, a good quality flush trim bit can do a respectable job of jointing an edge. Click image to enlarge |
Jointing With A Router
A workable compromise
Text, photos and video by Tom Hintz
Posted – 1-18-2007
Compromise
Let’s be clear. A dedicated jointer will always be the best choice for straightening the edge of a board. With proper setup and technique an edge can be made reasonably straight and square with a router. However, the limitations of relatively short router table fences and the miniscule contact area of a router bit bearing make it nearly impossible for a router to match the accuracy of a real jointer.
Grain Direction
As with any routing operation, cutting with the grain rather than against it is crucial. Grain orientation is especially important because we are using a straight cutter that is even more prone to chipping and tearout if it is not cutting with the grain. The good news is that because we are working with the edges of a board, turning it so the grain is flowing with the direction of the cut is usually simple.
For more on grain orientation see Related Stories below.
The Bits
Taking full width cuts across the thickness of a board, even when cut depth is minimal, can put considerable strain on a router bit. The strength and rigidity of ½”-shanked bits with sharp cutting edges helps resist flex and chatter. Flush trim bits are popular for jointing in addition to their normal trim work. I use an Infinity Tools flush trim bit (#06-690) that has a ½”-diameter shank and an overall diameter of ¾” at the cutters. This bit has slanted cutters that help it slice the wood fibers cleaner than a straight cutter.
Taking light cuts and moderate feed rates remain important to maximizing the effectiveness of jointing with a router. I have found that removing 1/16” or less per pass makes this operation easier to manage and produces the best results in terms of straightness and how clean the resulting cut surface is.
Preparing the Wood
Jointing with a router can be simplified with a little preparation of the stock. Removing large defects before jointing makes it far easier to create a straight edge with the short router table fences or trying to follow a clamped-on guide. For more on this preparatory procedure see Related Stories below.
Another important preparatory step is reducing the length of the piece being jointed when appropriate. If your project calls for pieces 3-feet-long, trying to straighten a 6-foot-long edge just complicates matters. Rough-cutting the stock into project-appropriate lengths before jointing (adding an inch or two for squaring the ends later) makes them far more manageable for jointing regardless of the tool or machine being used.
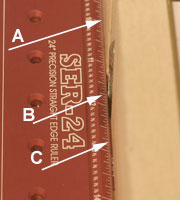 |
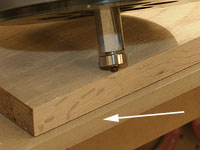
Shimming the outfeed side of the fence outward slightly is the key on a router table. That way as the bit trims the edge (B) the newly straight edge slides onto the outfeed table (A) and guides the remaining board edge (C) along the exact same path. The result is a very straight edge. Click image to enlarge |
We have to remember that working with very small pieces is always dangerous. If your project needs pieces under 12”-long, cutting the stock into lengths that will yield two or three of them, jointing that piece and then cutting you project pieces is a safer way to approach the task. We want to work with pieces between 2 and 4-feet long whenever possible to be as safe as we can and get the best results.
Jointing On a Router Table
Of the two router-based options, the router table is the most accurate and easiest in most cases. The primary feature necessary is a split fence system, which is all but standard fare today. We also need to be able to shim the outfeed fence face out slightly. If the faces are removable, this is nearly always easy.
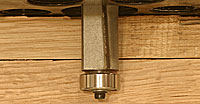
Install the bit and adjust the height so that the cutters are fully in contact with the wood. I raise the bit enough that 1/8” or so of the cutters are above the wood just to be sure of a full, clean cut. If the bit has a bearing, this adjustment also insures that the bearing will not contact the wood. The router table fences are what guide the wood, not the bearing.
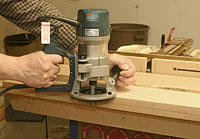
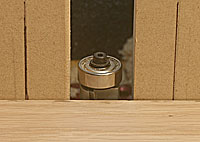 |
On the router table we use the fence to guide the wood so the bearing is adjusted out of use. Make sure the cutters extend above the wood slightly to be sure the full thickness is trimmed. Click image to enlarge |
Shim the outfeed face of the fence outwards slightly. If your fence, like my INCRA LS Positioner System with the Wonder Fence in the photos, has a built-in system for doing this, follow the manufacturer directions for shimming the outfeed face. If your fence is not so equipped, installing a shim cut from the cardboard from a cereal box (or similar) provides enough of an offset. The important thing is to cut the shim large enough so that it fully and evenly supports the fence face. It must remain square to the table and parallel to the infeed face. Use a good straightedge to check this alignment.
Adjust the halves of the fence (horizontally) so that they are close to the bit on either side to provide the maximum support for the wood during the cuts. Using a straight edge, adjust the position of the fence assembly so that the outfeed face is even with the bit cutting edges. The cutter should be pointed directly towards the operator for this setting. Lock the fence down and check its alignment with the bit to be sure it has not changed.
 |
 |
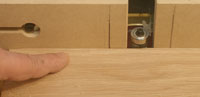
(top) As the bit cuts a flat edge, move your hands to apply pressure to keep that section flat on the outfeed fence as soon as possible. (bottom) Through the rest of the cut, focus on keeping the newly cut edge flat on the outfeed face of the fence. It might take a few passes but keeping the edge flat on the outfeed side of the fence insures creating one long, straight edge. Click images to enlarge |
With this fence alignment, as the bit cuts the wood, the new edge slides onto the outfeed fence. This is exactly how a jointer works, the edge of the wood sliding onto the outfeed table after the knives cut it flat. The only difference is that we have the board laying down rather than standing up as on a true jointer.
The technique for making jointing cuts on the router table is very similar to that used on a jointer. The wood is moved right to left and as the bit cuts a flat area more than a few inches long on the edge, pressure is focused to keep that new edges surface flat on the outfeed side of the fence. It may take several passes to make the entire edge flat but as long as the majority of pressure is applied on the outfeed side of the fence, the edge will remain straight as it extends down the length of the board.
To joint the opposite edge, first take the board to the table saw and with the freshly jointed edge against the fence, trim the raw edge parallel. Then go back to the router table to take a light jointing cut to clean up the sawn edge. We could just joint both edges but they will not be parallel unless the straightening cut is taken on the table saw.
Clamp-On Fence
The procedure for using a clamped-on fence for jointing with a router is simple but has a major pitfall. It is important to remember that the bearing that follows the fence rides on a contact area similar in width to a knife-edge. If the fence has any deviations in the face on which the bearing rides, that small contact area will drop into it and replicate that defect across the full edge being jointed with alarming precision. The only solution is to either repair ay defects in the fence or use perfectly flat material.
 |
 |
(top) Because of the tiny contact area of the bearing, the fence face must be perfectly flat and straight. (bottom) With the piece to be jointed hanging over the fence no more than 1/16", guide the router down the board, keeping the base flat on the wood and the bearing following the fence face. Click images to enlarge |
Finding material with a perfectly straight edge, or making one is really the toughest part of using a hand-held router and a clamped-on fence for jointing. Most folks cheat and just buy a piece of MDF (medium density fiberboard) because their edges are very straight and defect-free right off the shelf. Plus, most home centers have relatively narrow pieces of processed MDF in the form of shelving blanks that make getting a long enough piece home far easier in today’s family cars.
In addition to sufficient length, it is important that the fence is wide enough to resist bowing under the pressure of the router. It must also be wide enough to allow securing it with clamps without them becoming an obstruction for the router. With all of the routers I have used, cutting the fence to 5” or 6”-wide solves both problems nicely.
 |
Take your time, follow the procedures closely and there is no reason you cannot route a very straight edge on your stock. Click image to enlarge |
The same cautions about stock length discussed earlier apply when using a clamped-on fence. I keep MDF cutoffs of various lengths for just this use so I more closely match the fence to the length of the material being jointed.
Clamp the fence, and the board being jointed, to a stable bench or other surface. Remember that the fence must be installed above or below the work piece to align with a shank or tip-mounted bearing. Align the edge of the fence so that no more than 1/16” of material will be routed from the work piece. Remember to pay attention to grain direction also. Adjust the bit depth so that the bearing is fully on the fence and the cutting edges fully engage the wood being jointed.
Video Tutor |
The video above shows both processes described in this story. |
Actually making the cut is exactly like any other router operation. Keep the base flat on the surface and move it with a feed rate that allows the bit to cut without forcing it. If the fence is perfectly straight, the jointed edge will be also.
While jointing with a router can do a good job of jointing board edges and produce a useable glue joint, a dedicated jointer remains the better option. If the dedicated machine is out of the immediate budget range, your trusty router and these simple techniques can save the day for the time being.
Related Stories
Preparing Wood for the Jointer
Have a comment on this story? –Email Me!
Back to the Tips & Tricks List
All written, photographic and drawn materials are property of and copyright by NewWoodworker.com LLC 2000-2019. Materials may not be used in any way without the written permission of the owner.