This is a Veteran Owned site

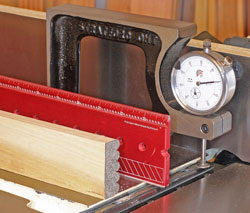 |
There are lots of theories on how to set jointer knives but only one that makes sense once you understand the goal. Click image to enlarge |
Setting Straight Jointer Knives
Sticks kind of work........
Text, photos and video by Tom Hintz
Posted - 2-11-2009
The jointer looks like such a simple machine but tiny errors in technique or setup can render it frustrating and all but worthless. Compounding this is that the difference between perfect and way wrong is measured in thousandths of an inch. The good news is that setting up straight knives on a jointer with the necessary accuracy can be done both easily and quickly.
Aligned To What
The first thing to understand is that the top of knives arc must be flush with the outfeed table surface for the jointer to perform correctly. I know some believe that the knives should be a few thousandths higher (or lower) than the outfeed table surface. One theory is that if the knives aren't a few thousandths above the outfeed table the wood will run into the edge of the table. However, say this in front of the engineers who design jointers and they get that "what's he been smoking" look on their face. The
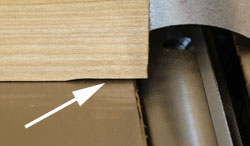 |
If the knives are too high, the wood can "fall off" of the infeed table and produce this snipe at the end. The board may also have to tip forward to move onto the outfeed table. Click image to enlarge |
knives have to be flush with the outfeed table surface so that the freshly cut surface can slide onto the outfeed table and continue on so that the remainder of that edge is cut straight. Technique is also important in making these cuts and is explained in depth in my Jointer Basics story in the Basics section of this site.
If the knives are higher than the outfeed table the end of the wood can drop off of the infeed table causing the knives to cut a small depression in that end of the board. This may also be called "snipe". The board also has to tip forward to make contact with the outfeed table, which messes up the straight cut theory in a big way.
If the knives are lower than the outfeed table surface, the leading end of the wood will run into the outfeed table and force you to lift or rock it up onto that surface. As you might suspect, that pretty much eliminates any hope of getting a truly straight edge. The only logical (and correct according to the folks who actually build jointers) knife setting is for them to be flush (and parallel) with the outfeed table surface.
Aligned Using What
 |
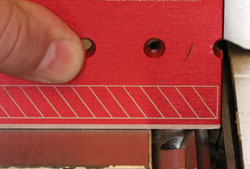 |
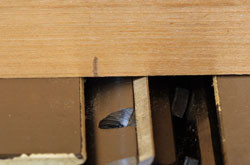
Some use a piece of wood (left) as a gauge. If the knife (unplugged!) moves it forward 1/8" or less, that is supposed to be right, but it is usually just closet. Using a metal straightedge and having the knife just touch it is better but not perfect. Click images to enlarge |
|
Considering that the goal is (or should be) zero error, it would make perfect sense to use a high-resolution setup tool like a dial indicator. However, there are other opinions. One of the more popular ideas is using a straight edge or stick of wood as a gauge for setting knife height.
The idea is to lay the straight edge or stick of wood (with a perfectly straight edge or this procedure is doomed) on the outfeed table, its end hanging over the cutterhead. The theory is that when the cutterhead turned (unplugged) slowly, a properly adjusted knife will cause the stick or straight edge to move forward about 1/8". If the gauge moves more than 1/8" the knife is too high. If it moves less, the knife is too low. I can buy the too high part but there is no way to know exactly by how much.
|
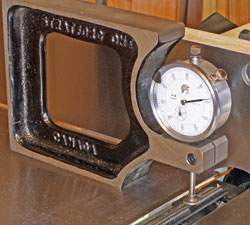
Using the Multi-Gauge makes setting the jointer knives fast and very accurate. I personally wouldn't do it any other way. Click image to enlarge |
If the knives are high enough to move the gauge (stick or straight edge) at all, they have to be rising above the outfeed table surface so are too high. To check my theory I adjusted the straight knives so that they moved the straight edge slightly less than 1/8", but within the range that should indicate a proper height. Then I checked the knife height with my dial indicator and found them to be between 0.004" and 0.007" above the outfeed table surface. Sounds close but insures 0.004" to 0.007"-deep snipe and excess material removal to get the edge sort of straight. Adjusting the knives so that they just touch the stick or straight edge makes more sense but is much harder to do reliably. Using this "touch" technique I still found the knives to be 0.002" to 0.004" above the outfeed table surface. Much closer but we can do better.
Accuracy is Easier
I use my Oneway Multi-Gauge for setting straight jointer knives because it is the most accurate and fastest way I have found. There is a lot to be said for being able to actually see the adjustment being made on the dial. And it is way faster to set the knife perfectly the first time around and eliminate the repeated set - test - set - test cycles. This gets more important when you consider that two or three knives have to be set identically. The design of the Multi-Gauge also makes it very easy to be sure the knife is actually parallel to the outfeed able surface because you can slide the Multi-Gauge across the table and watch the indicator needle. If you can't get your jointer knives set perfectly with this tool, you aren't trying.
See It Work! |
I set the Multi-Gauge with its probe on the outfeed table and zero out the dial. Move it so the probe rests on the edge of the knife and rock the cutterhead back and forth to find the exact top of its arc. Read the dial and adjust the knife height to bring the pointer back to zero and you are done. Do this on both ends of the knife, check it over its full length by simply sliding the Multi-Gauge across the outfeed table and you are ready to move onto the next knife.
Using the Multi-Gauge it is easy to set knives well within 0.001" of perfect. It is also easy to achieve that accuracy on all of the knives, which insures the best performance of the machine and the smoothest finish on the wood because all of the knives are working equally. Having all of the knives working together also distributes wear more evenly which can greatly extend their life between sharpening.
I know some like to use the stick or straightedge method and are happy with the results they get. Nobody is going to try and stop them. There are others who simply enjoy getting their machines set up as perfectly as possible to maximize their performance. This also helps to keep machines working easier which can only extend their life. For me, using the Multi-Gauge makes that process fast and easy, two other things many of us like a lot!
Resources
Jointer Problems, Causes & Fixes
Have a comment on this story? - Email Me!
See the Multi-Gauge Review - Click Here
Back to the Tips & Tricks list
All written, photographic and drawn materials are property of and copyright by NewWoodworker.com LLC 2000-2019. Materials may not be used in any way without the written permission of the owner.
