
This is a Veteran Owned site
Hollow Chisel MortiserSetup and MaintenanceText & photos by Tom Hintz Revised - 11-1-2010 Hollow chisel mortisers have become very popular in home-based woodworking shops. Though relatively simple to use, there are setup and maintenance procedures that preserve their accuracy and maintain trouble-free operation. As always, follow manufacturer recommendations and instructions supplied with your machine. Pay particular attention to instructions related to the safe operation of your machinery. Cleaning and LubricationContamination of moving parts by sawdust and other debris must be controlled for the machine to operate properly. For maximum benefit, clean and lubricate the mortiser before making adjustments.
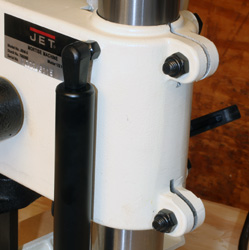
The power head of mortising machines travel up and down on some form of slide, keyway or a post, all designed to keep the bit traveling straight up and down accurately. Contamination of those sliding surfaces affects ease of use, accuracy and eventually, the life of the machine. In most cases, moving parts can be cleaned with a rag or an old paintbrush. Stubborn contamination may require some kind of solvent, but make sure the material used is paint and plastic safe. In no case should caustic materials be used. After cleaning, dry the area completely. While nearly any type of grease or clinging oil will lubricate these moving parts, consider dry graphite or Teflon-based products that dry after application. Dry lubricants do not attract or hold dust and may extend the periods between necessary cleanings. The owner's manual should provide instructions on what parts need lubrication, what parts do not and may even suggest acceptable lubricants. Slider AdjustmentsThe sliding mechanism on which the power head moves is usually adjustable so the owner can compensate for normal wear. Though set up at the factory, I always go over these adjustments on new machines to insure they are set as best as can be.
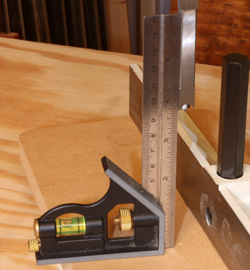
Following the recommendations of the manufacturer on adjustment procedures and the allowable tolerance is mandatory. The engineers who designed the machine consider the properties of the materials used to make these parts when calculating adjustment tolerances. This is not a good time to try to out-think the manufacturer. Stay within the guidelines to insure the best performance and longest life of the tool. Checking the slider adjustment occasionally should be part of the machines maintenance, the frequency dependent on how much use the machine sees. Square Chisel to the TableOn mortisers with an attached table surface, checking its alignment to the chisel is also important. If the table is not square to the chisel, the mortises cut will be at an angle, transmitting that misalignment to the project. Install one of the larger chisels in the motor head, aligning its flat sides with the front-to-back and side-to-side axis and then lower the chisel so it is close to the table surface. Place a good 90-degree square on the table surface; one leg flat on the table and the other leg against the flat chisel side. Look for gaps between the square and the chisel. Check this alignment on the left and right sides as well as the front. If there is a gap between the chisel and square, shim the table accordingly to bring the table into alignment with the chisel.
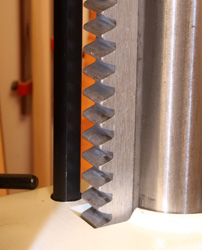
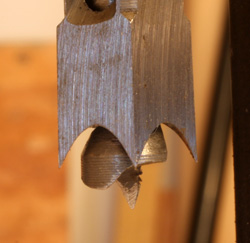
On my mortiser, I found a very slight gap at the top of the square when it was placed on the right side of the chisel. I confirmed the out-of-square condition by moving the square to the left side of the chisel and noting that the gap was now at the lower portion of the chisel. I also placed the square against the front surface of the chisel and found the chisel and table were square to each other on that axis. I loosened the table mounting screws and inserted a 2"-wide strip of common notebook paper (folded to double the thickness) between the table and the mounting surface next to the left side mounting screws running front to back. The shim runs the full width beneath the table to avoid throwing the table out of square along the front to rear axis. After tightening all of the table mounting screws, I used the square to recheck the table and found that the gap was gone. Chisel and Bit SpacingThe combination of a square chisel preceded by a round drill requires a specific gap between the two for proper operation. Because chips are evacuated through a slot in the chisel housing, there must be sufficient space between the drill bit and the tip of the chisel for the chips to be carried up to the slot by the specially designed flutes on the drill. Most manufacturers give a range of bit to chisel clearances, sometimes indicating the range of settings are meant to accommodate different woods. Unfortunately, they seldom describe what setting is for what type of wood.
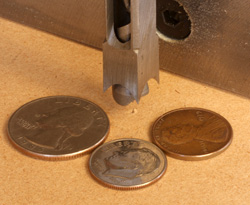
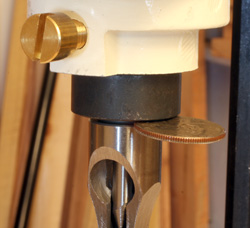
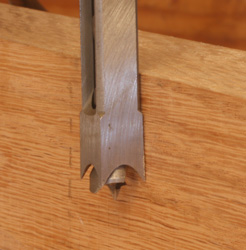
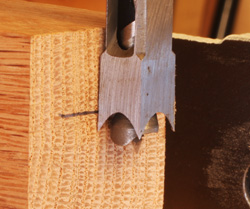
The logical interpretation is that the greater bit to chisel clearance is for softer woods that produce larger chips and shavings. Hardwoods, which normally generate much finer chips when drilled, can use the smaller end of the tolerance range. While researching this story I cut mortises in every species of wood I could find and this bit to chisel concept seems to hold up. In reality, most woodworkers use a bit to chisel setting in the middle of the range for all of their work. This one-setting-fits-all approach usually works, but remember this setting in case you encounter a problem with chip extraction in the future as it might be the cure. While manufacturers sometimes provide instructions on how to attain this bit to chisel setting, they are often more complicated than need be. Enterprising woodworkers discovered that American coinage provided an alternative that simplifies the set up task. Locate the recommended bit to chisel clearance in the instructions that came with your mortiser, and then find a coin with a thickness that most closely matches that number. Insert the chisel into its bushing and raise it up to the bushing face trapping the appropriate coin between the bushing and chisel face (see photos) before tightening the setscrew to secure the chisel. Insert the drill bit through the chisel and into the chuck, holding the tip of the bit fully up against the end of the chisel. Tighten the chuck to secure the bit. Loosen the chisel set screw, remove the coin and slide the chisel up, butting it against the bushing. Make sure the chip port in the chisel faces to the right or left, not front or back, before tightening the setscrew to secure the chisel housing. You should now have the proper bit to chisel clearance for your machine. Chisel Parallel to Fence
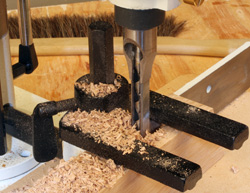
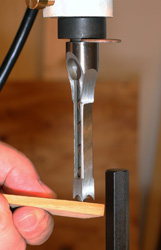
For this operation, you can use the face of the fence itself, or place a piece of wood with parallel faces between the fence and chisel. Lower the chisel so the flat portions of its sides are at the fence level. Slide the fence forward until its face, or the wood in front of it, contacts the chisel. Loosen the chisel set screw and turn the chisel until the rear flat is flush against the fence or wood. Make sure the chip ejection port is facing to the right or left and that the chisel housing is butted against the bushing before tightening the setscrew. Depth of CutWhen setting the depth of a mortise, remember that the drill bit precedes the chisel housing that actually cuts the square shape. The protrusion of the bit cuts indentations in the bottom of the mortise that serve a useful purpose. When a mortise and tenon are coated with glue and assembled, some of the glue is scraped from the sides and becomes trapped at the bottom of the mortise. The irregular bottom surface gives that glue somewhere to go. When setting the depth of cut for a mortise we have to consider the drill bit protrusion. I have found it easiest to draw a line representing the bottom of the tenon on the side of the material in which the mortise is being cut, place that piece on the mortiser bed and lower the chisel (not the drill bit) until it is slightly below the layout line and lock the depth stop rod. This setting allows the tenon to seat fully into the mortise while providing a small amount of room for excess glue. Chisel LifeThere are two schools of thought regarding the expected life span of mortising chisels and bits. Some consider these pieces to be consumables, meant to be replaced when they become too dull for effective use. Others sharpen the chisels with specially designed stones (available from Lee Valley) that touch up the inner bevels, restoring their cutting edge. The drill bits do not seem to lose their boring ability to any appreciable degree. The feed rate for cutting mortises is relatively slow which limits the wear and tear on the bits.
Whatever your choice, keeping the chisels in good condition is important to the performance of the mortising machine. Oddly, softer woods like pine will reveal dull chisels before most hardwoods. The softer wood tends to crush and bend when a dull chisel is pressed into it. How Clean is Clean?Using a relatively small, square chisel usually leaves small ridges on the sides of the mortise. If the chisel is parallel to the fence, these ridges are usually very small. In addition, most woodworkers make a second pass through the mortise to "clean up" the bottom and make sure all of the material has been removed. This process cleans up the ridges as well. Leaving theses small ridges in the mortise has no affect on the strength of an otherwise properly fit mortise and tenon joint. Some even believe the ridges prevent scraping too much glue from the sides of the tenons and actually increases the strength of that bond. Good woodworking equipment costs lots of money. Taking the time to set up and care for machines properly does not take a lot of time but can save piles of money in the long run. Related NewWoodworker.com Articles
|
||||||||||||||||||||||
Do you have a comment about this page? - Email Me!
|
||||||||||||||||||||||
All written, photographic and drawn materials are property of and copyright by NewWoodworker.com LLC 2000-2019. Materials may not be used in any way without the written permission of the owner.